Group Members:
Lead Designer: Sophie Rooks
Lead Writer: Stephanie Scotto
First Design Iteration:
My partner and I came up with the idea of constructing a human brain made up of puzzle pieces. Each puzzle piece will depict a part of the brain, such as the temporal lobe or cerebellum. The big sections of the brain will then be broken down into smaller sections such as the amygdala or hippocampus. All puzzle pieces will be different colors, and each piece will also have the name of the brain part engraved into the piece.
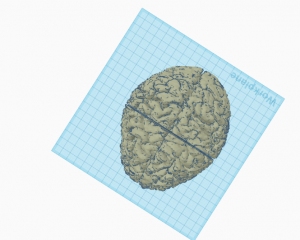
The first step to this project is going to Thingiverse and finding a brain to start the process because creating the stringy and textured brain structure will not look as nice using just shapes and holes in Tinkercad. We are then going the slice the brain into multiple pieces (using a series of specific duplication, hole, and grouping methods). Once the brain is sliced into pieces, we will engrave the name of the brain part into the piece, making it clear which part of the brain one is looking at. Finally, we plan to connect each by turning all pieces into a puzzle piece. Each puzzle part will be made by a cube and half circles combined and then grouped into each designated piece. Certain designated pieces will also have a hole to insert the puzzle piece into.
The brain we are creating is relevant to the project because it is an interesting and fun concept, but also intricate. Looking at the final product will inform the audience of each part of the brain in a way that is easy and comprehendible because each part will be a different color and contain and engraved name. Successfully splitting the brain into different parts and creating the puzzle pieces will be the tricky parts, but doable. It will also be interesting to see how the puzzle pieces attach to one another.
Brain Making Process:
The brain was sliced apart into its individual parts using a series of holes, boxes, and ovals.

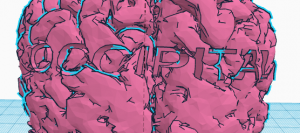
The name associated with each part of the brain was created using the text and engraving it into the part it belonged to by inserting the text as a hole.
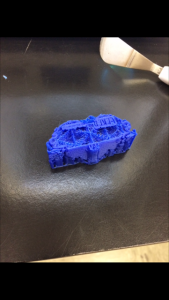
My partner and I completed a test print to figure out how we would connect our parts of the brain. We first started playing around with the connector pieces on Tinkercad. We then found a paired match for the connector we decided to use. While we were playing around with the connectors, we realized that we did not want them sticking out in between parts of the brain. We wanted each part of the brain to basically be touching. We then tried making a hole using one part of a connector in one part of the brain, while the other connecting connector stuck out of another part of the brain. The connector and its connecting piece were then aligned. We shrunk the brain parts a bit and did a test print.

There were a couple of issues associated with the test print. The connector piece did not connect successfully with the part of the brain containing a hole. Also, the print was too small to completely test the connectors. However, we figured it would probably not work out because the connectors had spherical aspects to them, and we did not quite know how we would get the connector in and out of its hole.
On the bright side, the test print did verify that the printer is able to successfully print the stringy parts of the brain, making the brain look realistic.
Our next step was to try making a puzzle piece. We used the gear in the “community shapes” section in Tinkercad, and elongated it to create the test puzzle piece. Two cubes were used to test the puzzle piece out. We created a hole using the gear puzzle piece in one cube, and made sure the gear stuck out in the other cube. We then aligned the gear and its hole.
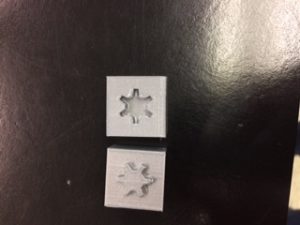
Once the cube puzzle was finished printing, we realized the puzzle pieces did not work out. The hole was aligned the with connecting puzzle piece, but the objects would not connect. They would make weird noises when we were trying to connect them (as if the cube would break or fall apart).
When we exported the brain from Thingiverse, there were thousands of triangles inserted in the brain. This was not realized until after we sliced the brain into five pieces and started our process. When we sliced the brain, the system was taking very long to process what we were doing, and at times, it would not let us slice the brain. We had to significantly shrink the brain in order for Tinkercad to successfully slice the brain up. After speaking to Professor Taalman, we decided to restart our brain. Because there were too many triangles in the brain, there was a good chance the printer would make small mistakes in a few places when printing. Also, restarting our brain would make slicing the brain much easier and quicker.

What we did from here is go onto Thingiverse again, and export an already made brain to Meshmixer. Meshmixer allowed us to edit the brain and reduce the triangle amount by 50% (as seen in the photo above). Meshmixer made the process of slicing the brain much more time efficient and simpler. Tinkercad was not lagging nearly as much as it originally was.
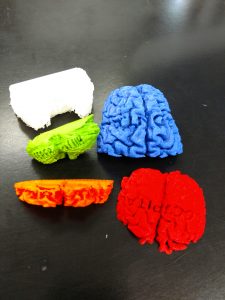
Final Product:
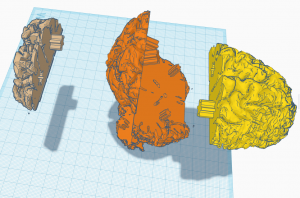
Sophie and I decided to use the Ultimaker to print out our final project. We inserted the engraved brain part names in the parts they belonged to. We also printed each part of the brain in a different color so they could easily be differentiated.
When we printed our first brain piece, we decided to enable the full object support on Cura.

If you closely look at the picture below, once we removed all of the supported filament, the brain had random parts of filament in places that made the brain structure look blotchy.

We figured the brain parts would print better and nicer with only the base plate support, so we stopped the print with the full object support.
As for the final decision regarding the puzzle pieces, we decided to not use them. We inserted all of the puzzle pieces and holes where they needed to be to connect the brain on Tinkercad .
However, we started printing one part of the brain, and it looked as if it would not turn out exactly how we wanted, similar to the cube puzzle test print.
 The issue was that the Ulitmaker would not make each puzzle piece and its hole clear cut. Even a few extra filament strings could determine whether they would connect or not.
Our brain project depicted all of the interesting (and difficult) tasks Tinkercad can provide. Some tasks were easier than others, but regardless, any success or mistake made in this project contributed to our learning of the ins and outs of Tinkercad, and will be passed on to our future work in Tinkercad.

The puzzle connectors did not go quite as planned, although, our final product depicts each part of the brain in an explanatory and colorful way. We hope you enjoy our brain!