Project Summary
2/9/2020
For the final version I aim to make it travel sized, so a size between 5×7 inches to 4×6 inches and maybe a bit smaller. I’m looking for the right fit for dimension height of the project. There needs to be enough clearance for a storage tray and the working tray. One hinge for the storage tray lid with maybe a click lock or another type of lock. For the tray I was thinking slide tray, but I’m not sure about another hinge on the project. There could be a pattern in the lid or maybe the name of the project (or both maybe). The pieces are going to be animal themed. Maybe the storage area should house enough pieces for clearance, and the case can hold two versions of the puzzle with difficulty of the pieces marked with lettering (E for easy and H for hard). I’m thinking I may have the pieces in acrylic and maybe in 2 colors for the difficulties.
Prototype

The materials I used for this prototype are super gel gorilla glue, 1 inch wide black tape, and foam board for pieces and box. I was going to use clay, but I think the foam board works just as well. The white foam board is what I used to cute pieces out from the drawn grid into animal shapes. I do plan on going back in with those 5×7 inch dimensions in a sketch book and drawing the pieces as a sketch. It may be easier to add in the offset later when I go to model the pieces or when I import the images. I would like to play around with the height of the box too and make the box and pieces more rounded.
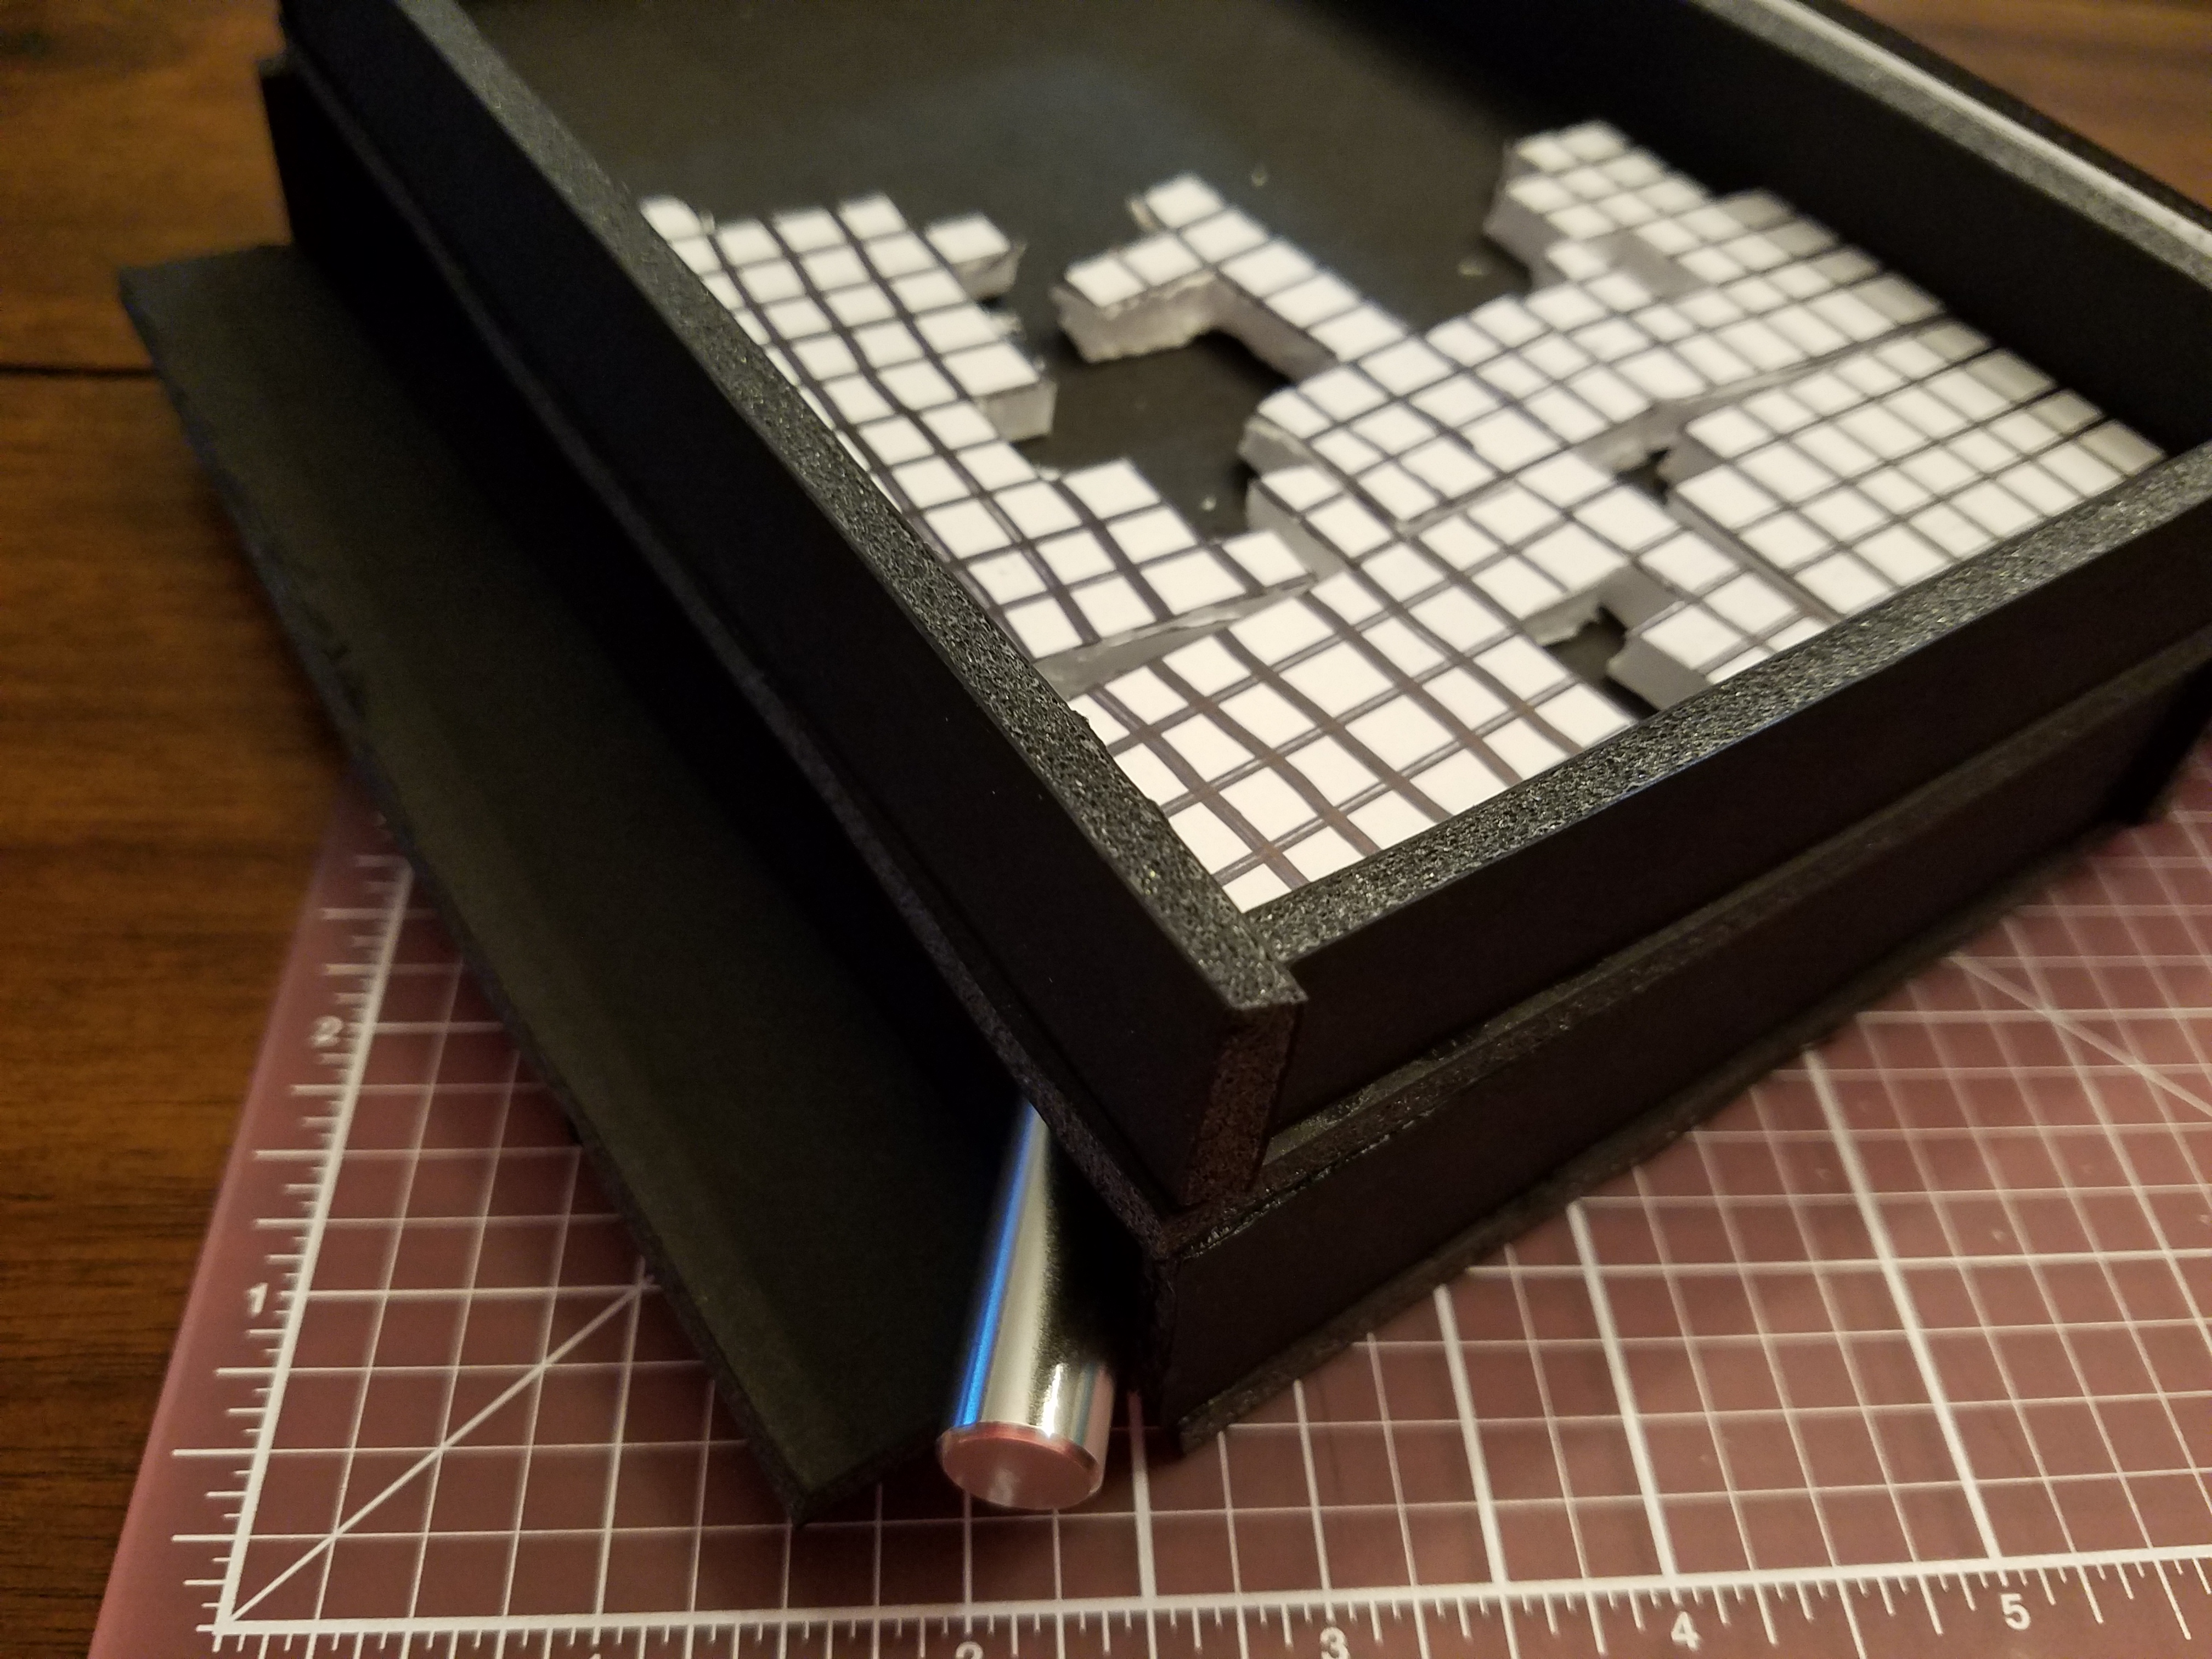
I added the compartment to the bottom and put the door on a tape hinge. I’m not sure if I want the bottom part to have ah hinge yet or not.
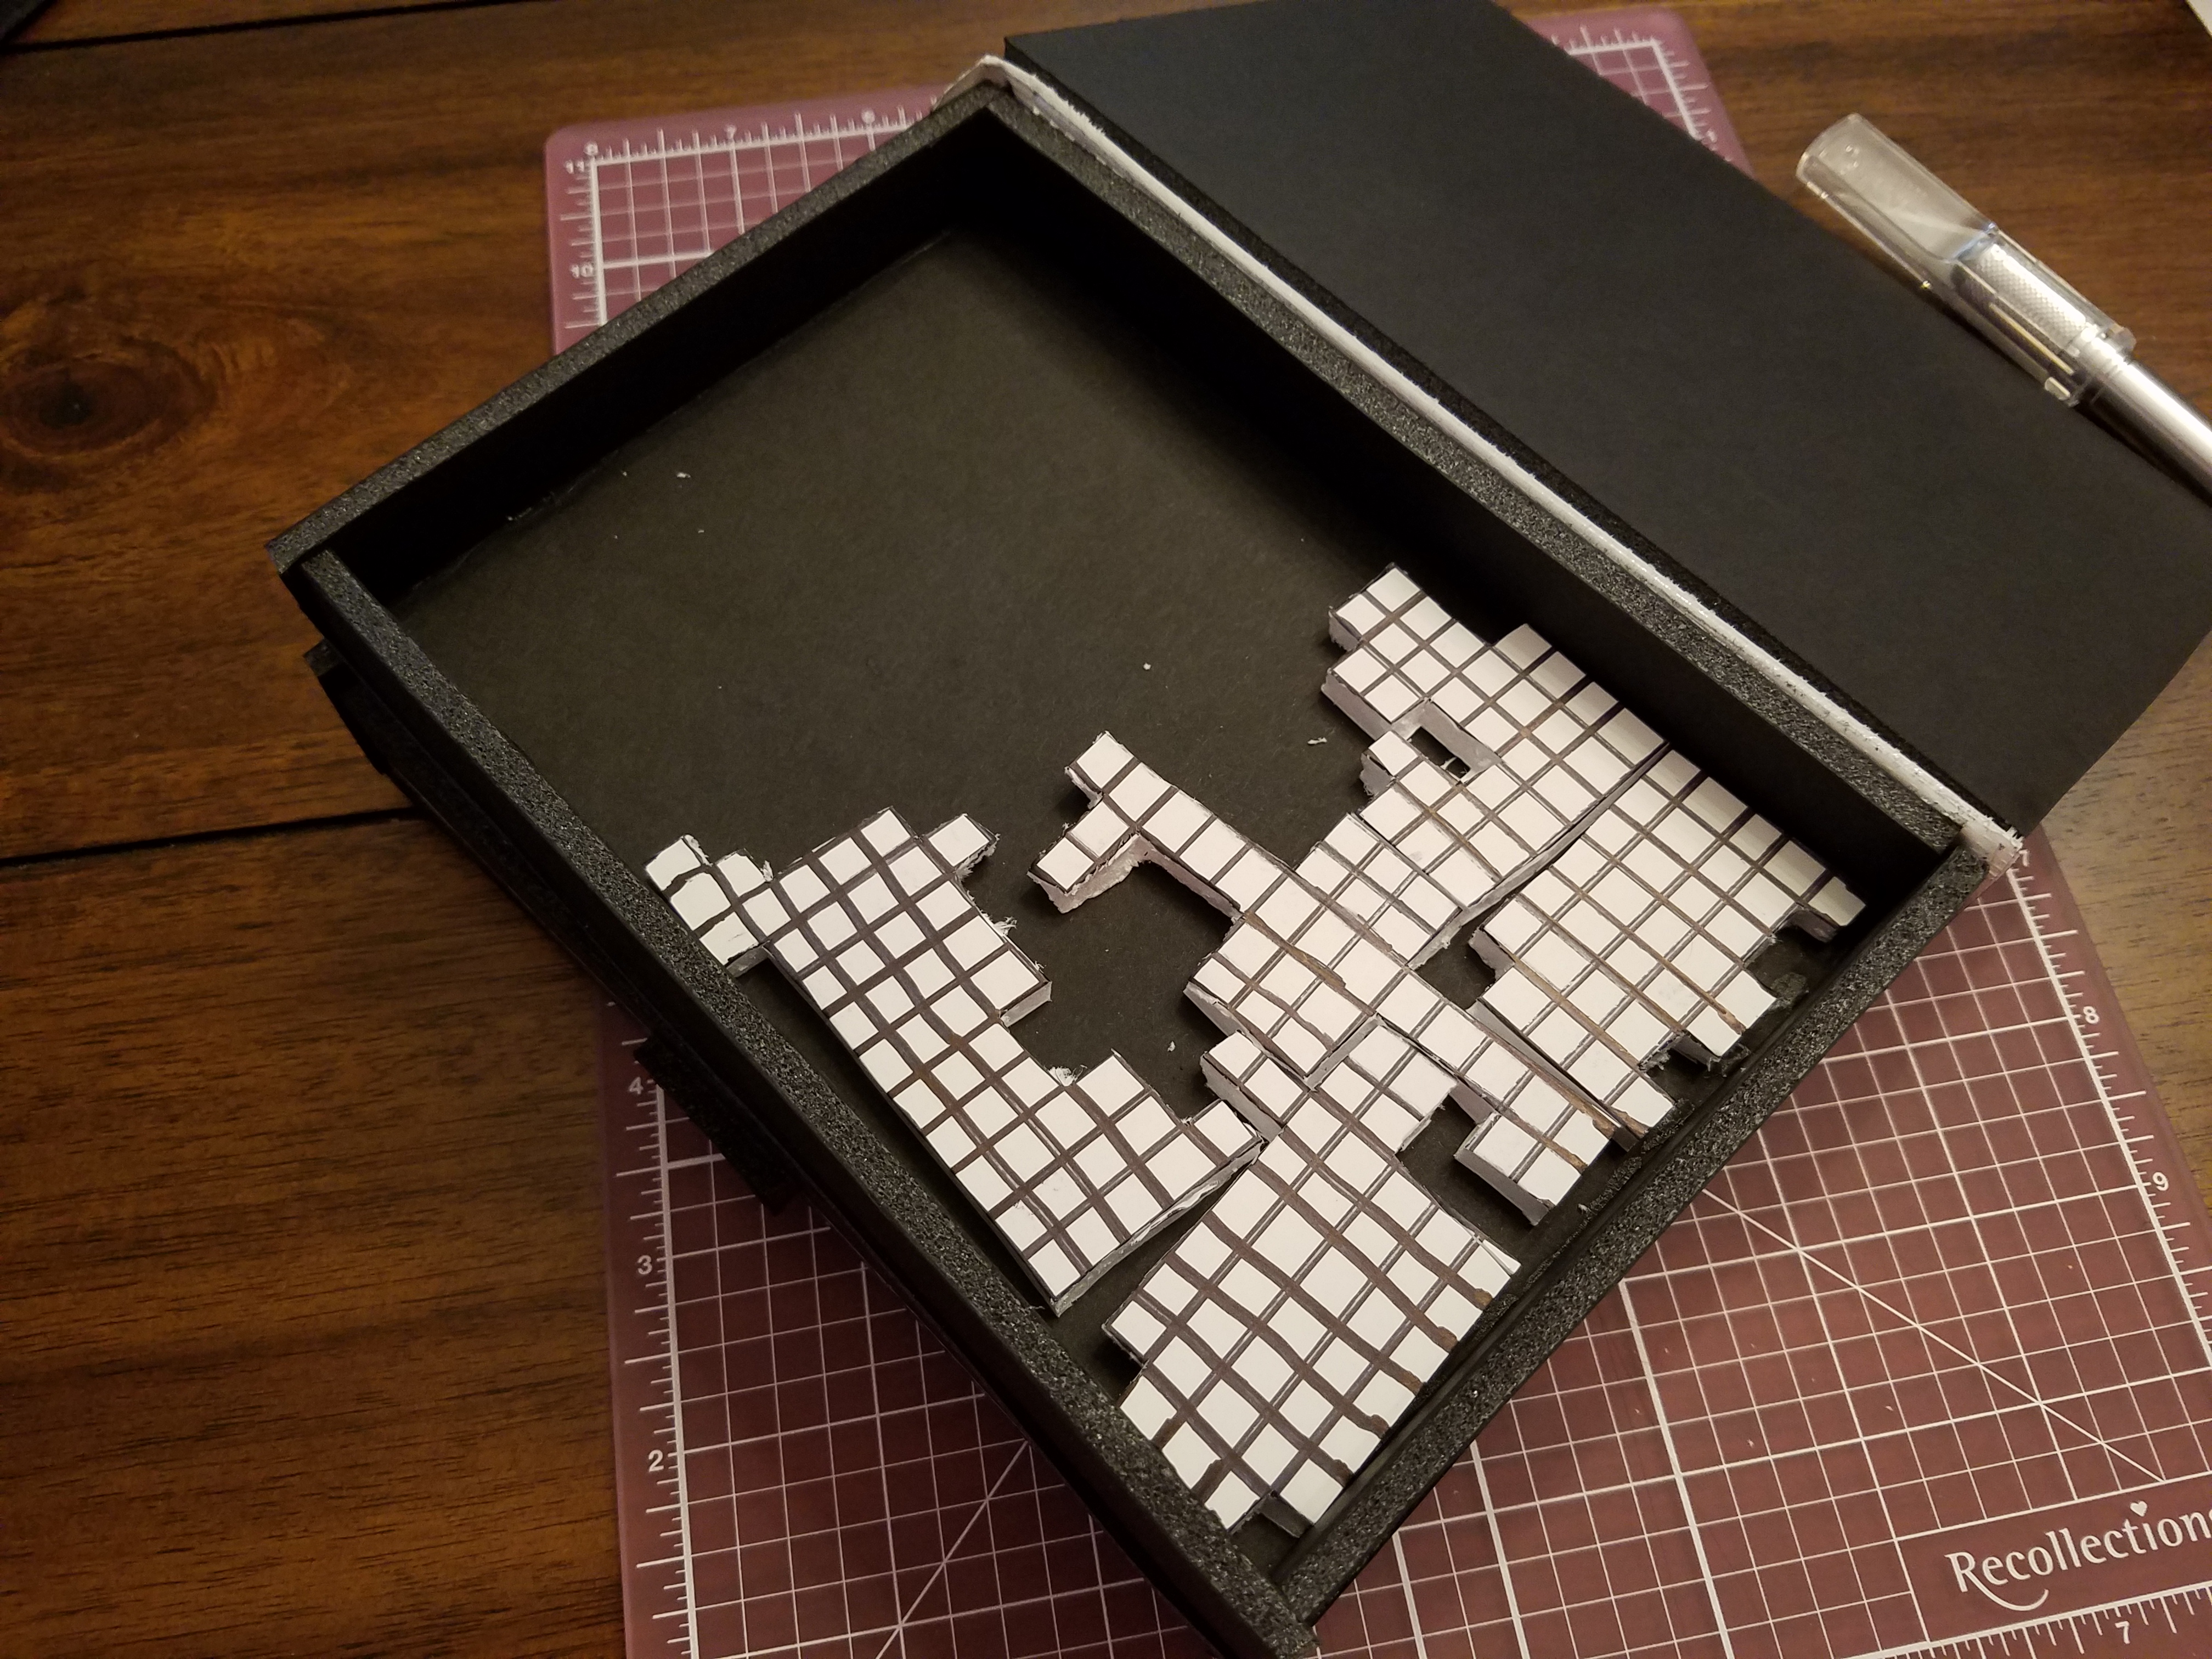
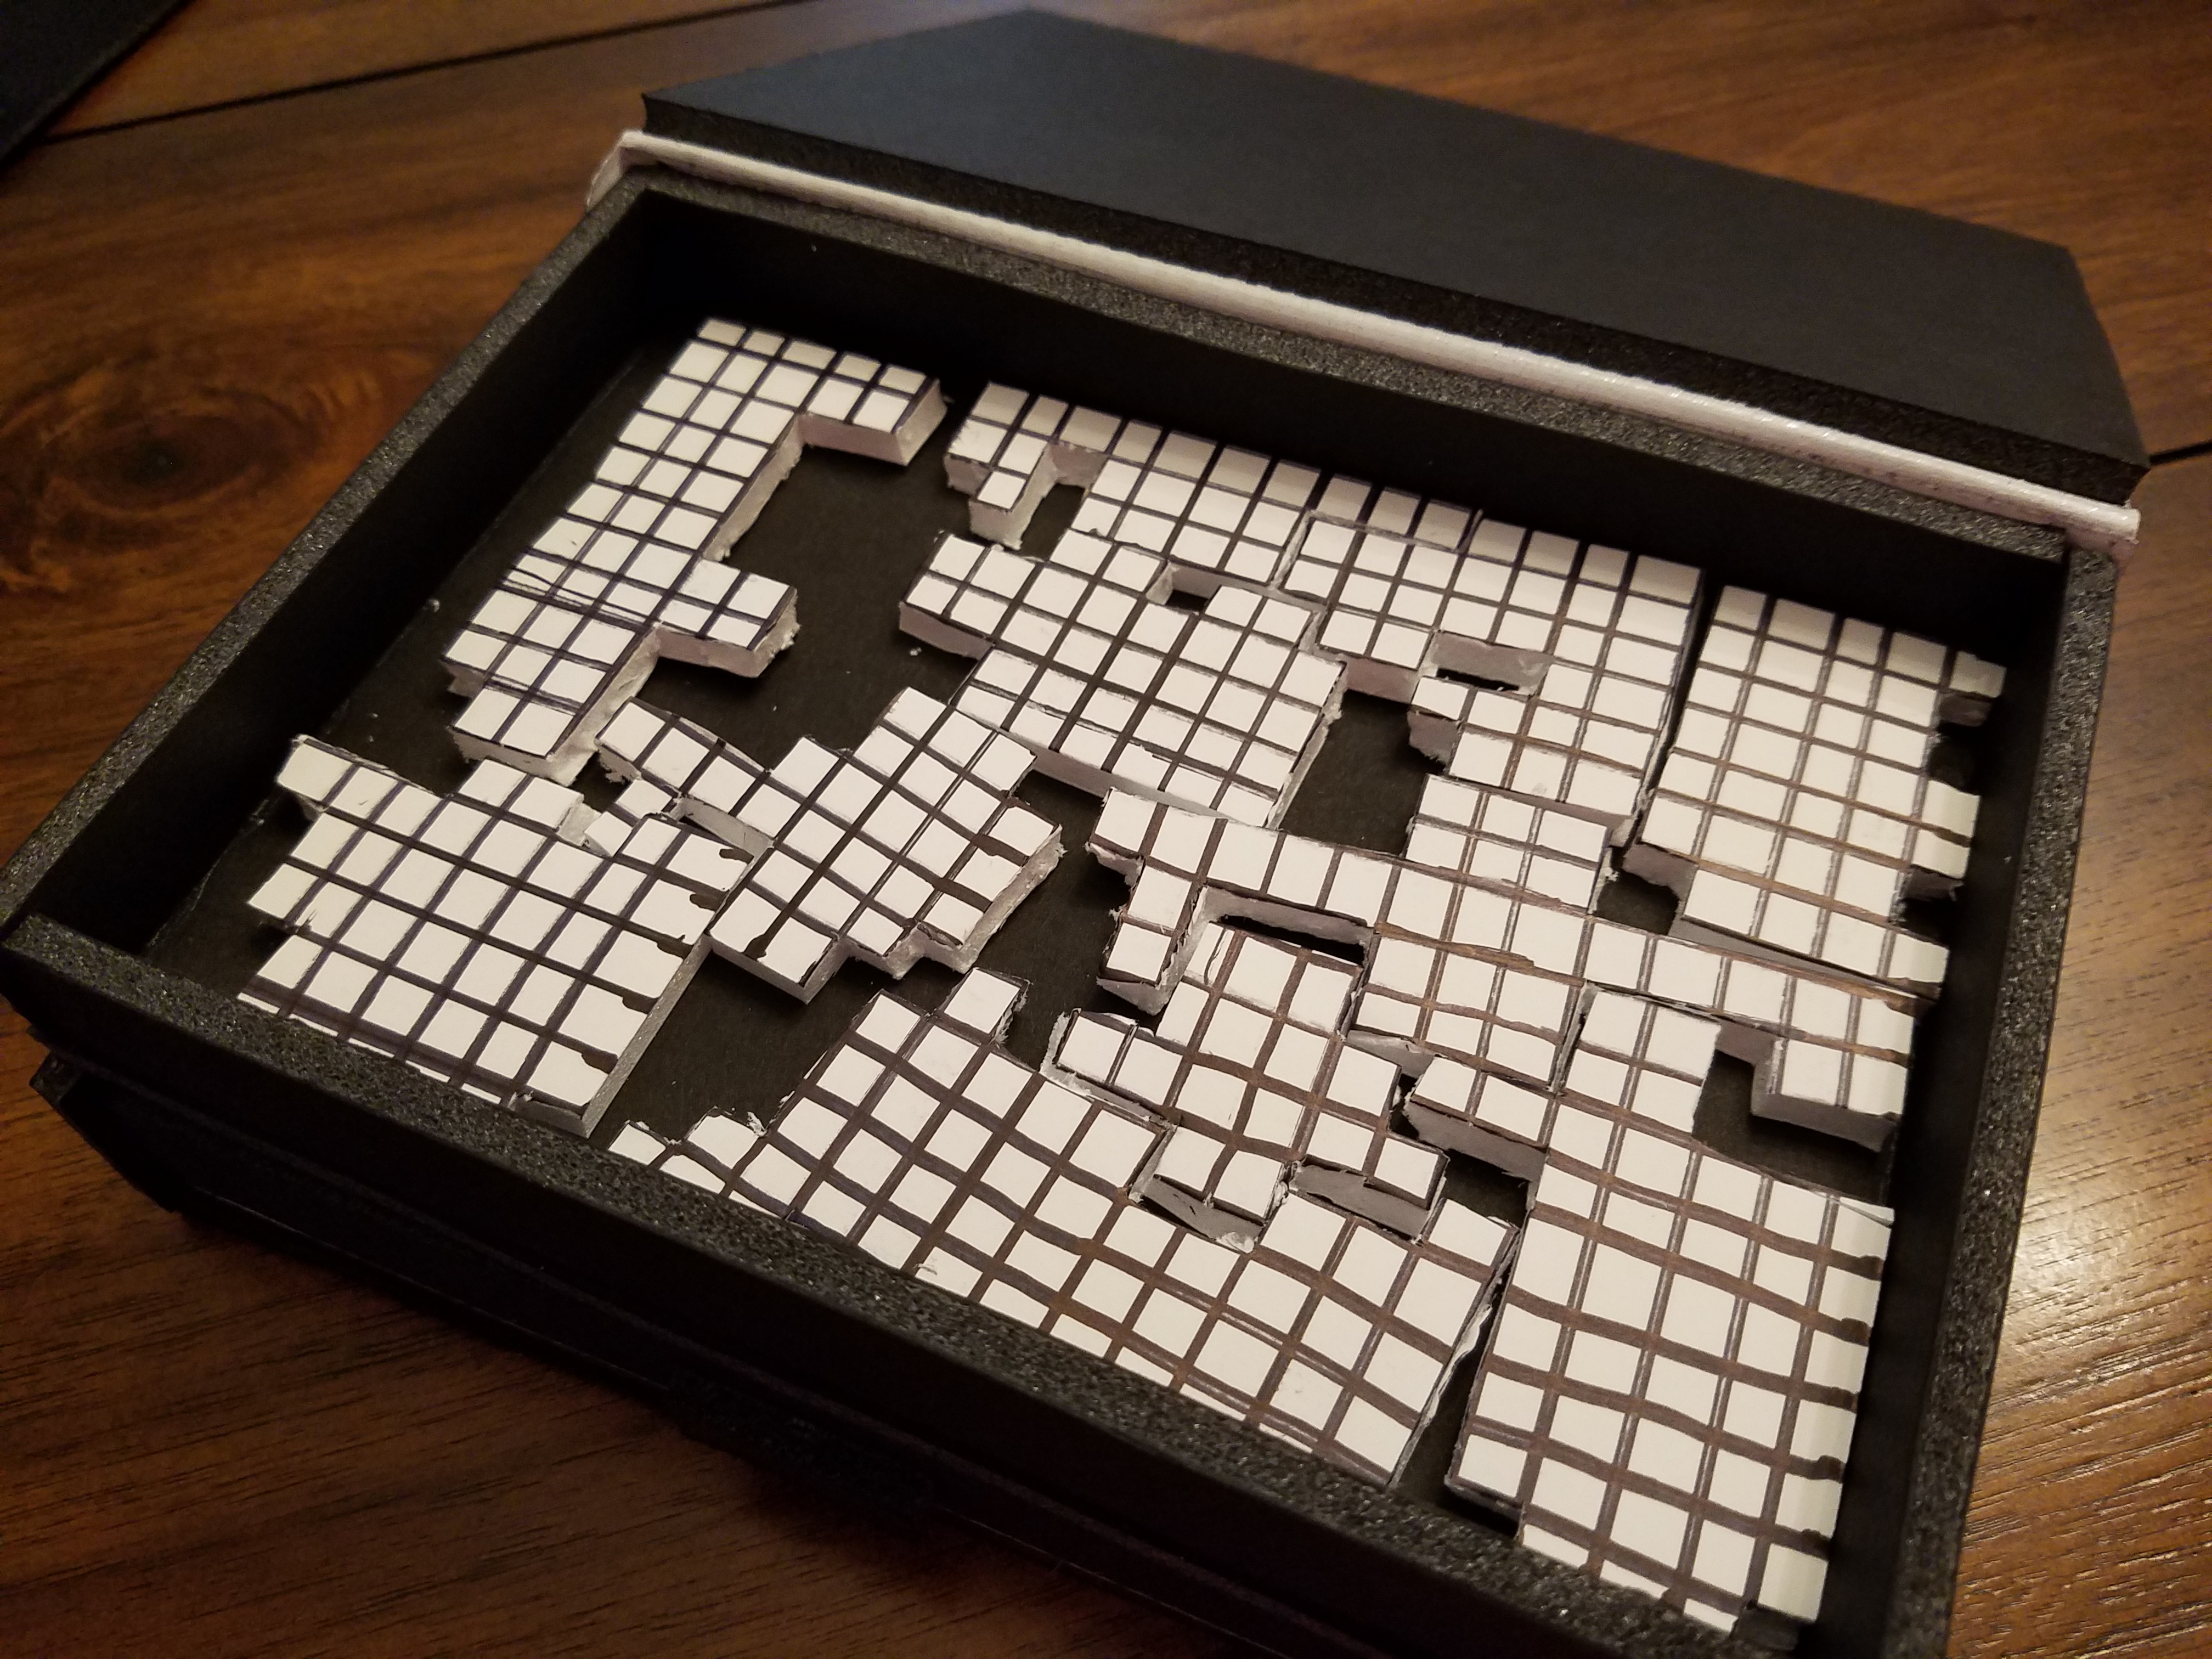
Here are some of the pieces. There’s a hedgehog, snake, corgi, bunny, parrot, flamingo, polar bear (or bear), turtle, elephant, cat, and a tropical fish. I do want front designs on each piece if they’re cut from acrylic or wood. I guess I should go slightly smaller with my animal sketch so they fit in a 5×7 inch box. I do like the feel of the foam board pieces and I think rounded edges would be nice. As for the box, I need to work on a hinge for it. For the bottom compartment there could be a slide drawer or a slide lock door? These are rough piece designs as I wanted to use the 5×7 grid first. I had to trim some pieces to make them fit better, but it’s not a perfect fit.
Initial Design Tests
One of the main elements to test for this puzzle design is in the case itself. I have to make sure I have a nice working hinge for the box. It’s proving to be a challenging task and I know I have further testing to do with this. I have three hinges so far.
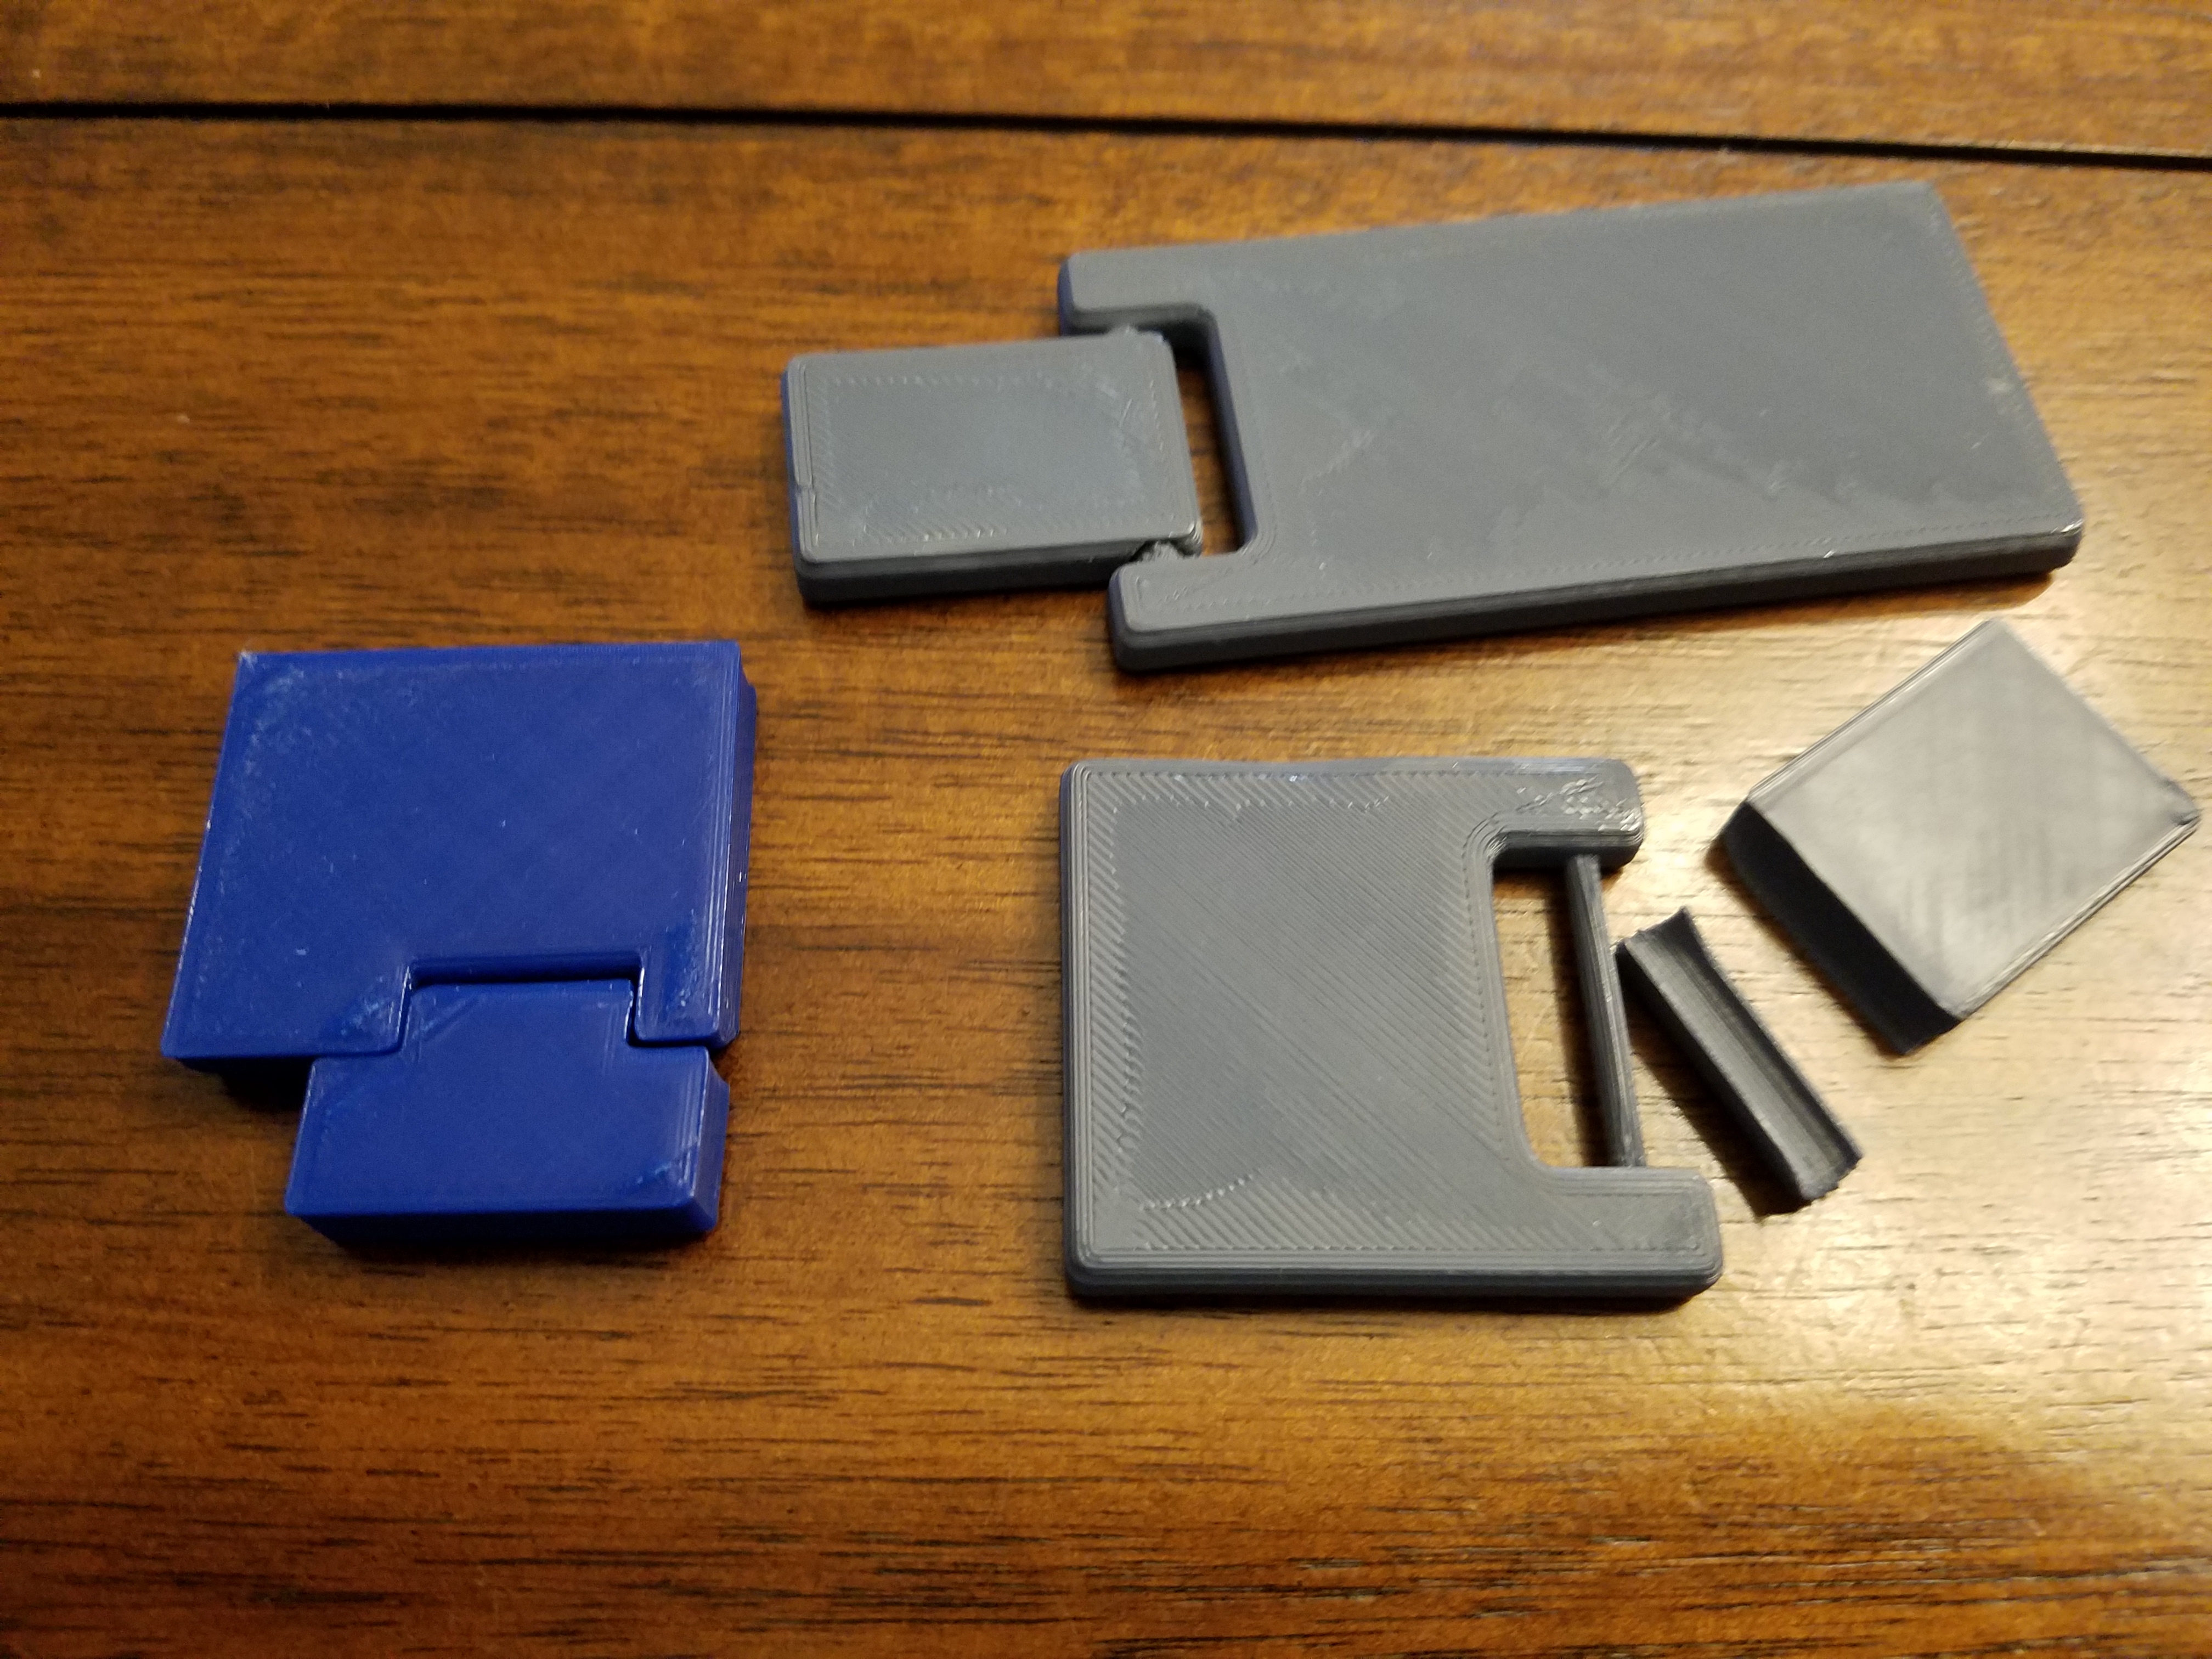
The gray long one was my first design. The hinge is stiff and the clearance between the hole and rod is too close. It will break if too much force is applied. The next gray one is a redesign of the inner rod circumference. The clearance was fine and printed in place nicely. I was told to test it by trying to break it. The rod didn’t break but instead the other hinge half. The reason it broke was because the hole and the shape of the hinge made to areas of weakness in the hinge. It snaps along this plane of weakness. If this were to be my final hinge I would decrease the width of each hinge and make sure that each piece where the hole is, is able to move and has enough width between the hole and the surface so that snapping does not happen along that weakness.
The blue one I designed as a ball joint style. It also does not have enough width with the hole. There is a weakness already where the piece can be removed if force is added. There’s not enough movement between the two pieces as there’s not enough clearance. It stops at a certain angle and not at a nice 90 degrees. Ball joints are nice to snap in place just in case the lid snaps off, but this version needs more work to improve it. The hinge area needs to be slightly longer and maybe add a little more height to the piece.
There is another hinge style I want to try but this is more common with flexible animal toys. These hinges are “c” or “u” in shape. They link in place with the opposite and are usually pretty easy to print with the printers. There’s a nice range of motion with it.
The fourth style of hinge I’m looking at is similar to the ball joint style. It’s another easy snap back in joint and can print in place. Instead of a double sided ball joint there is one ball on one side and a concave area on the other side for the opposite joining joint.
My next iteration would be to see how theses work on a longer scale. The box is one that can hold a 5×7 inch rectangle inside. I need a hinge that can close at 90 degrees and can be open at 180 degrees or a little higher. It needs to be a loose hinge with a good range of movement.
Small scale testing is great for hinges. The lower compartment may also have a similar hinge or a lock mechanism to make sure pieces stay secured inside.
Continued Testing
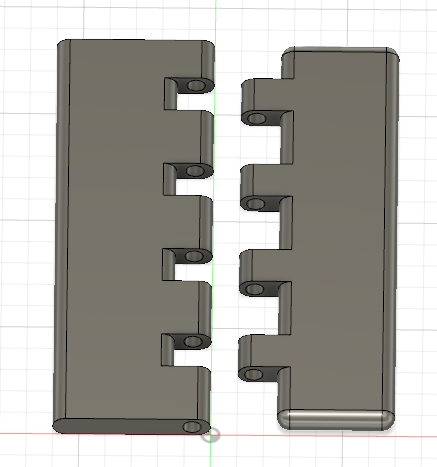
I decided that with the feed back I got last class from people to try to redesign the pin hinge from a print ready one to one that prints in two halves. There is no modeled pin in this version. The hole is 7 mm in diameter. This allows me to use something that’s more sturdy for the pin to be slide into the hole connecting the two halves. Both ends of the hinges are rounded and the inside of the hinge area is also rounded. I wouldn’t’ be able to fully round two ends on the piece on the left because of the holes, but if I were to connect that piece to my box walls then I would be able to round the outside corners.

I do like the look of this hinge better. When I get it printed I want to test the angles of the hinge. I am hoping for a wider angle of bend. The round curves of the hinge should hopefully help with the range of the angle when opening the lid of the box. There would be a lock mechanism on the other end of the lid. This makes it easier to print the lid and the box separate from one another and attach them later. I would just have to make sure they’re at the right scale for fit.

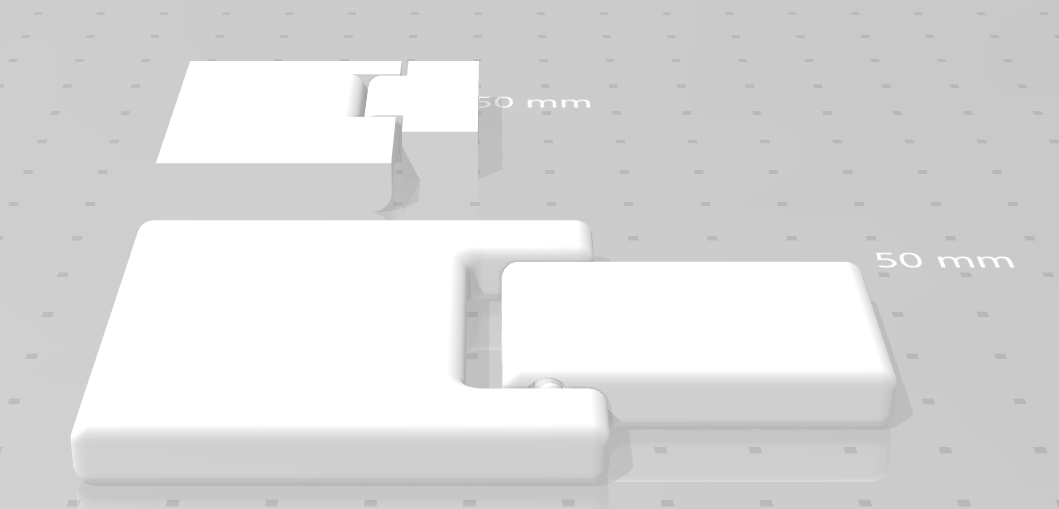
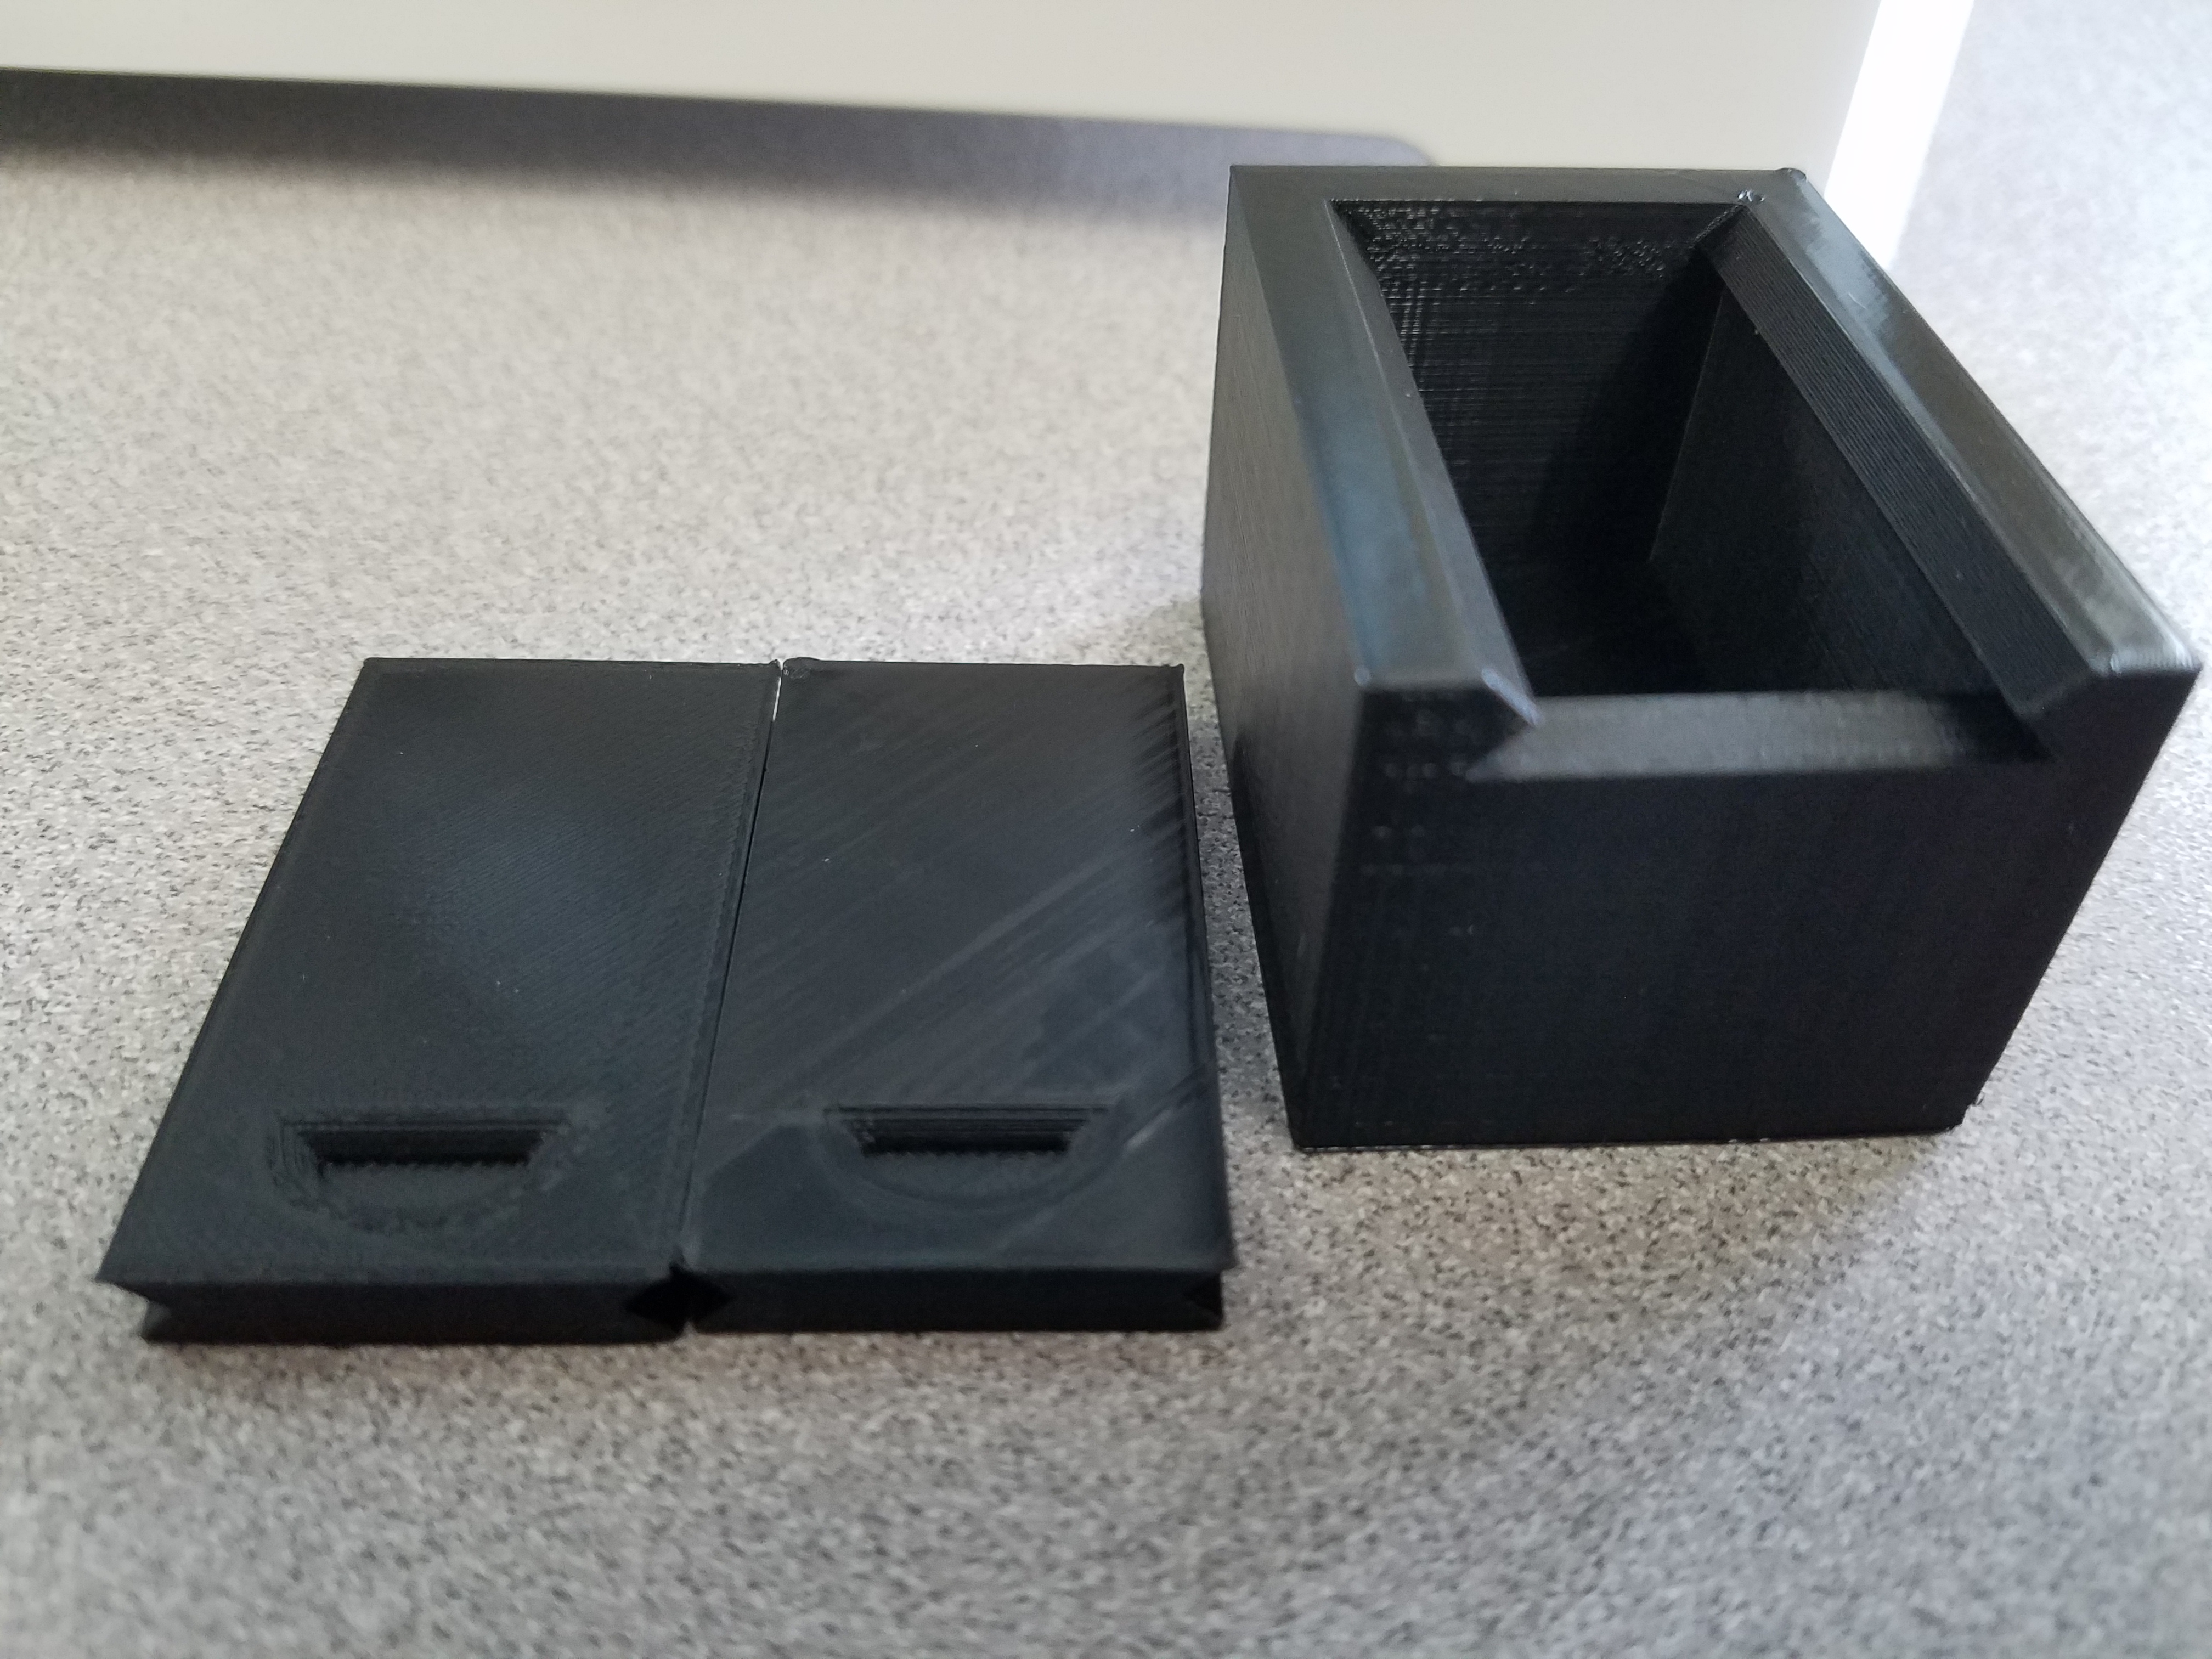
There was another suggestion that got my attention that I completely forgot about. Slide lids are really great at holding a snug fit. I would have to work on clearance between the lid and the box, but I don’t want it too loose. This works great because I wanted to implement a lower storage compartment into the box to hold the second set of puzzle pieces and any extra ones that have not been used in solving the puzzle. As long as there’s a snug enough fit to the lid then the lid shouldn’t randomly slide off in a bag.

Here is a small slide lid box I designed in Fusion 360. From that sketch I extruded the main box compartment and the lid and separated the two halves. I made two rectangles, one to fit on the back of the box and a slightly smaller one to fit on the front of the box just under the lid groves. I am hoping that the groves are not a difficult print. The angle is at 45 degrees. If it can print without much of an issue I can use this on my box. I’m not sure if I want the game play compartment to have a slide lid just yet or continue with my hinge design. It could work for both compartments.
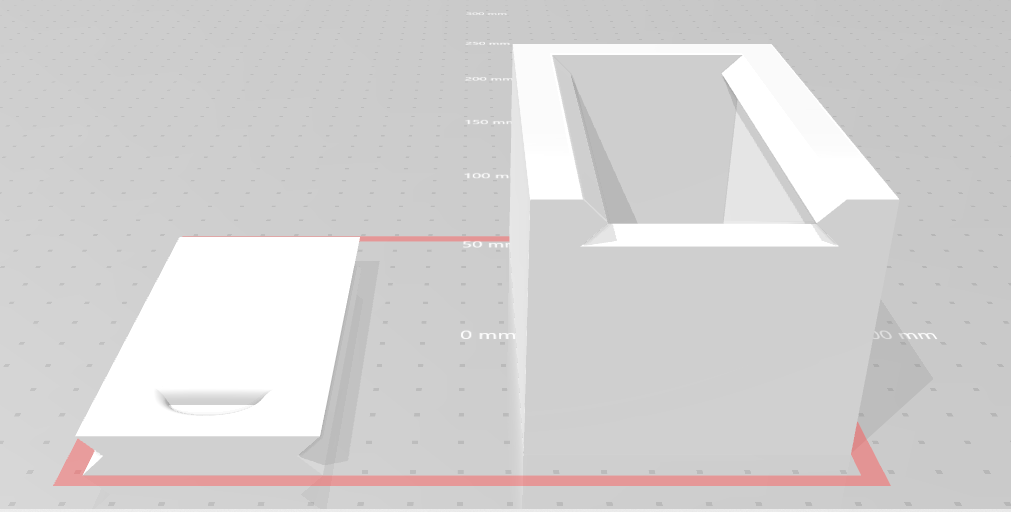
Now I could take it a step further and design a locking slide panel lid. It should not be too hard to do. I could add a latching system or a snap lock. If I do choose the slide lid for the top compartment though I wouldn’t really need a lock as long as the clearance is just right. The lock just adds additional security. The hinge design would need a lock mechanism to keep the compartment closed. With an angled notch on the box for the slide lid and the lid itself the Glowforge would not be the best option for this box. I would have to cut out the notch myself. But 3d printing the box shouldn’t be too difficult.
Print Tests and any success.
Had a hiccup with the first print not printing what was in the file itself. So I’m attempting a second print for my hinge.
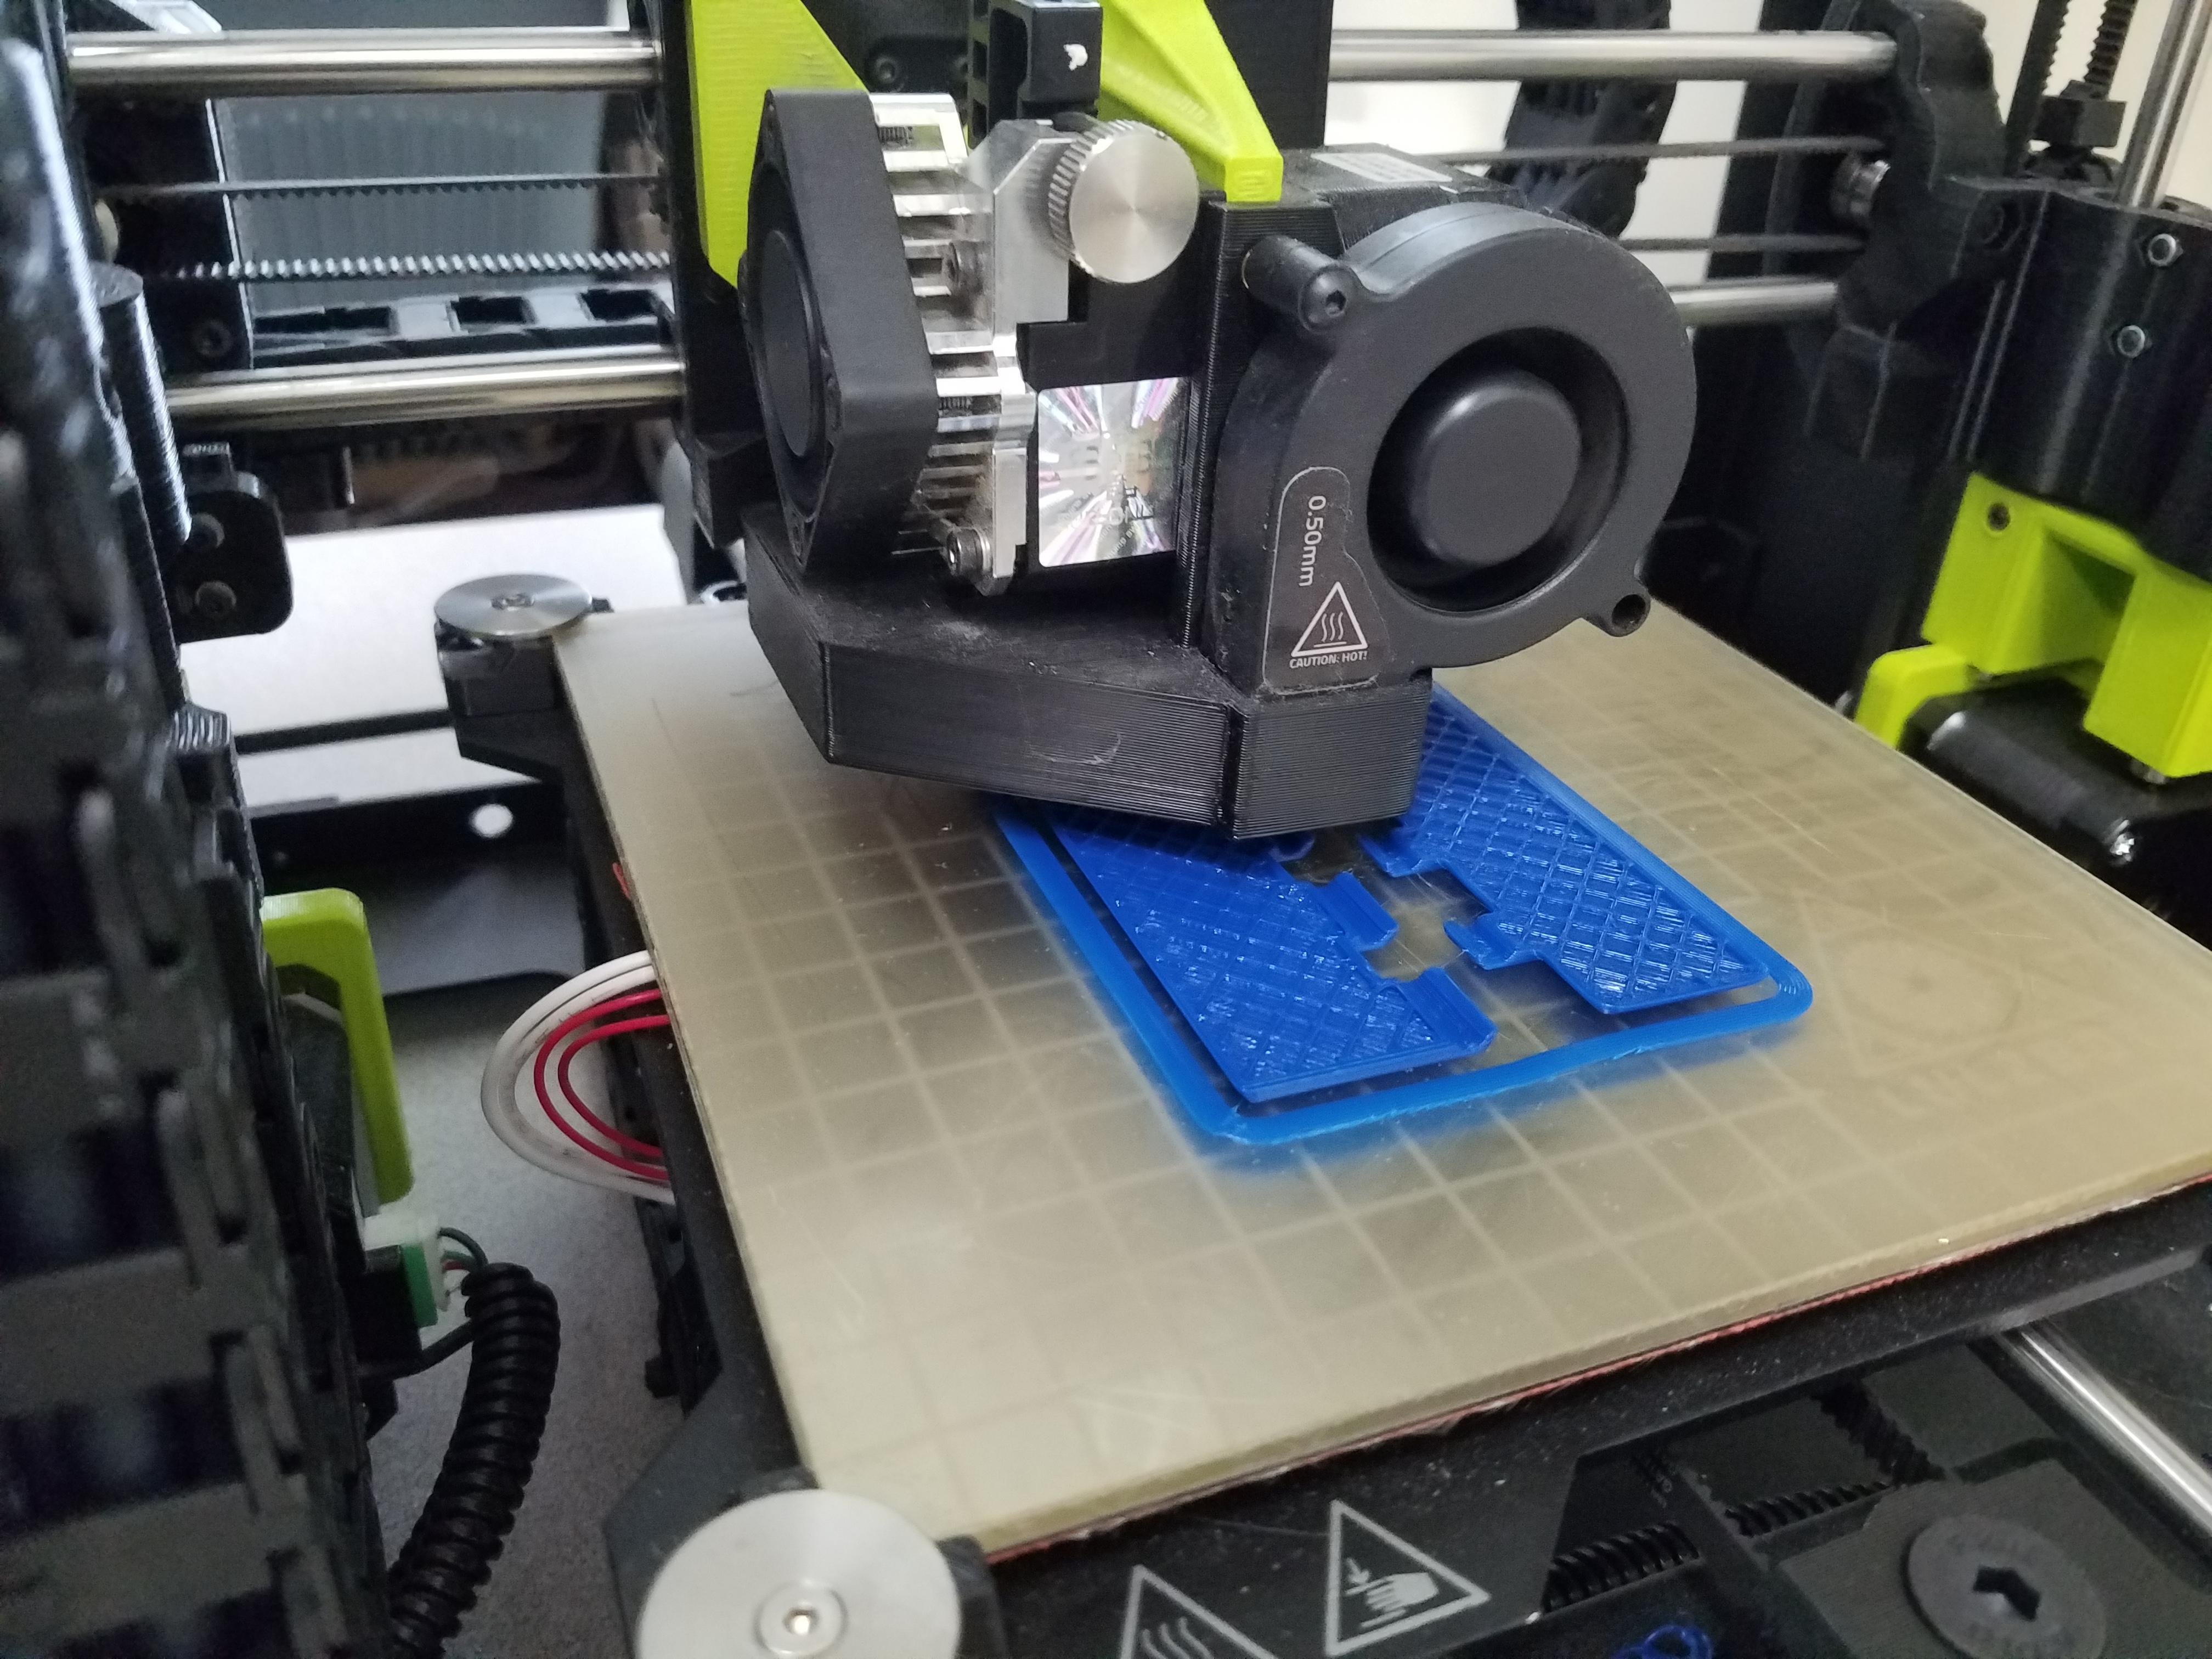
The length of the hinge I had to scale down. It was originally following the long edge of my puzzle box (7 inches). I had to scale it down to print on the Lulz bot mini. I am wondering if scale is going to be an issue now and may have to scale the project smaller to be able to be printed. It should not affect the hinge strength, but I would like to try and get this box printed from the printers itself along with the pieces. I may be okay if I use the Ultimaker printers. I think the print beds are bigger on them than the Lulz bot minis.
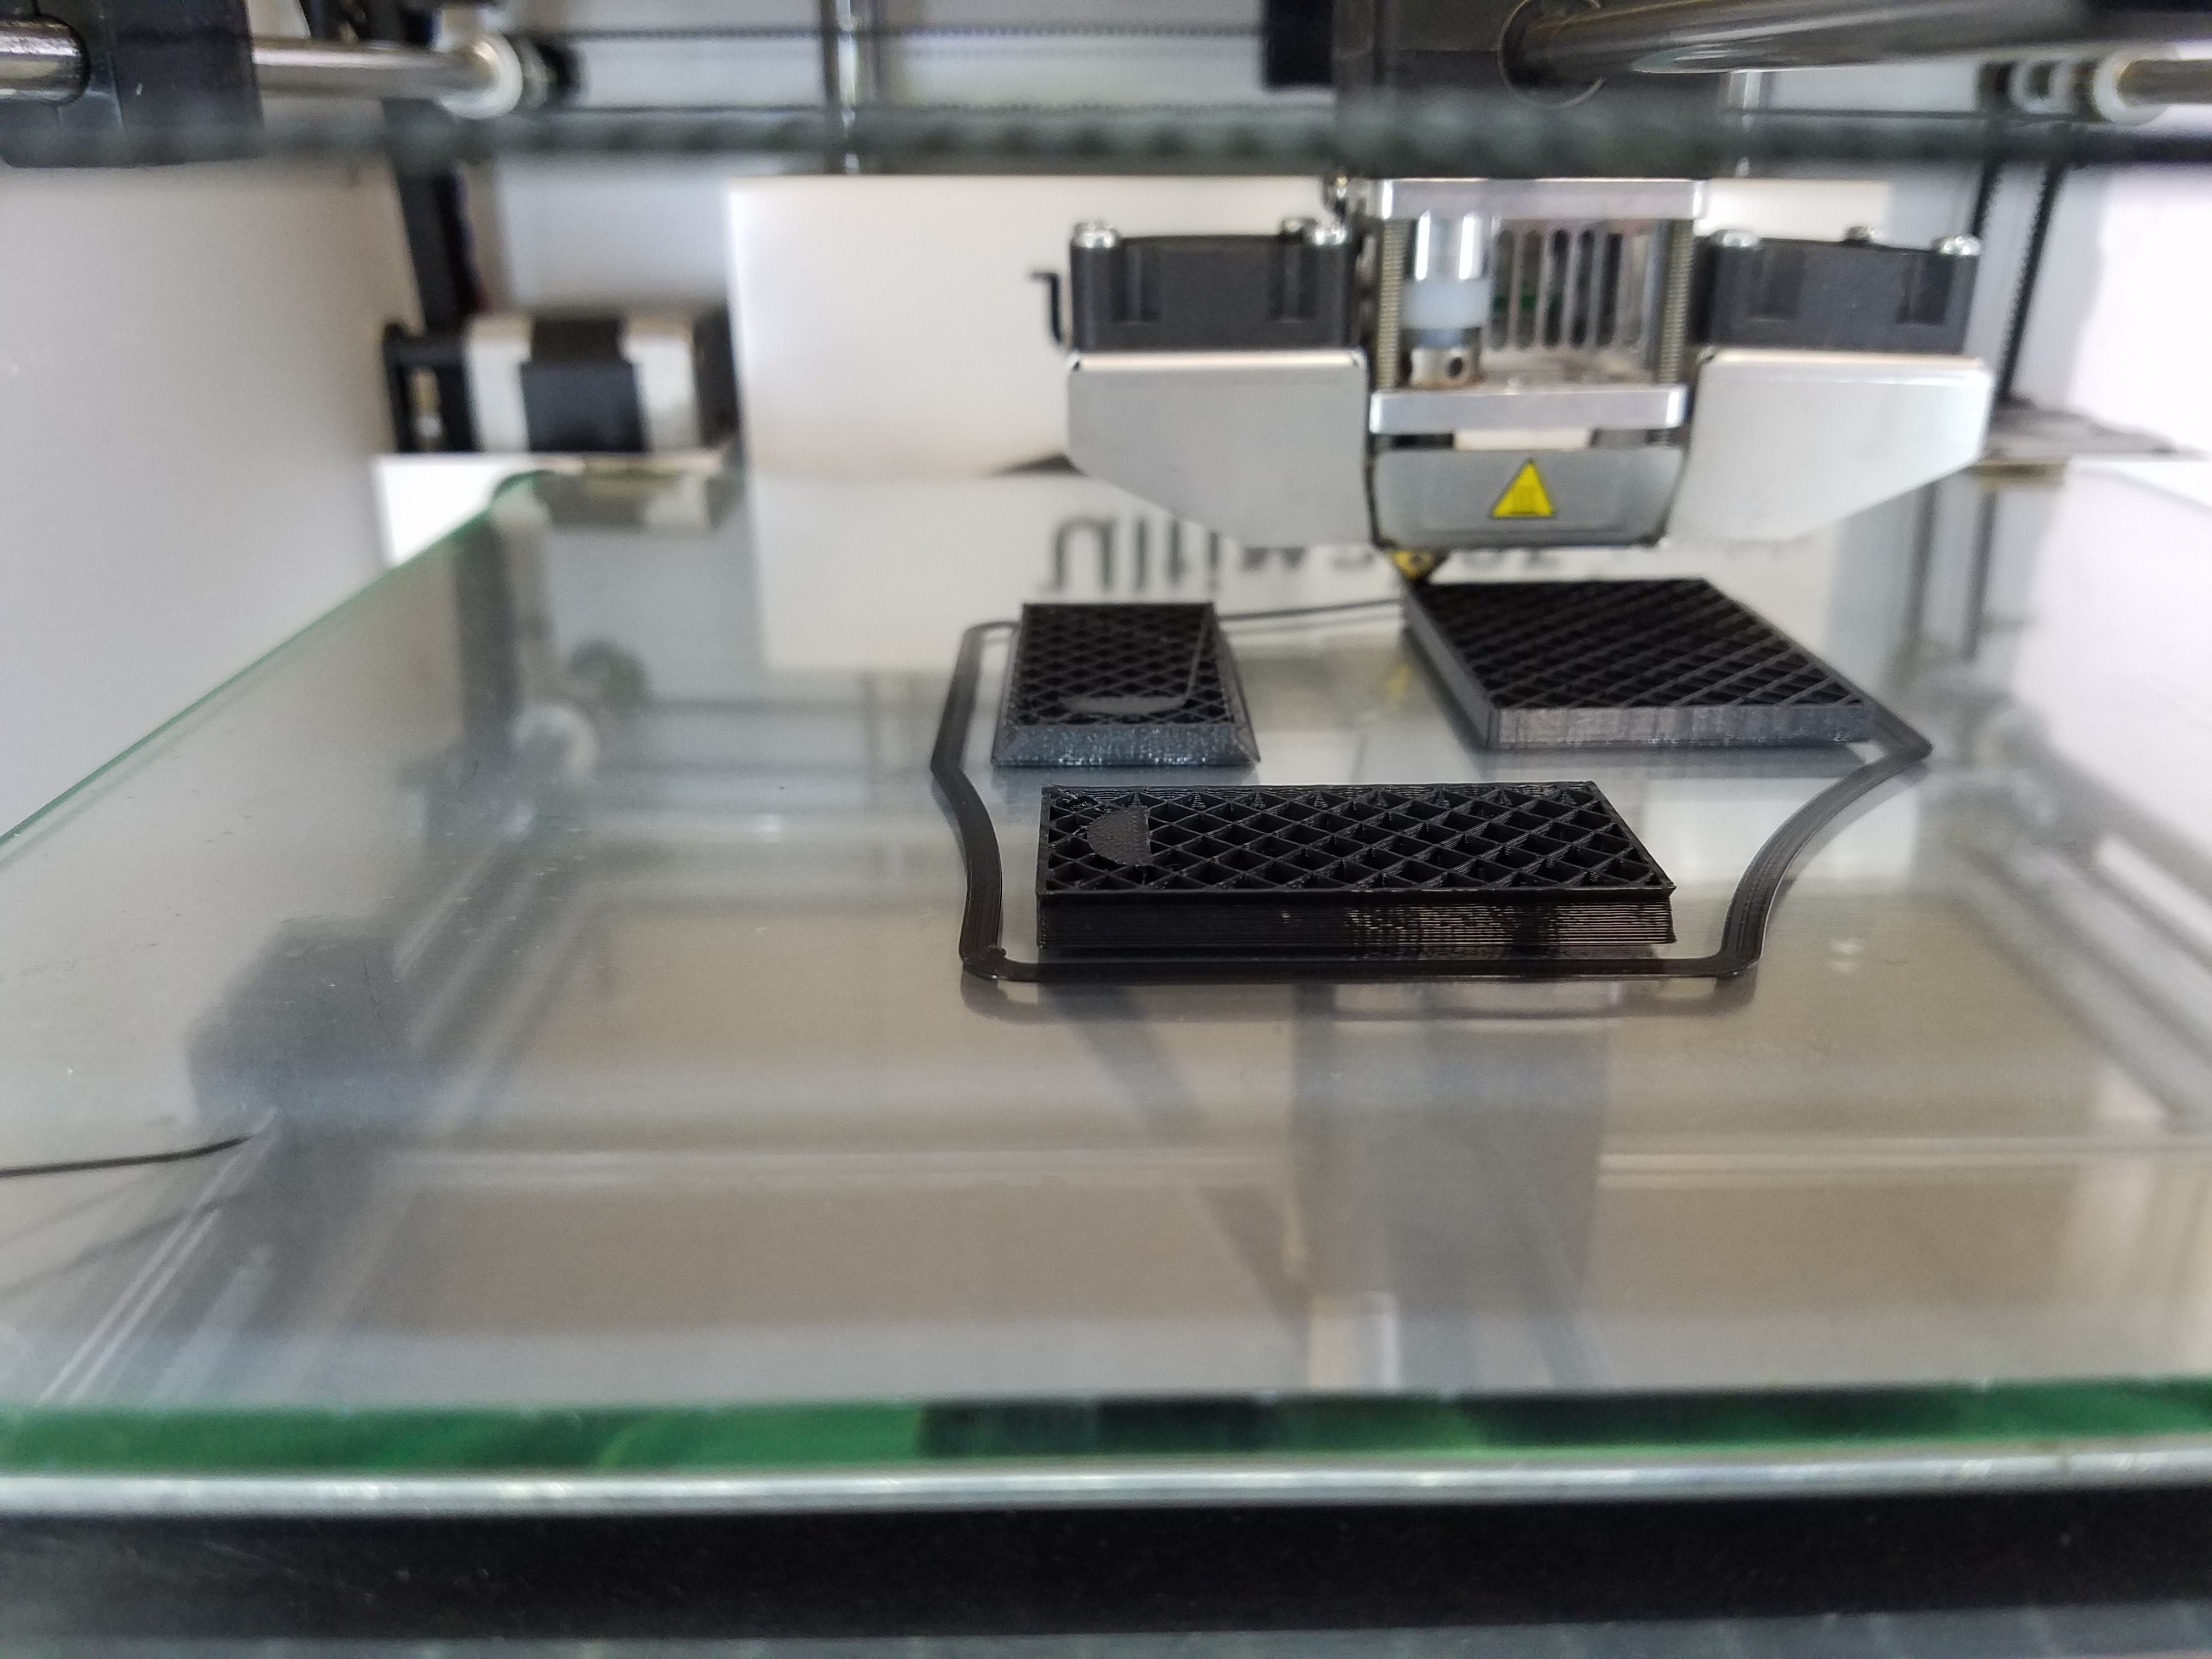
I’m happy with how the print is with the slide lid box. The angle of 45 degrees is not showing any print problems so far with the lid. No support structures needed yet. The box printing is going well also. I’m waiting to see how the locking edge goes on the box.

Ran into a clearance snag with the hinge. It’s and easy fix. Just need to mess with the inside surfaces by a few mms. Will print out another one once clearance is fixed.
The second lid that printed had some off set adjustment. It’s not enough though. I am printing a third one to test the offset. So the lid needs to be smaller in order to slide. I don’t want to force the second one to slide in because I won’t be able to get it out.
Design wise I think these may be more of a success. The hinge looks like a big improvement. More pictures to come.
Offset seems to be the next challenge with both the hinge and the slide lid box. I’m currently working that out.