Hello

Hi! My name is Thiha Aung and I go by Wayne. I am an international student from Yangon, Myanmar. I am a senior, majoring in Finance and minoring in Business Analytics.
Thingiverse Model
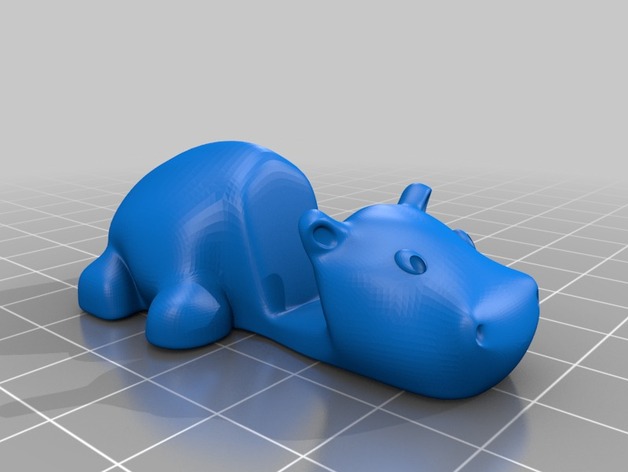
Title – Keychain / Smartphone Stand
Designer – Shira
Link – https://www.thingiverse.com/thing:1587568/files
I choose the Hippo Keychain and Smartphone stand. I think it is very cool, we can use as keychain and can also be used as a smartphone stand while watching movies. Over 300 people have used the designer’s model and they have posted the picture of actual 3D printed objects so it is also reliable.
Thingiverse Print
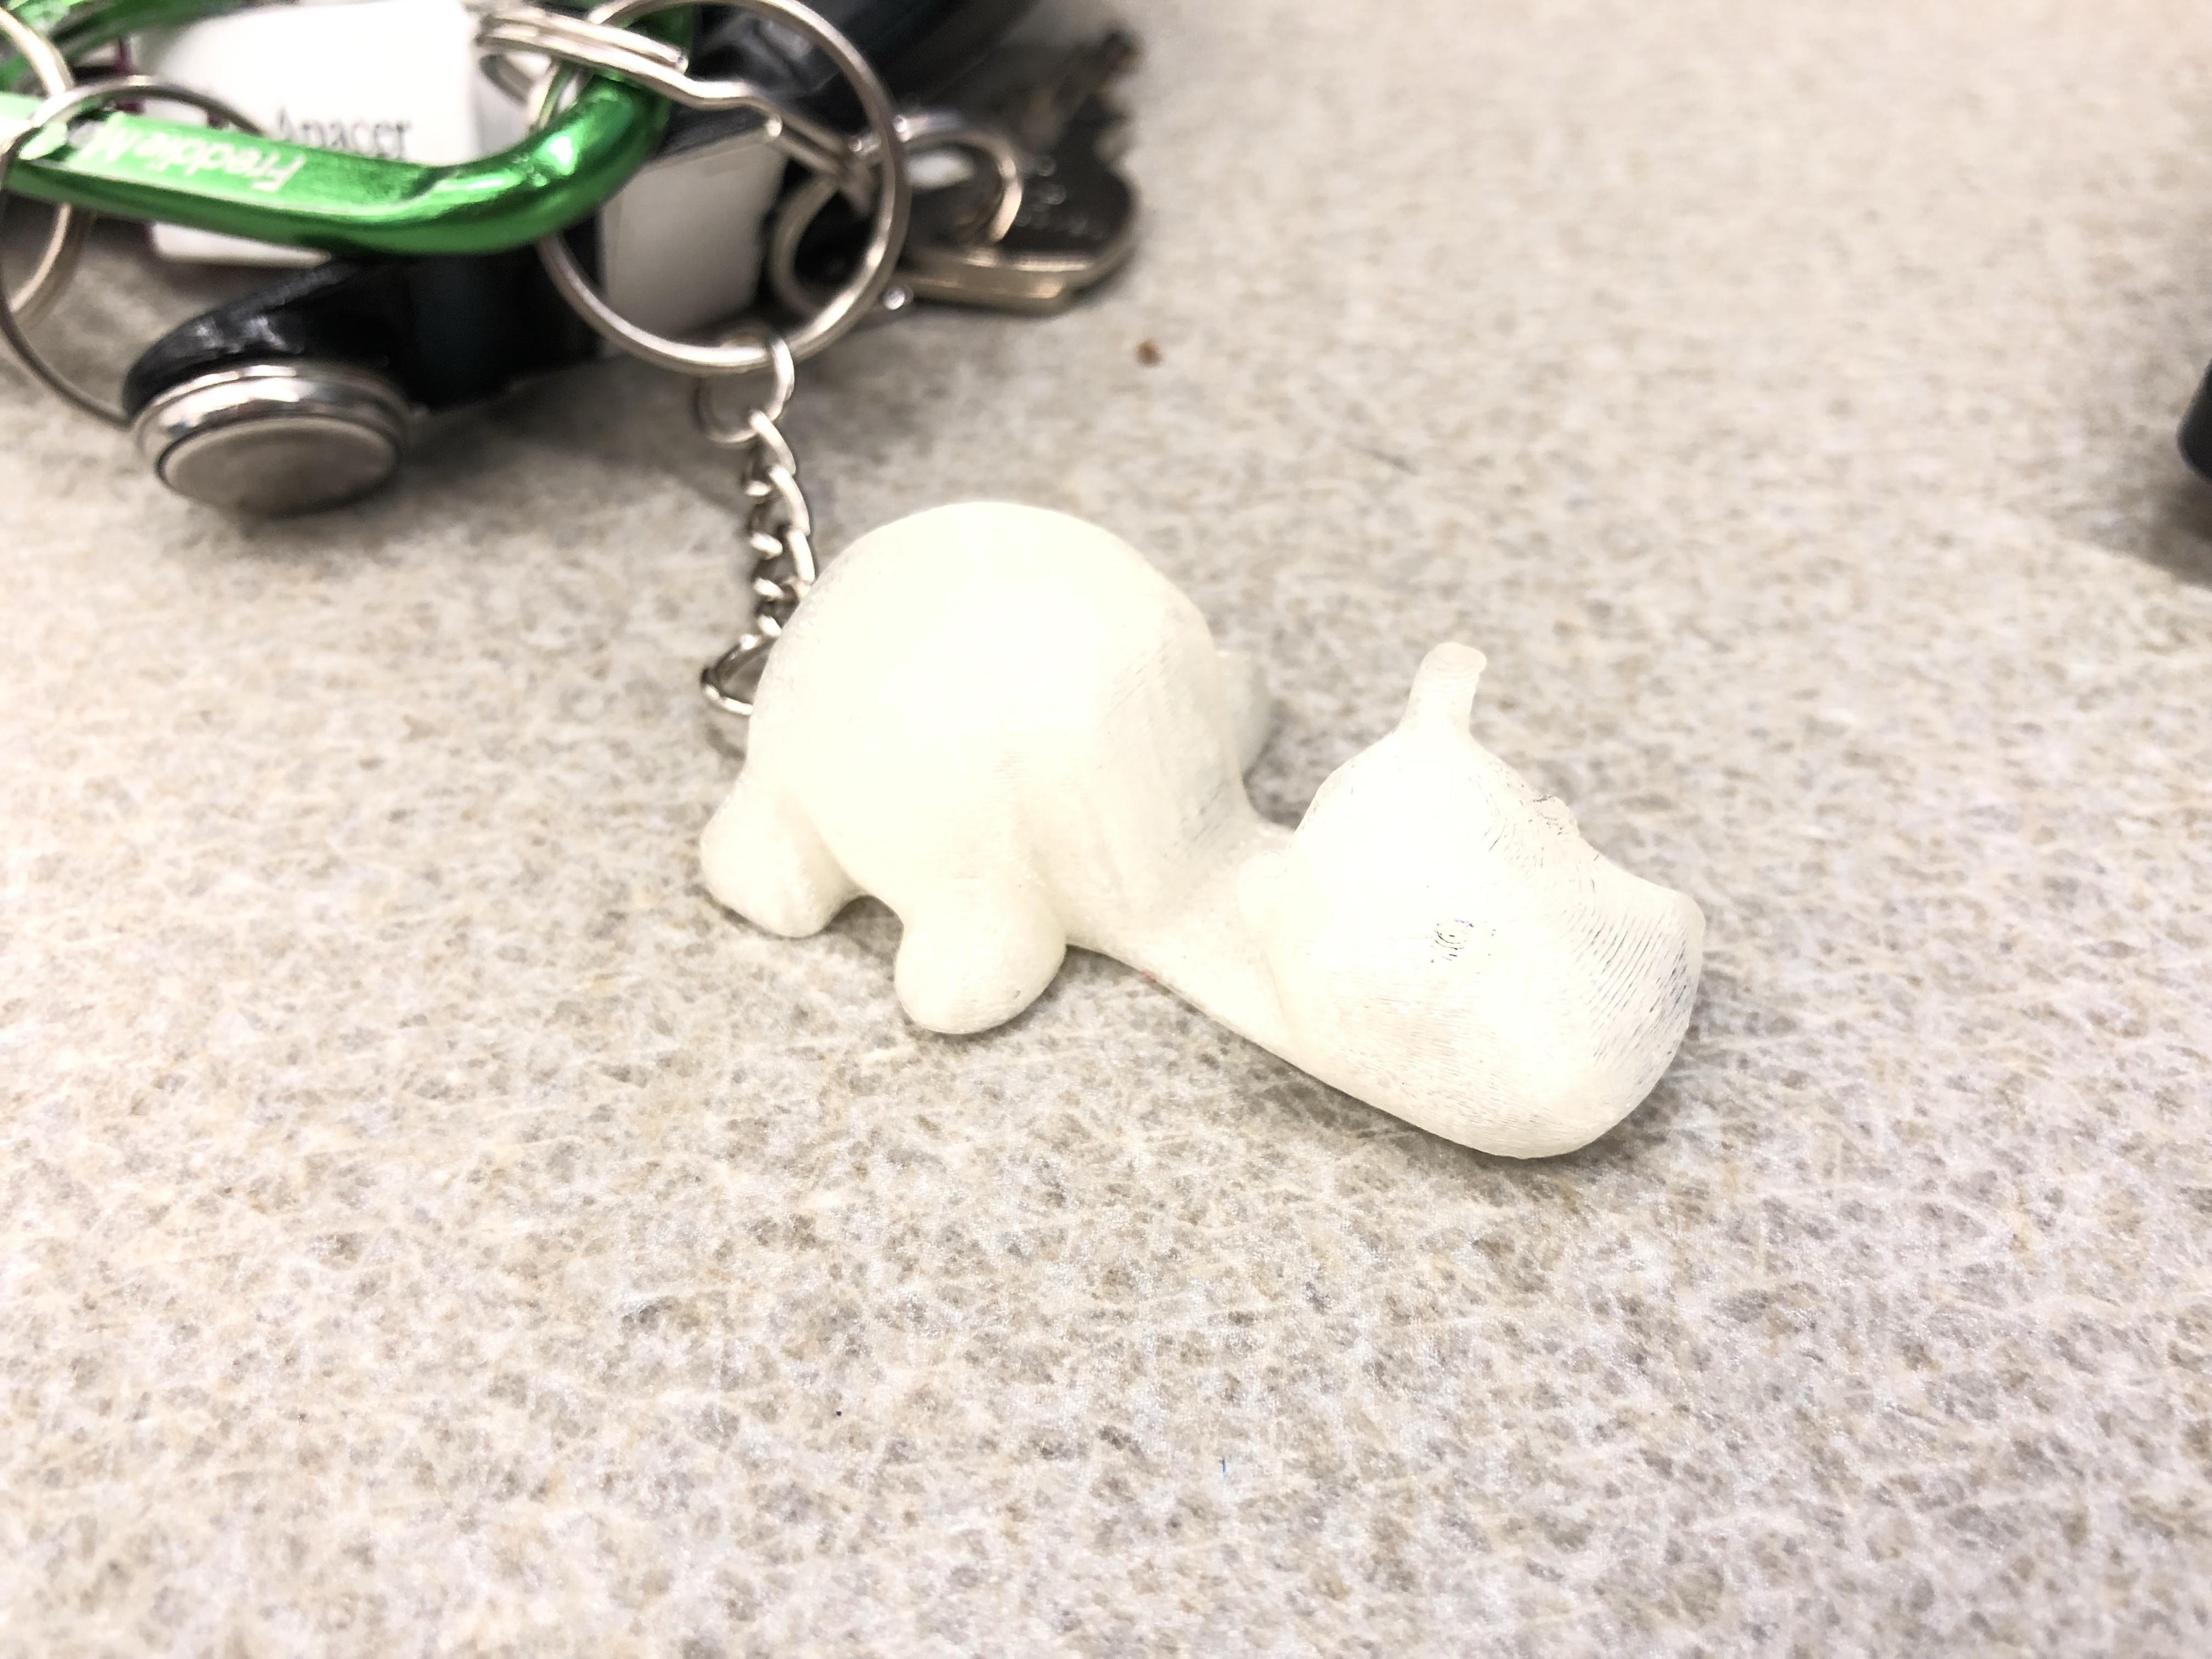
This is my printed the Hippo Keychain. It successfully printed on my first trial. Now I put this together with my keys. I think it will be a good idea especially if I printed with gray colored plastic.
https://www.thingiverse.com/make:592104
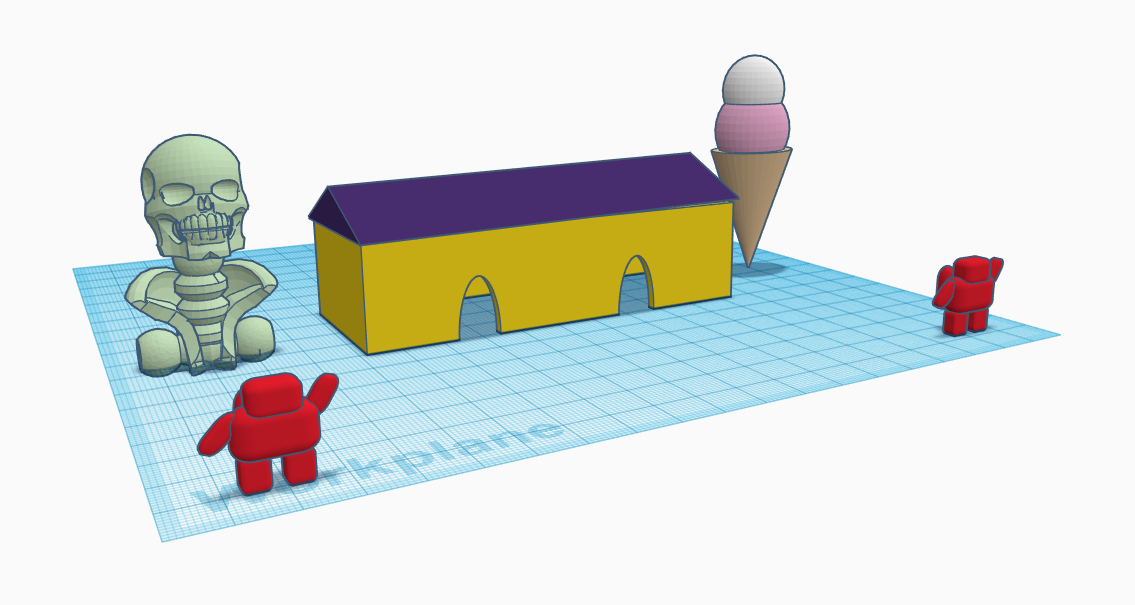
20 Forms in Tinkercad
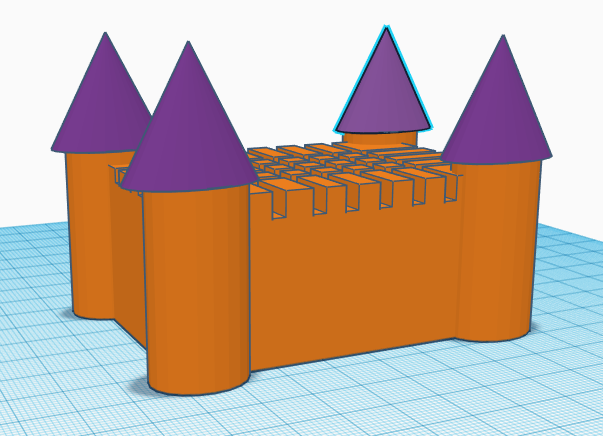
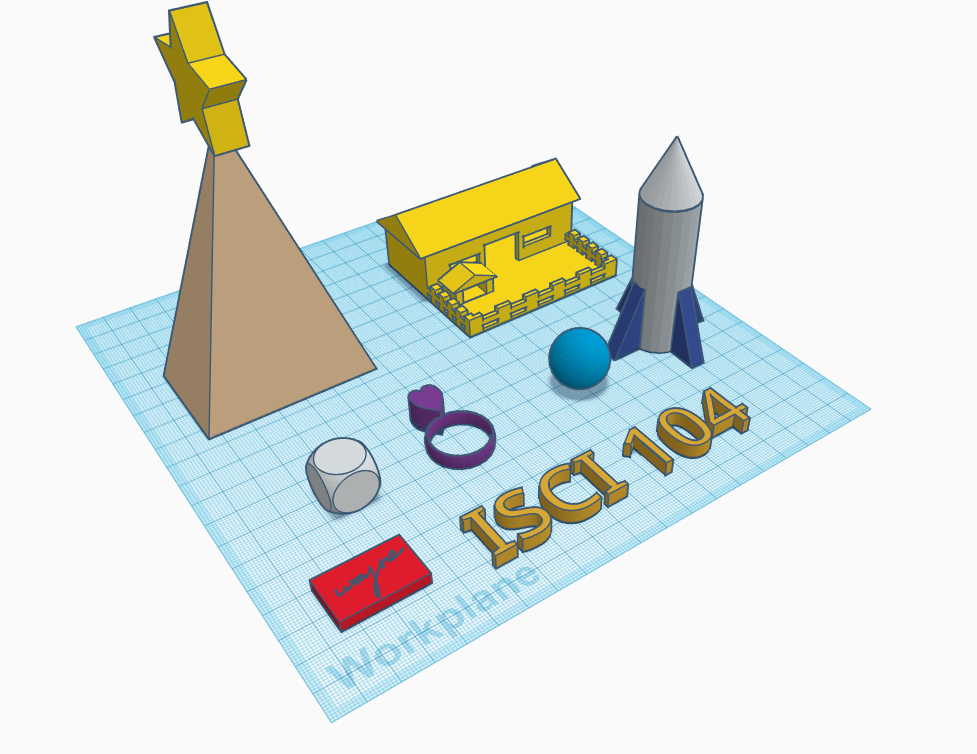
- Castle – I created the box first, then added four cylinders at the corner, put cone at the top of each cylinder. I cut out some rectangular on the top.
- Skull statue – I took the skull from the printable kits .
- Hallroom – I created a hall with four doors, I cut out the inside part of the rectangle, so it is like a hall.
- Astrobots – I also put two Astrobots and big ice-cream on the second work plane.
- Ice-cream cone – I got the ice-cream from the character.
- Pyramid – I put a star at the top of the pyramid.
- House – Tinkercad had a modifiable house that includes fence.
- Rocket – I created a rocket by putting cone on the cylinder and put four wedges on the side of the cylinder.
- Dice – Dice can be found under basic shapes category.
- Ring – I created a ring by putting heart on the top of the ring.
- Signature pad – I drew my signature with scribble and make a hole in rectangle pad.
- ISCI 104 text – I created using the text from Text and number category.
- Ball – I also put a ball beside my rocket which can be found in basic shapes.
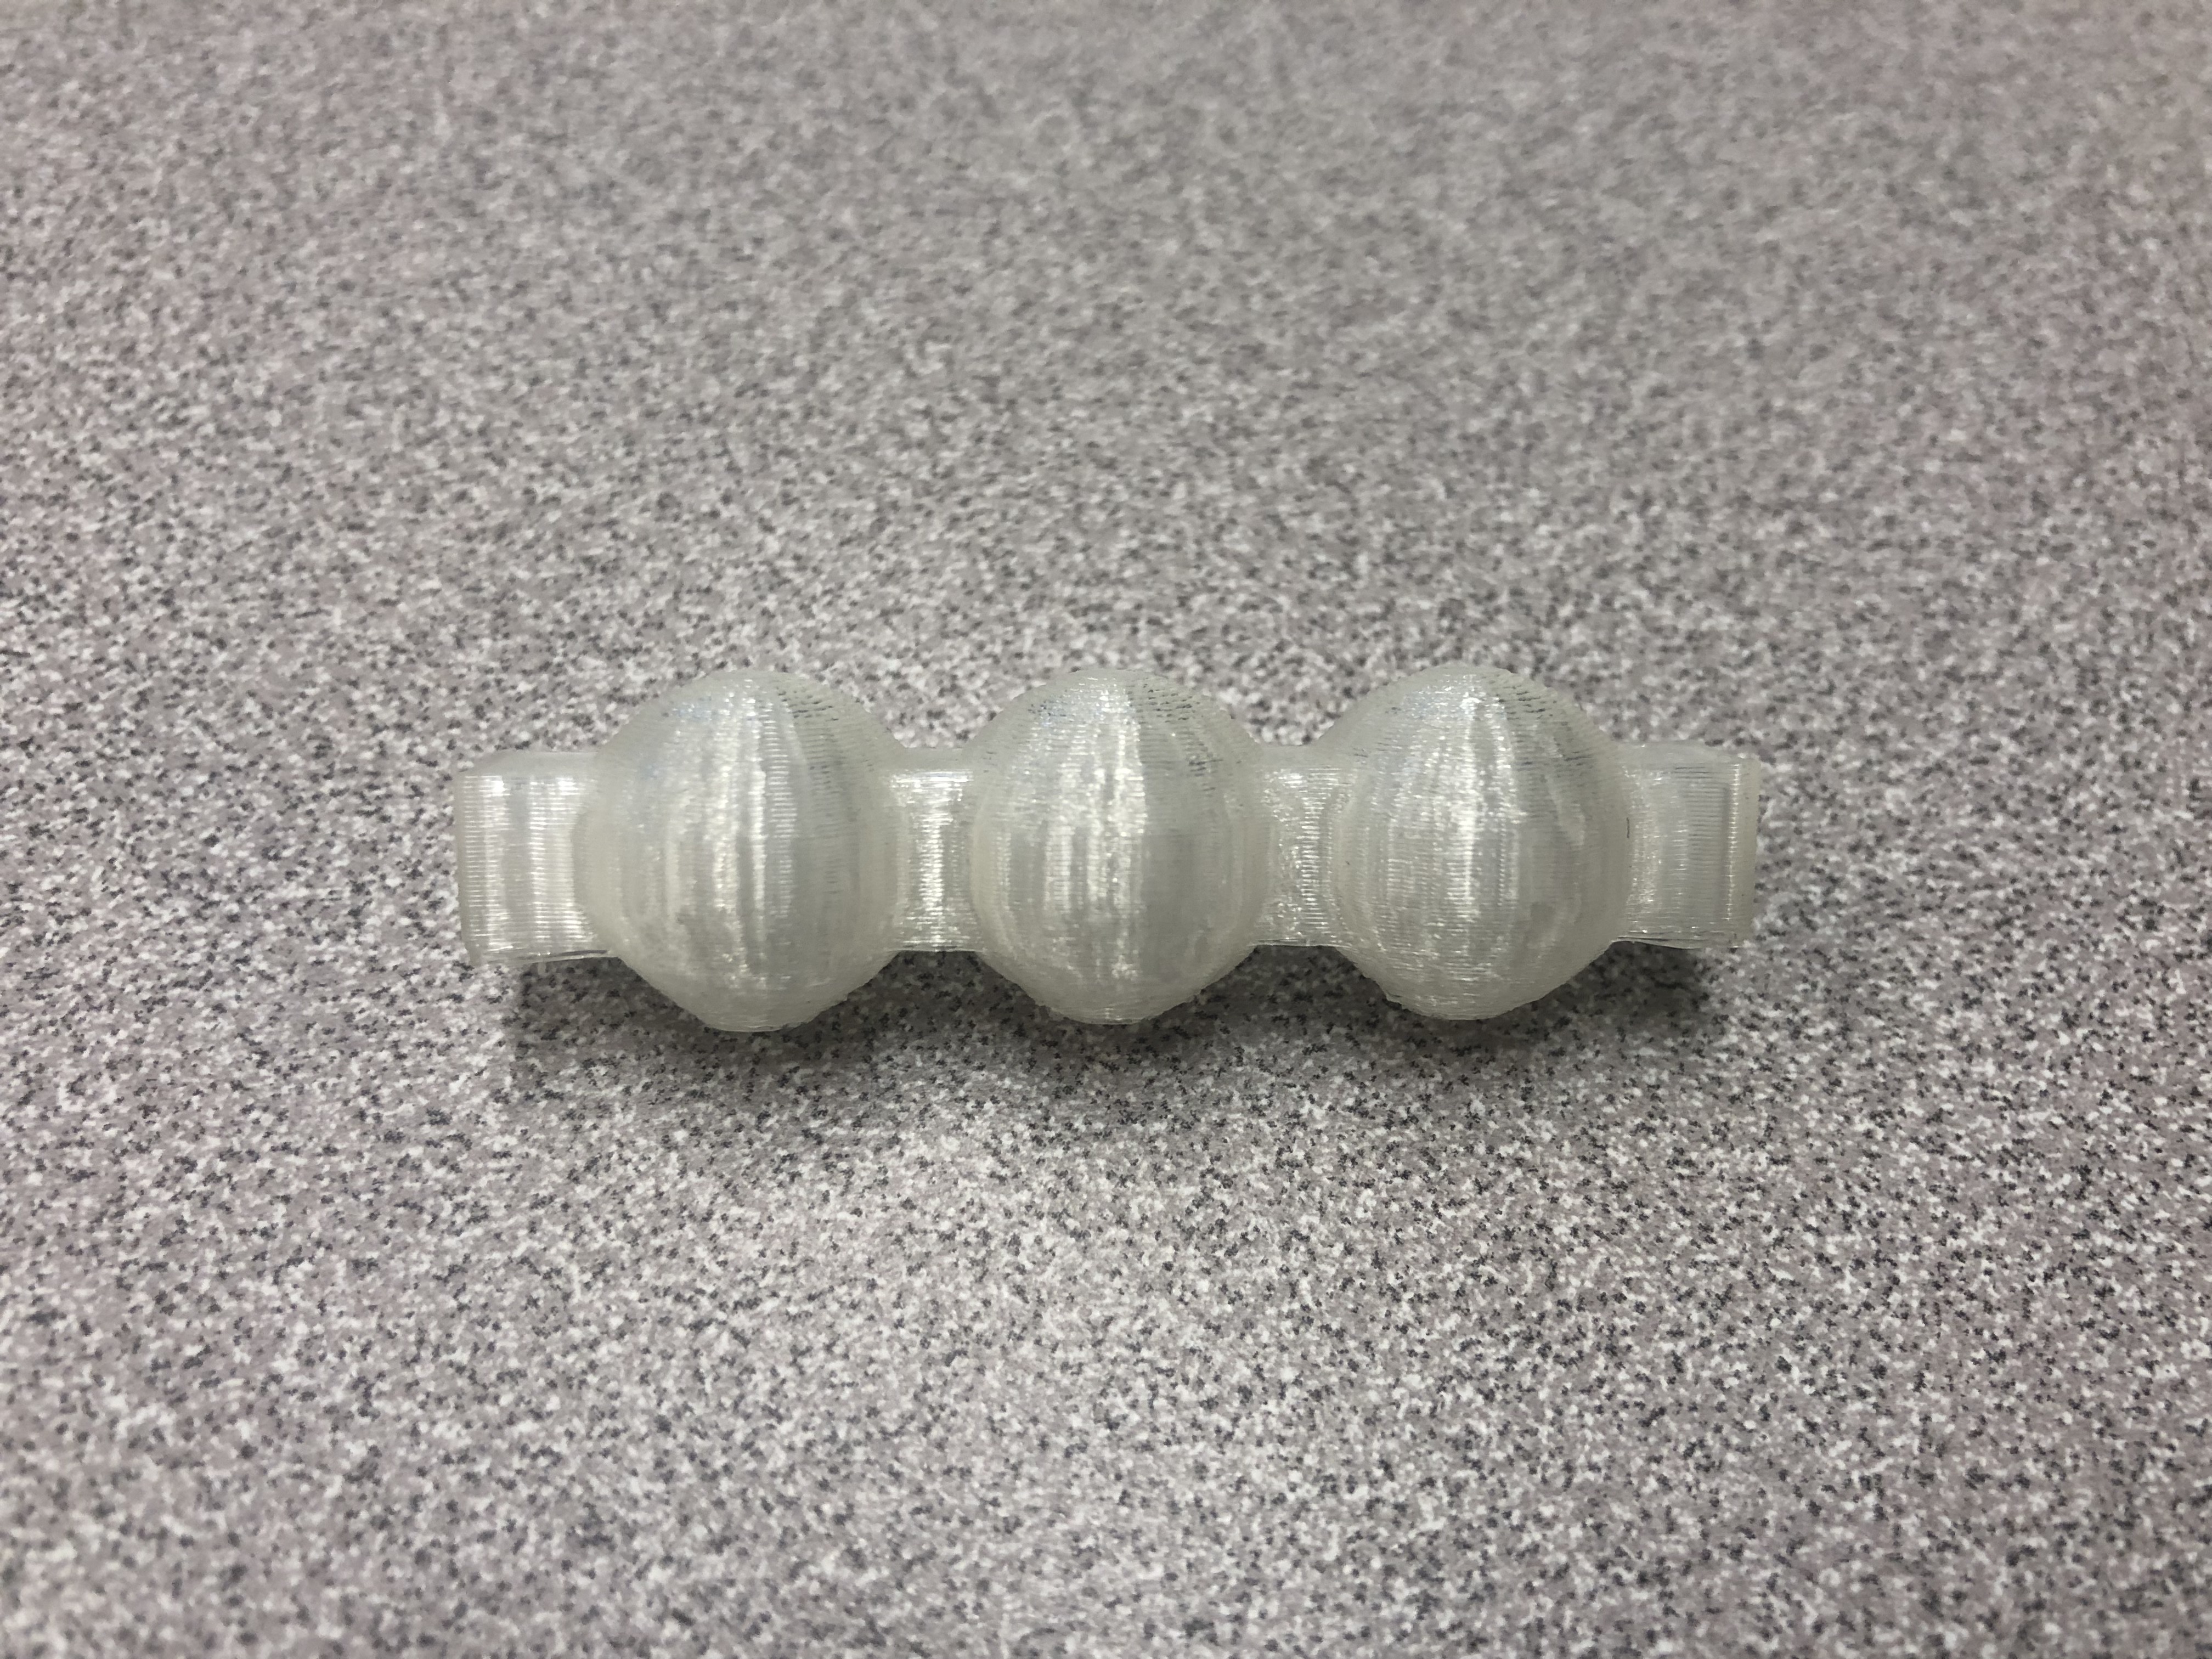
Tinkercad Print
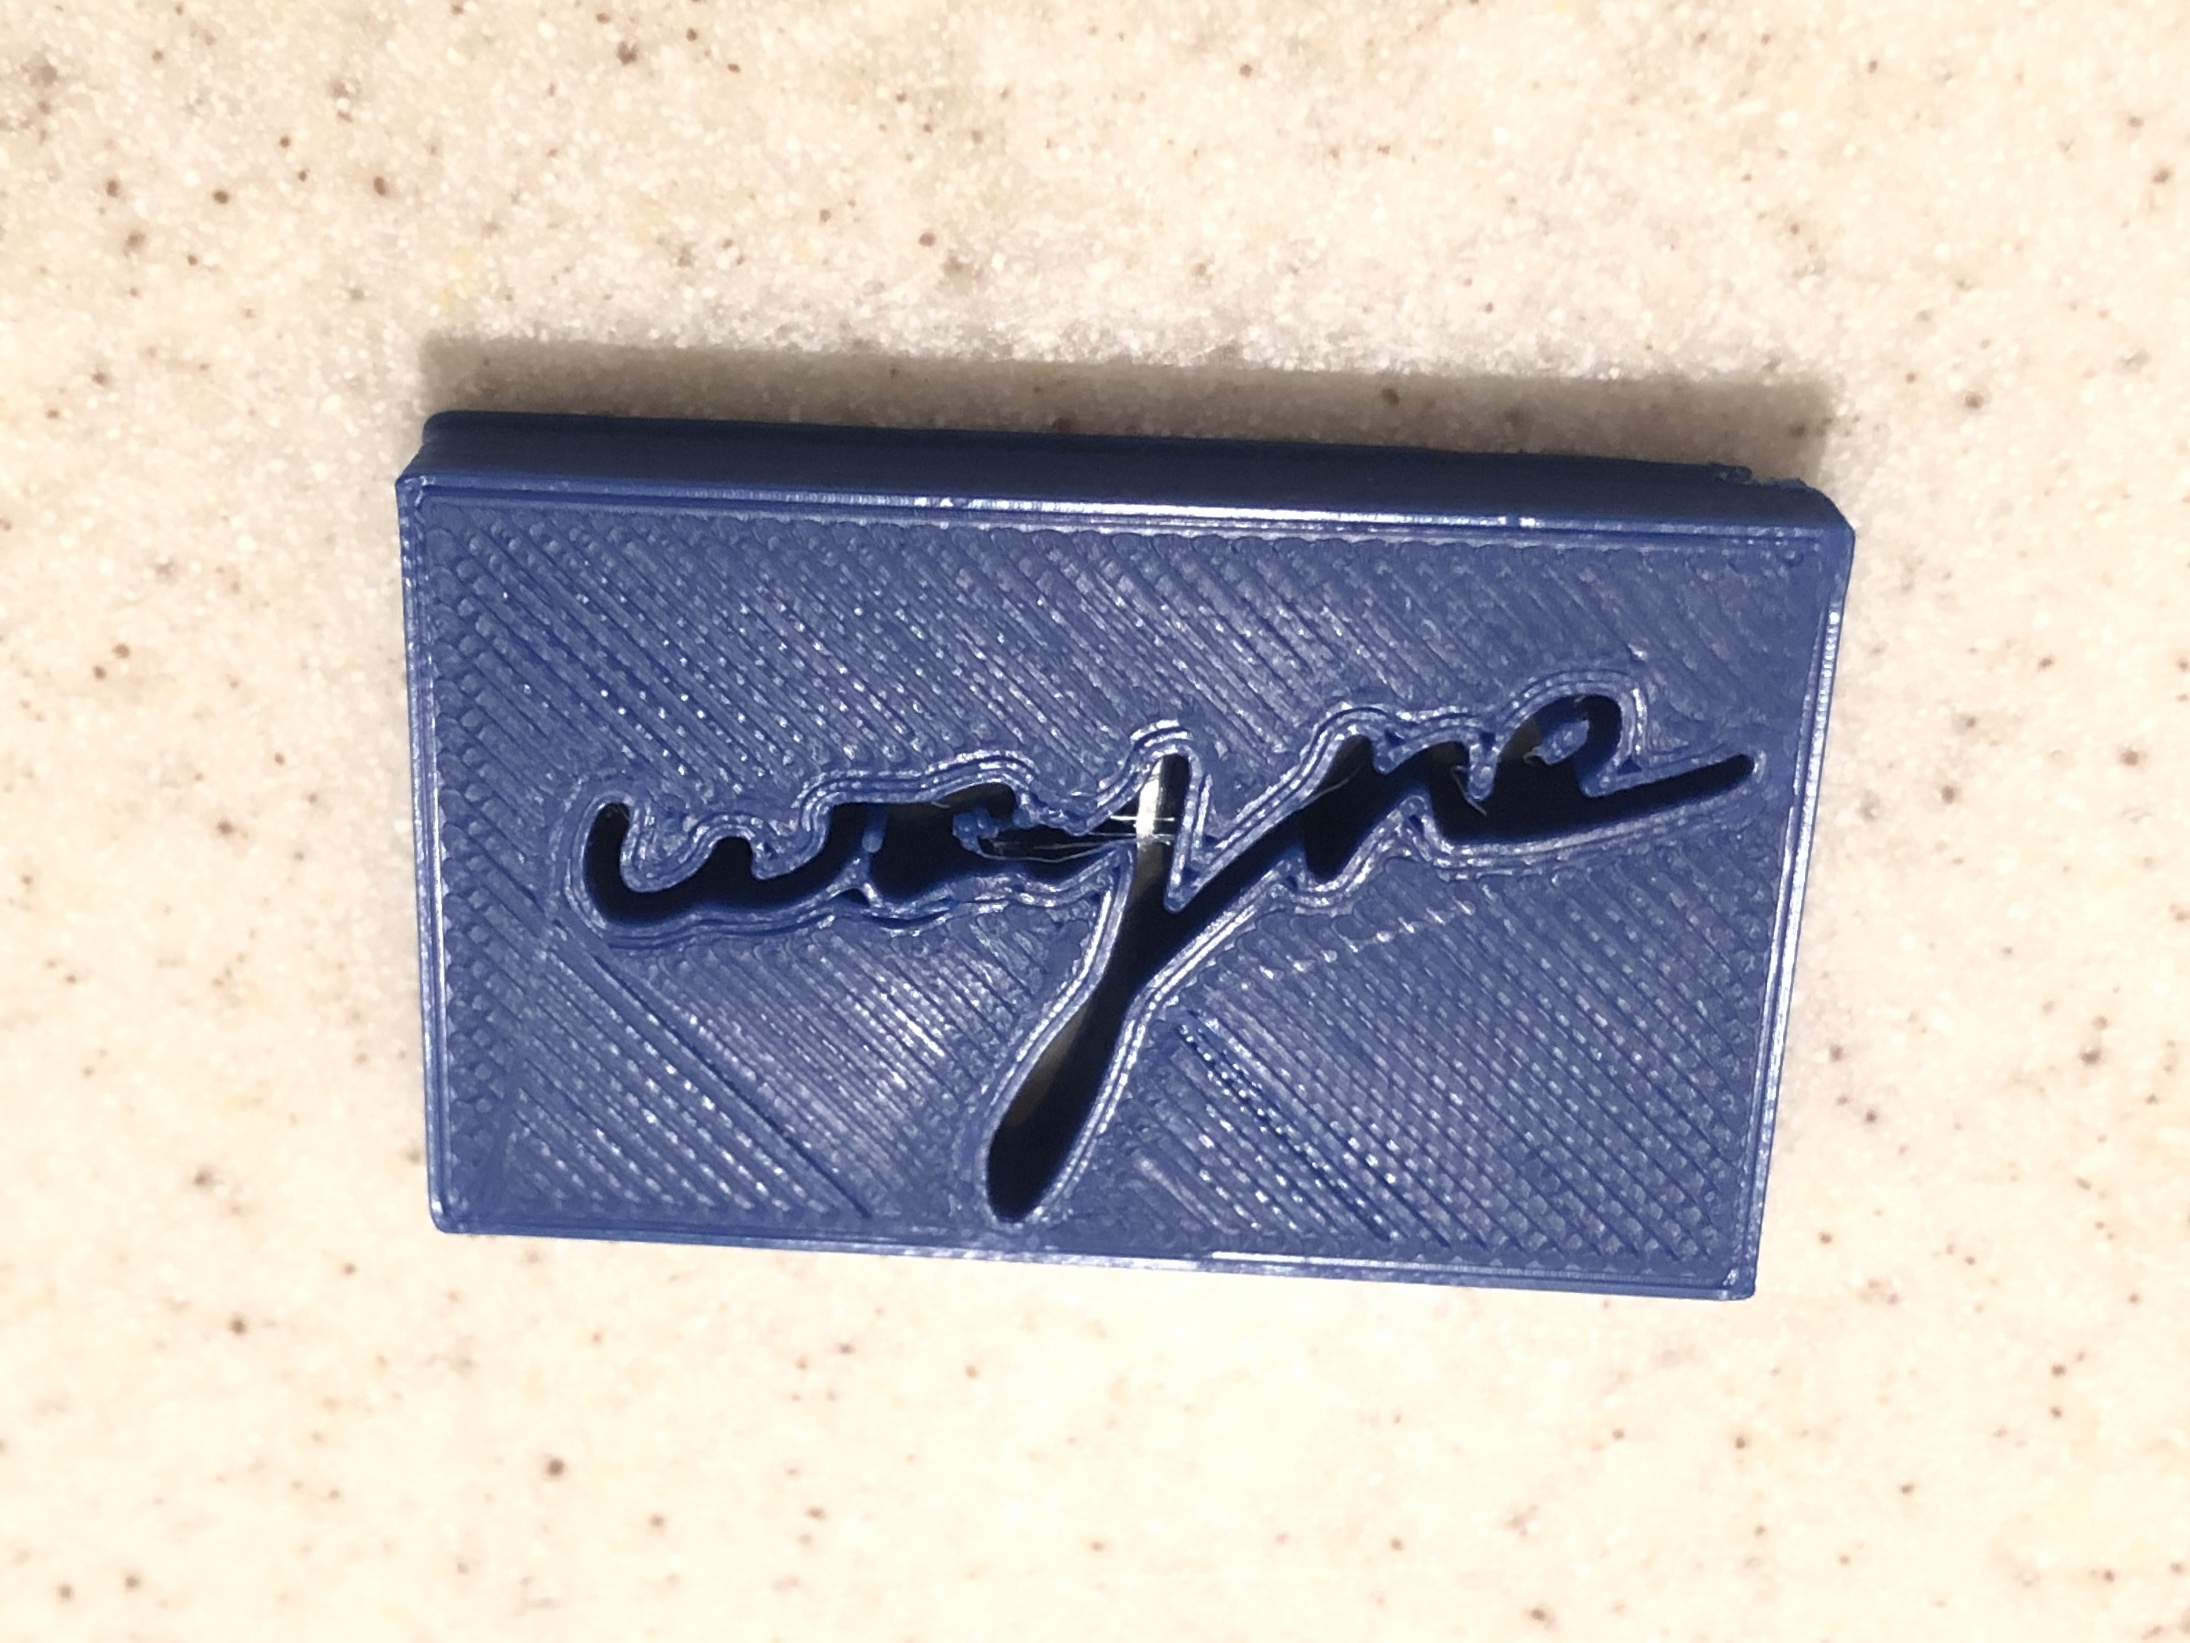
- I printed my signature pad “Wayne”. My first printing was not successful but it printed out beautifully on my second printing. I canceled the first printing as soon as I saw the mess. The printing only takes about 20 minutes to finish.
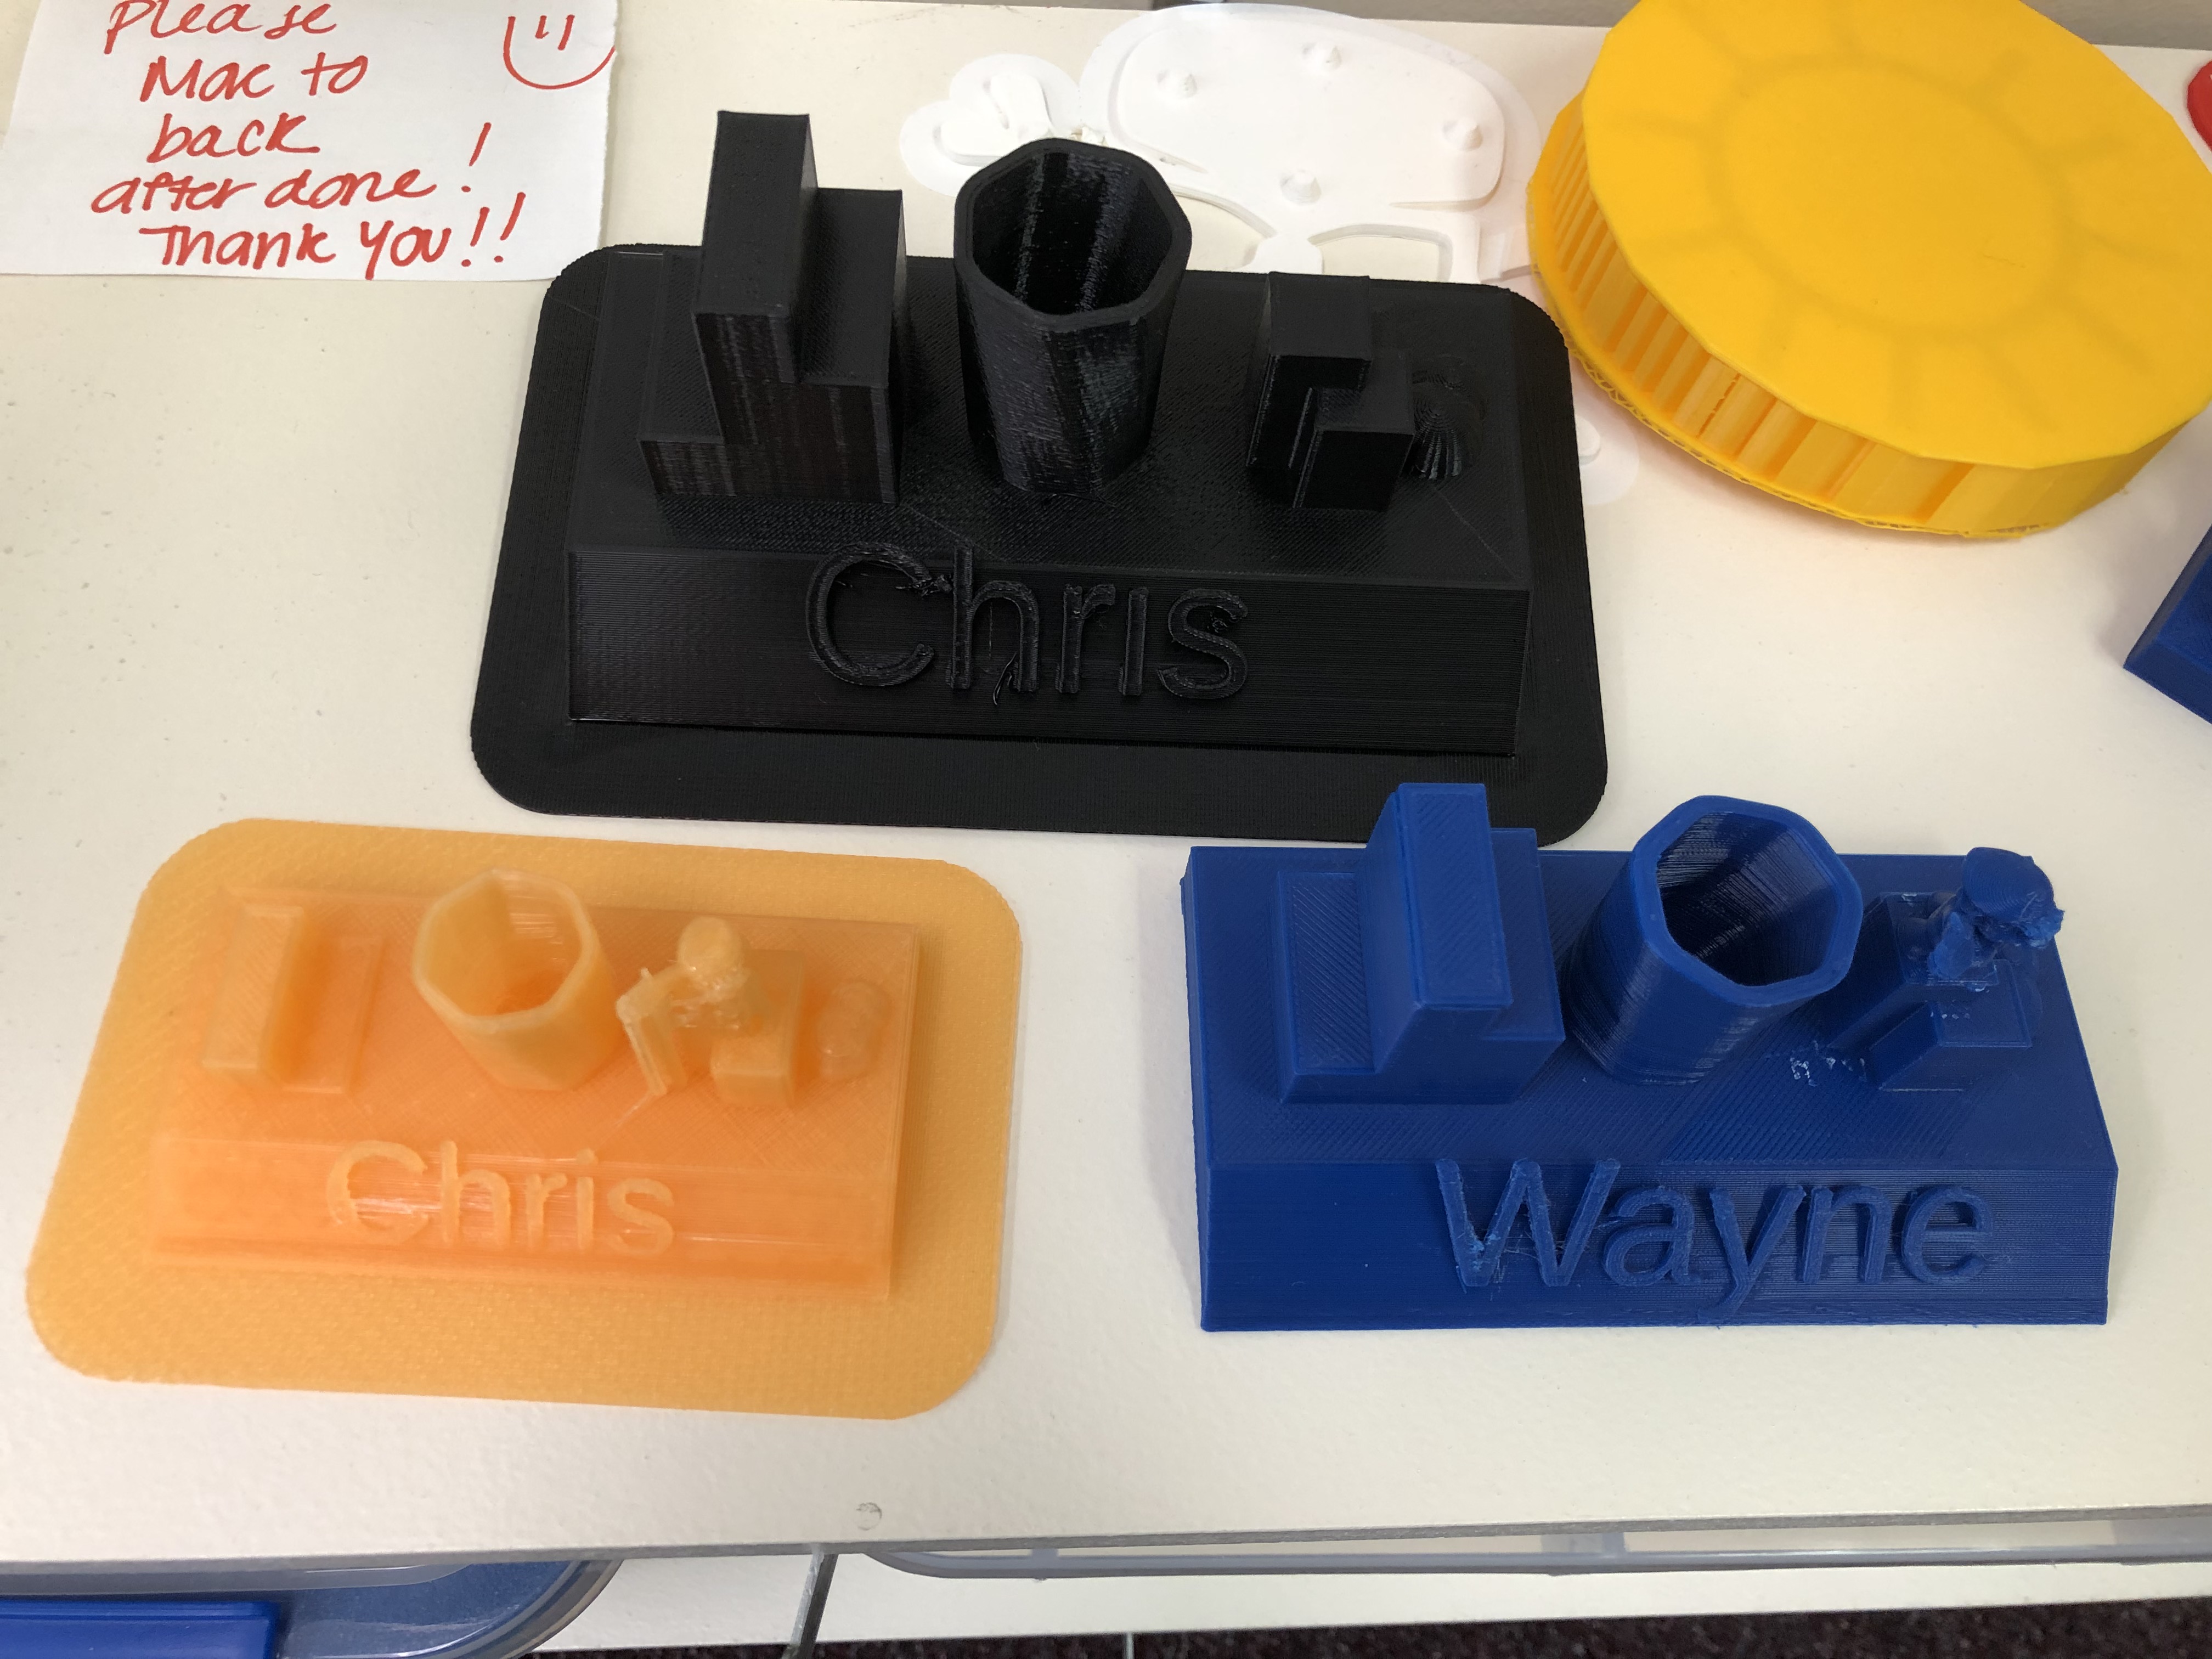
Summary of Group Tinkercad Project
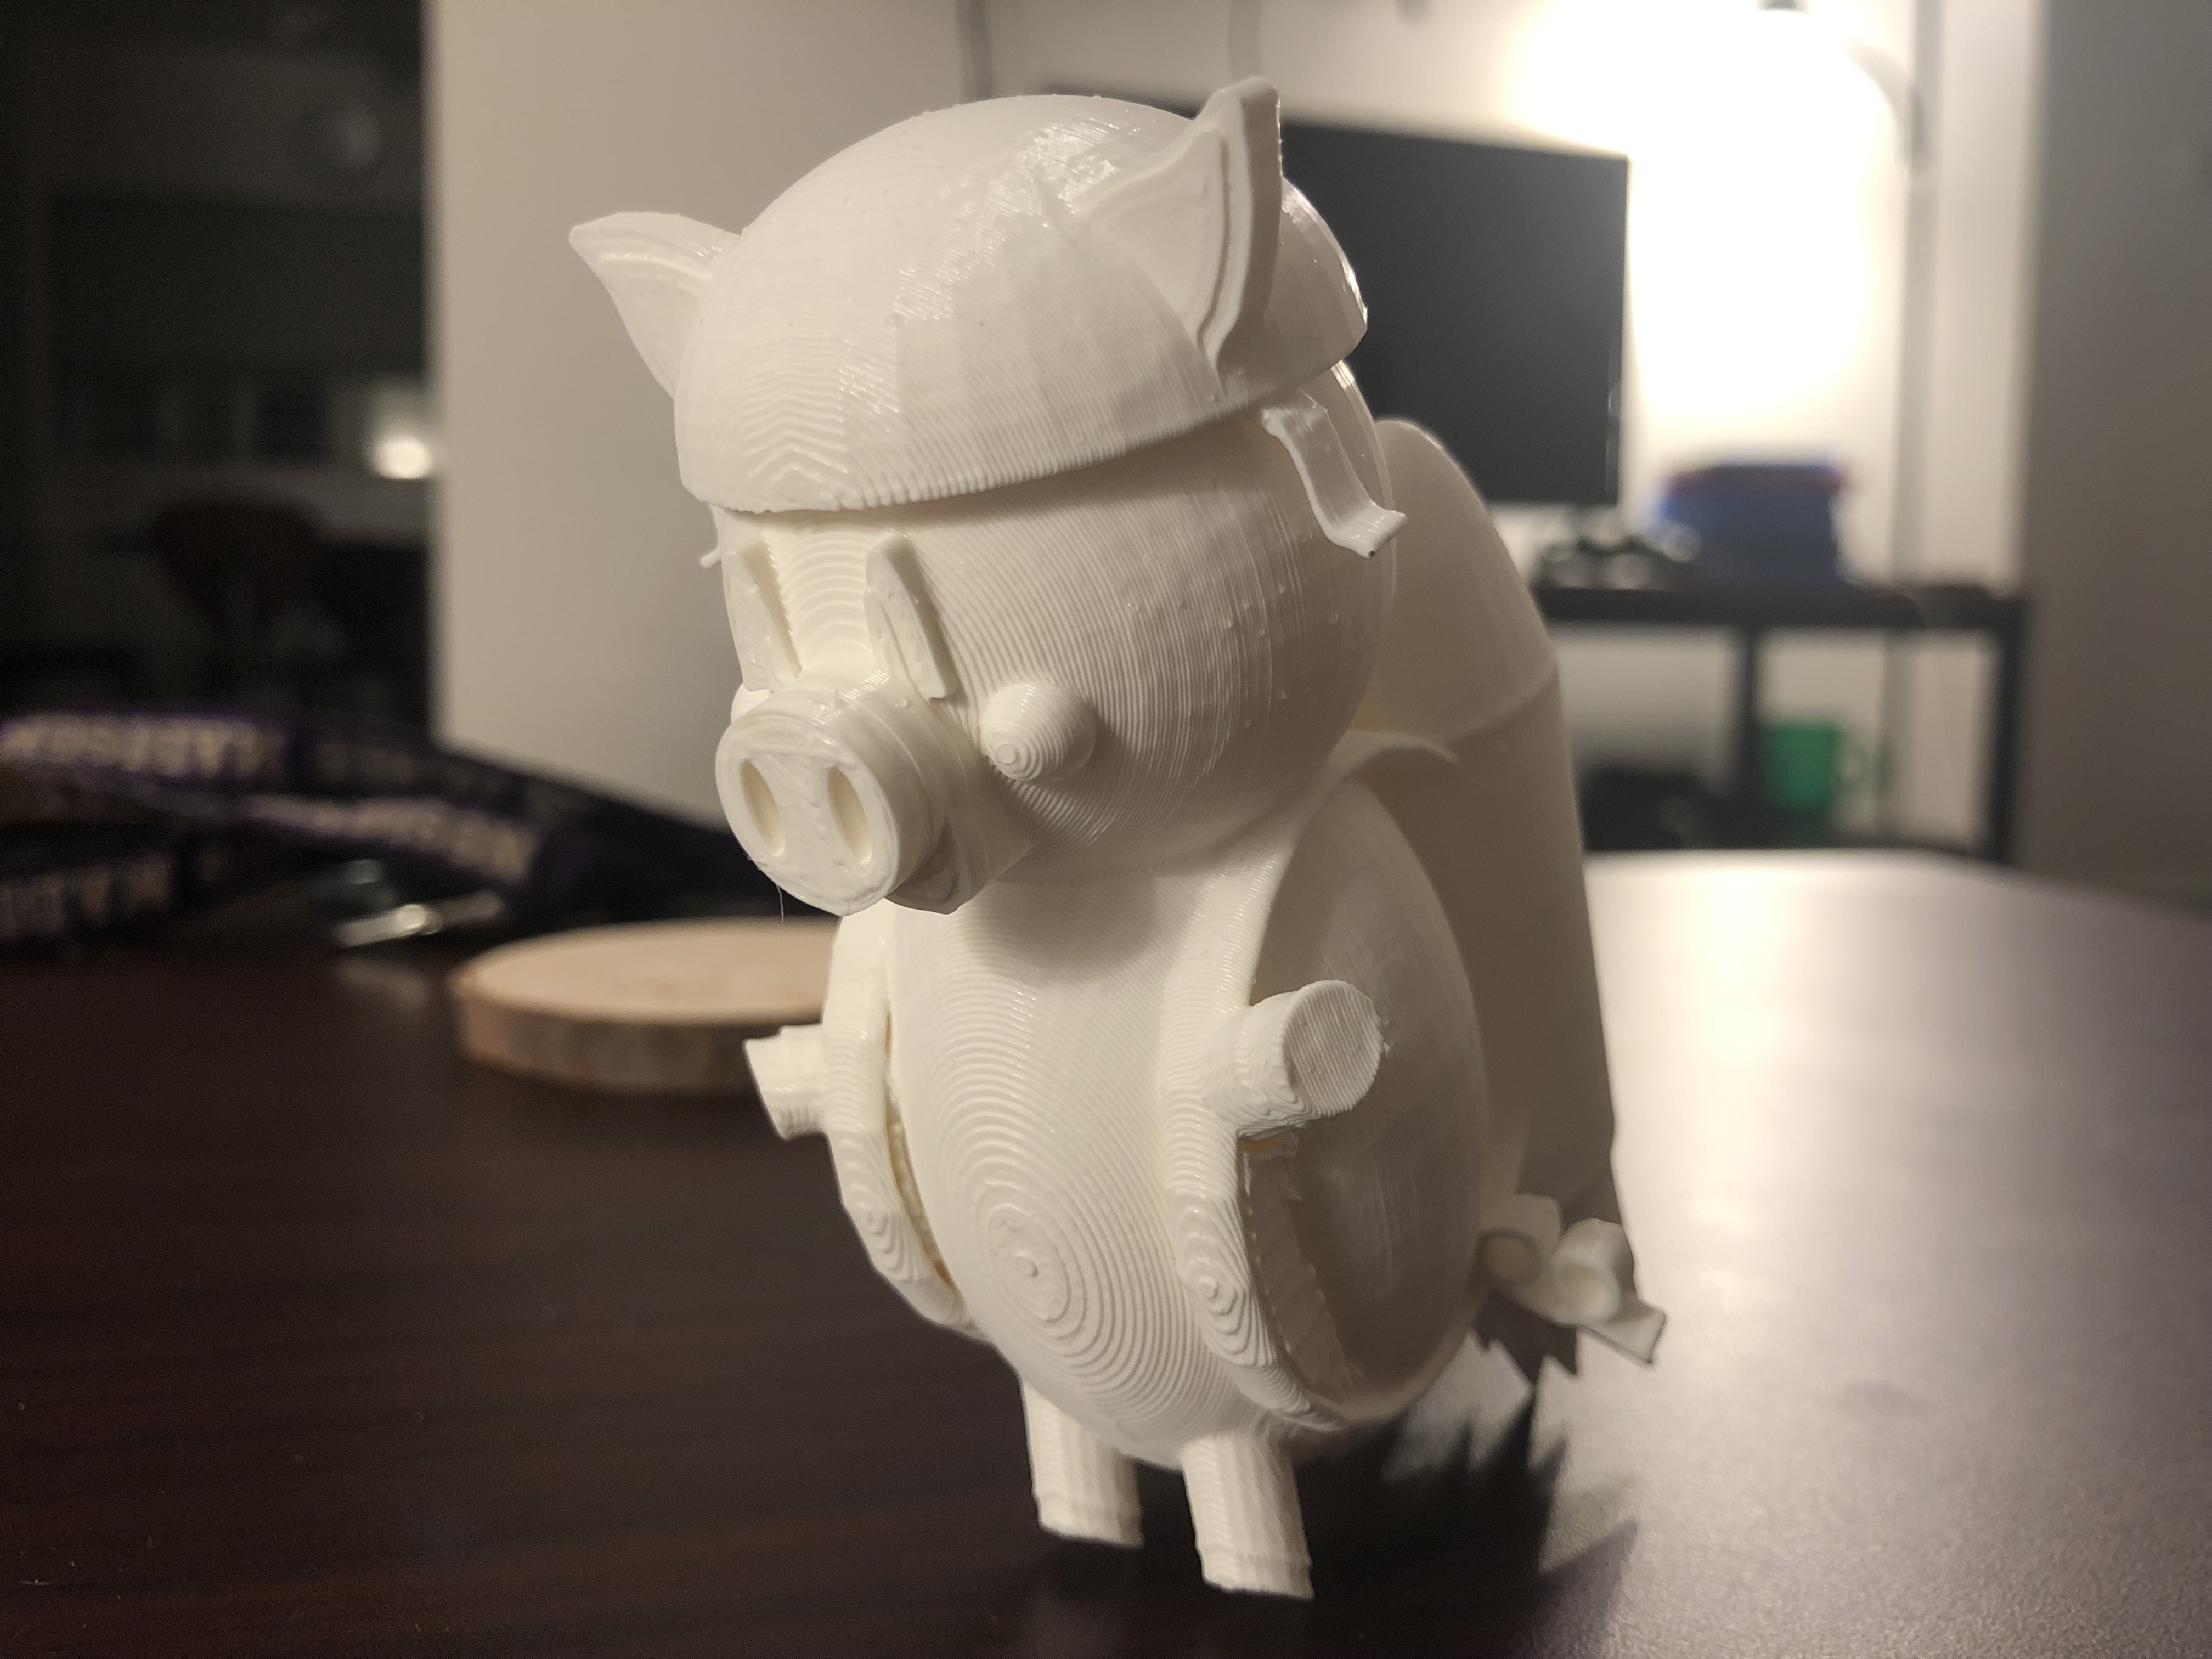
- Title of Printing: Flying Pig
- Group partner – Chris Traynor
- We used Tinkercad tools to create a design of our flying pig model. We used some basic tools to create the head of the pig, the body of the pig and jetpack. But we also have to use scrabble tool to draw ears and tail of the pig. This model is the cartoon character.
- The picture above is the final print of the model and it printed successfully. One thing to keep in mind when printing is to generate support so that pig’s ears and tail will not fall down.
- https://geekhaus.com/isci104_spring2019/2019/01/15/flying-pig-3d-print/
- https://www.thingiverse.com/thing:3377810
20 Forms in Fusion 360
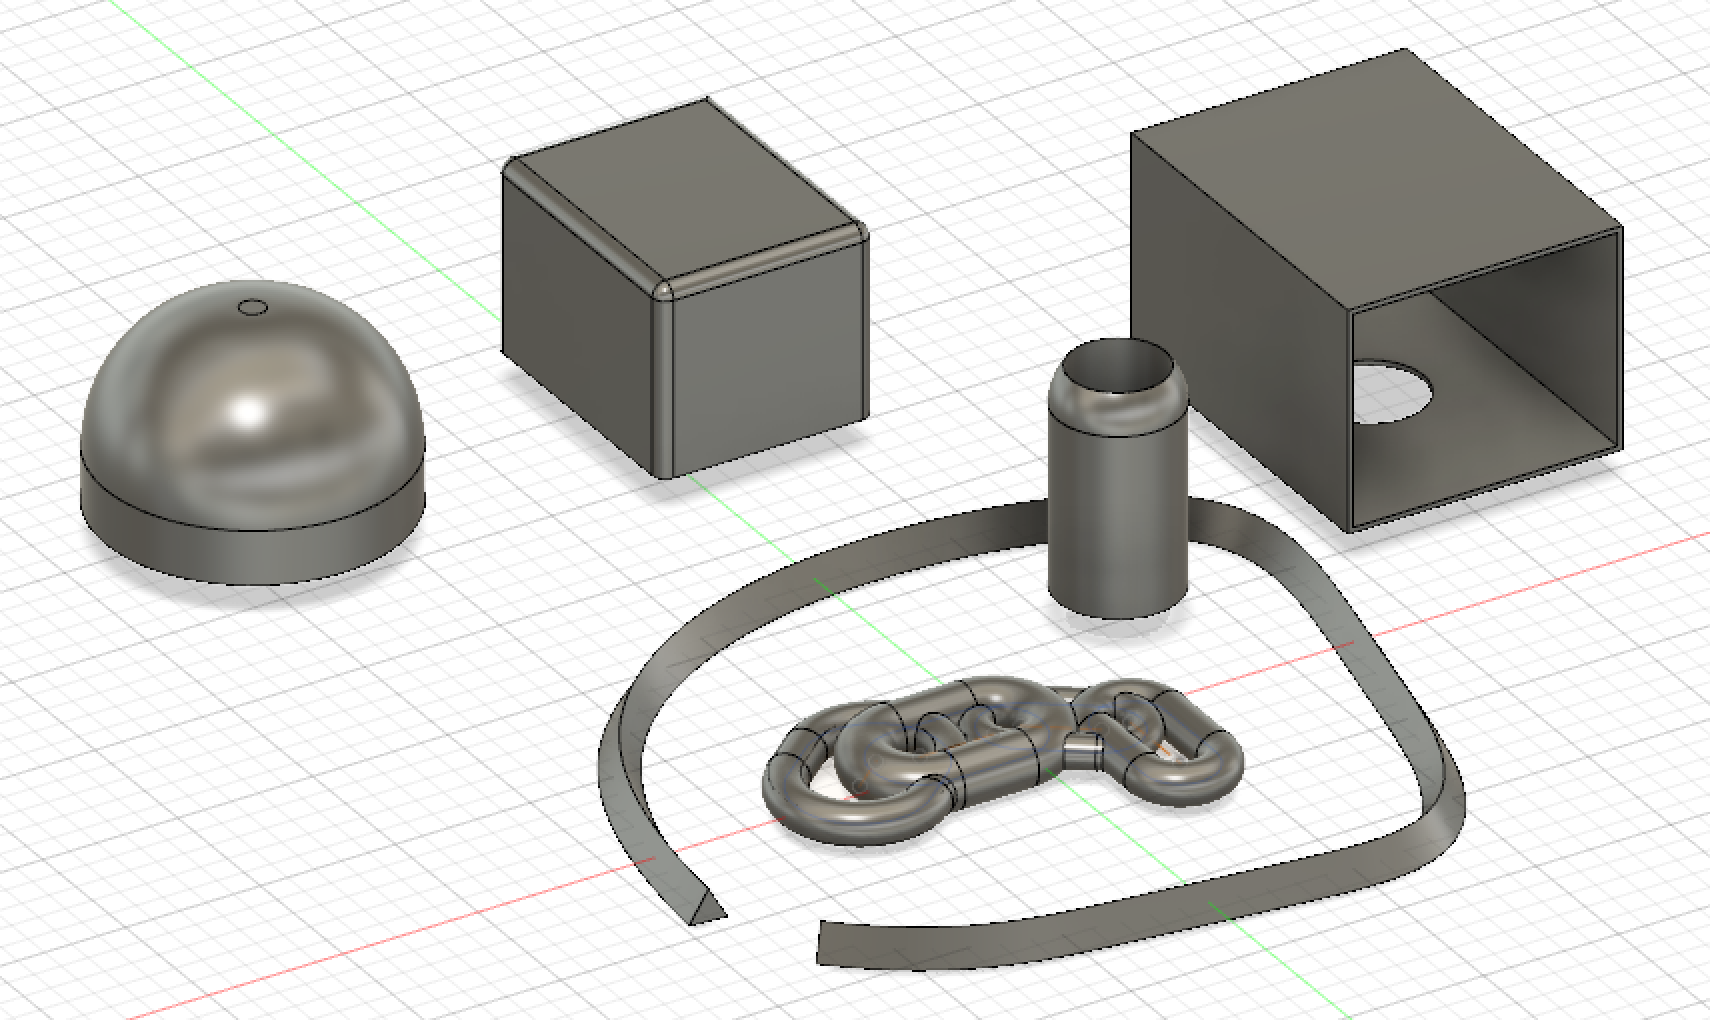
Left to right and up to down
- The first picture first created a cylinder and then used a fillet feature to get it. If we do not want to use fillet, we can also put the ball shape on the top of it.
- It is just a rectangular box (used fillet) to change the corner of the box.
- Triangular line: I used the sketch(fit point spline) to create it and form it into pipe shape.
- Created cylinder and then used fillet the top surface feature and look like cup.
- Created four sketch(slot) and created pipe and look like chain
- Created the rectangular box and used shell to make like an open box. Then cut circle hole in the box by adding circle.
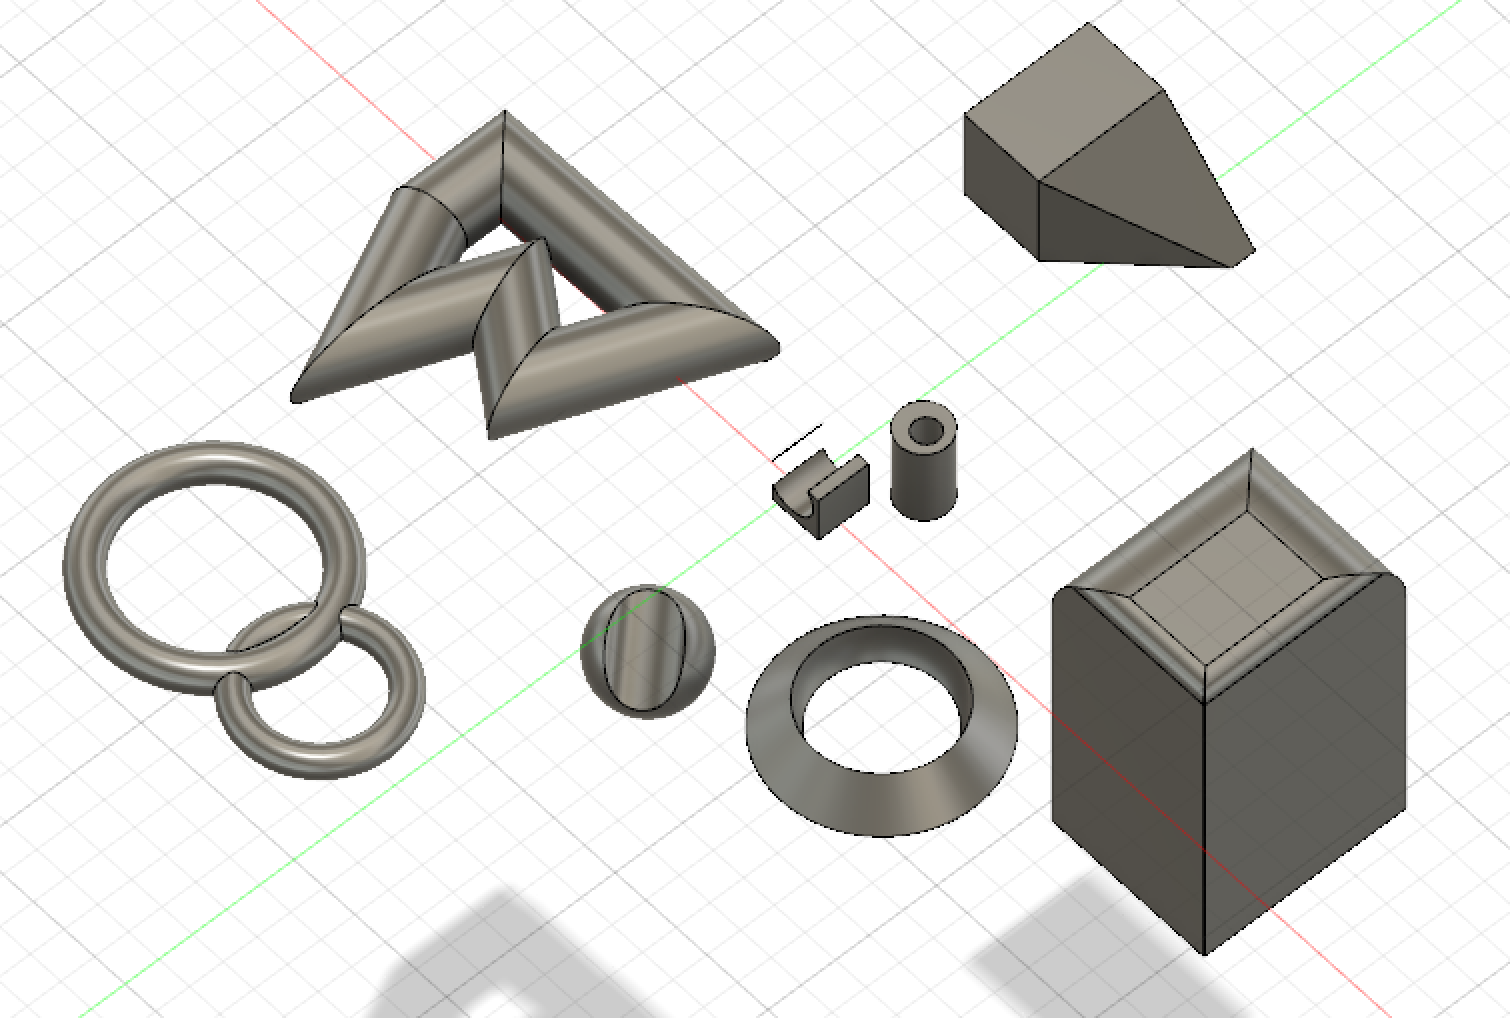
- Two pipe connected to each other and look like 8(in reverse).
- Used sketch to draw some triangle shape and used the pipe function from “create”.
- Created the circle and cut out the cylinder.
- Created small box and cut out the cylinder in horizontal.
- Created rectangle and used chamber, it will look like house if it is in vertical.
- Get cylinder shape, used fillet and cut out the middle part by placing with round ball.

- Small box with hole (using cylinder) to cut it out. There is also another way to do it, which is using the hole function. By using that function, it is more easier and user friendly. As this last screenshot was made first we can see most simple figures in this screenshoot
- First created the coil and out the ball inside the coil.
- Used thread on the cylinder to see line on the cylinder.
- Donut shape (used torus) to create this model
- It is just the rectangle shape
Note: The first one was made at last and the last picture was made at first. I think that I see some improvement after and after (but not a lot). I still need to learn how to use the Loft; I cannot used loft because, it is showing error as my two sketch are on the same surface. I did not figure out how to make the sketch in the higher surface level.
Fusion 360 Print

- I printed the chain, one of my forms from Fusion 360 design above. As the chain is designed on the flat surface, I thought it will print flat on the surface. But when I exported as .stl and imported to the pinter software, it changes to vertical, so I need to generate support. As I waited to see my printing, it was going well, but later near the end, the line becomes a little bit messy. Therefore, the print is not quite successful. If I have spare time, I might reprint it and believe that it can be printed successfully.
Fusion 360 Vase Design


Star-shaped Vase
- In order to create a star-shaped base, we need to follow the following procedure
- First of all, the base of the vase has been created using the circle sketch tool. Then from the construct tab used the off set plane to add another layer above the circle. We can adjust the height of how much we want to set. In the first picture, I set 100mm from base to the middle plane. Then created the sketch using Fit point spline tool to create some wavy shape.
- The top plane has been added again 100 mm from the middle plane and created a star shape.
- Then used the loft function to connect all the sketch from the three plane. One important thing to remember is that, when using the loft function, we have to start from the plane which we created first. (for example: base circle plane in this design)
- After using the loft tool, we will see the second picture. We can also go beyond from the video by designing the vase with more off set plane but in this design only use three off set planes worrying that it will sharpen the edges if the vase. But I created the star-shape for the top part of the vase instead of regular circle shape.
Fusion 360 Vase Prints
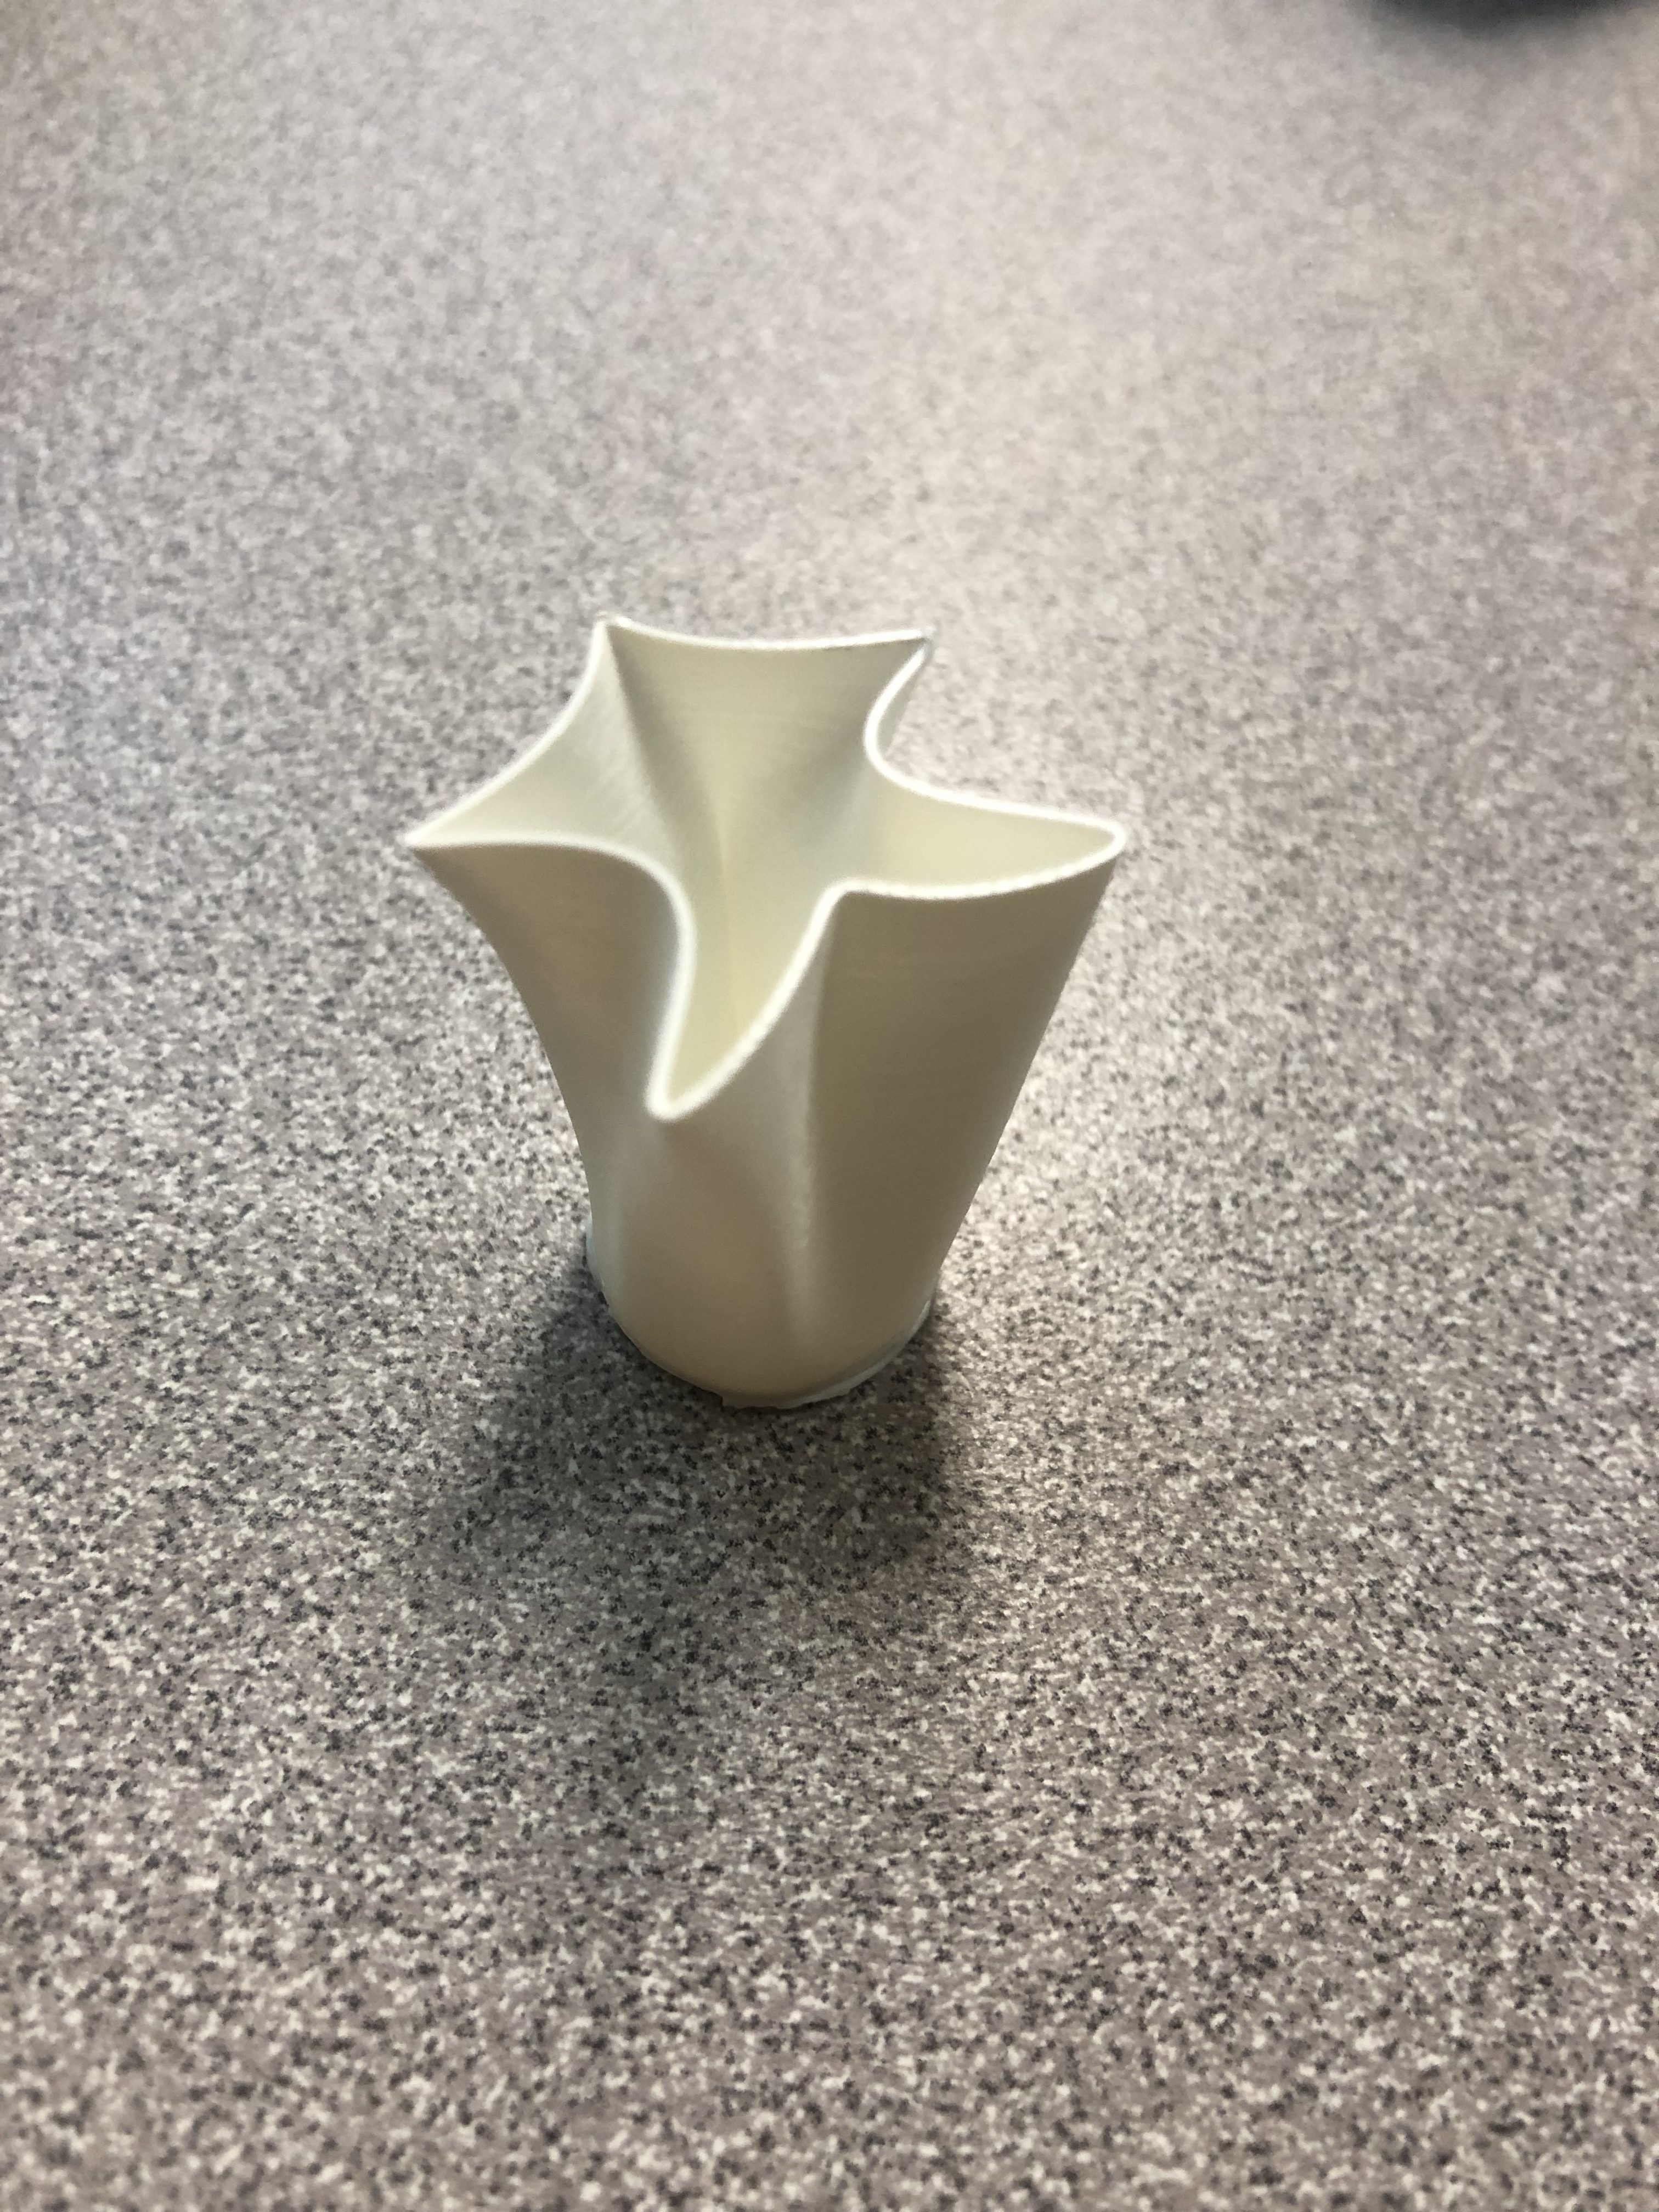
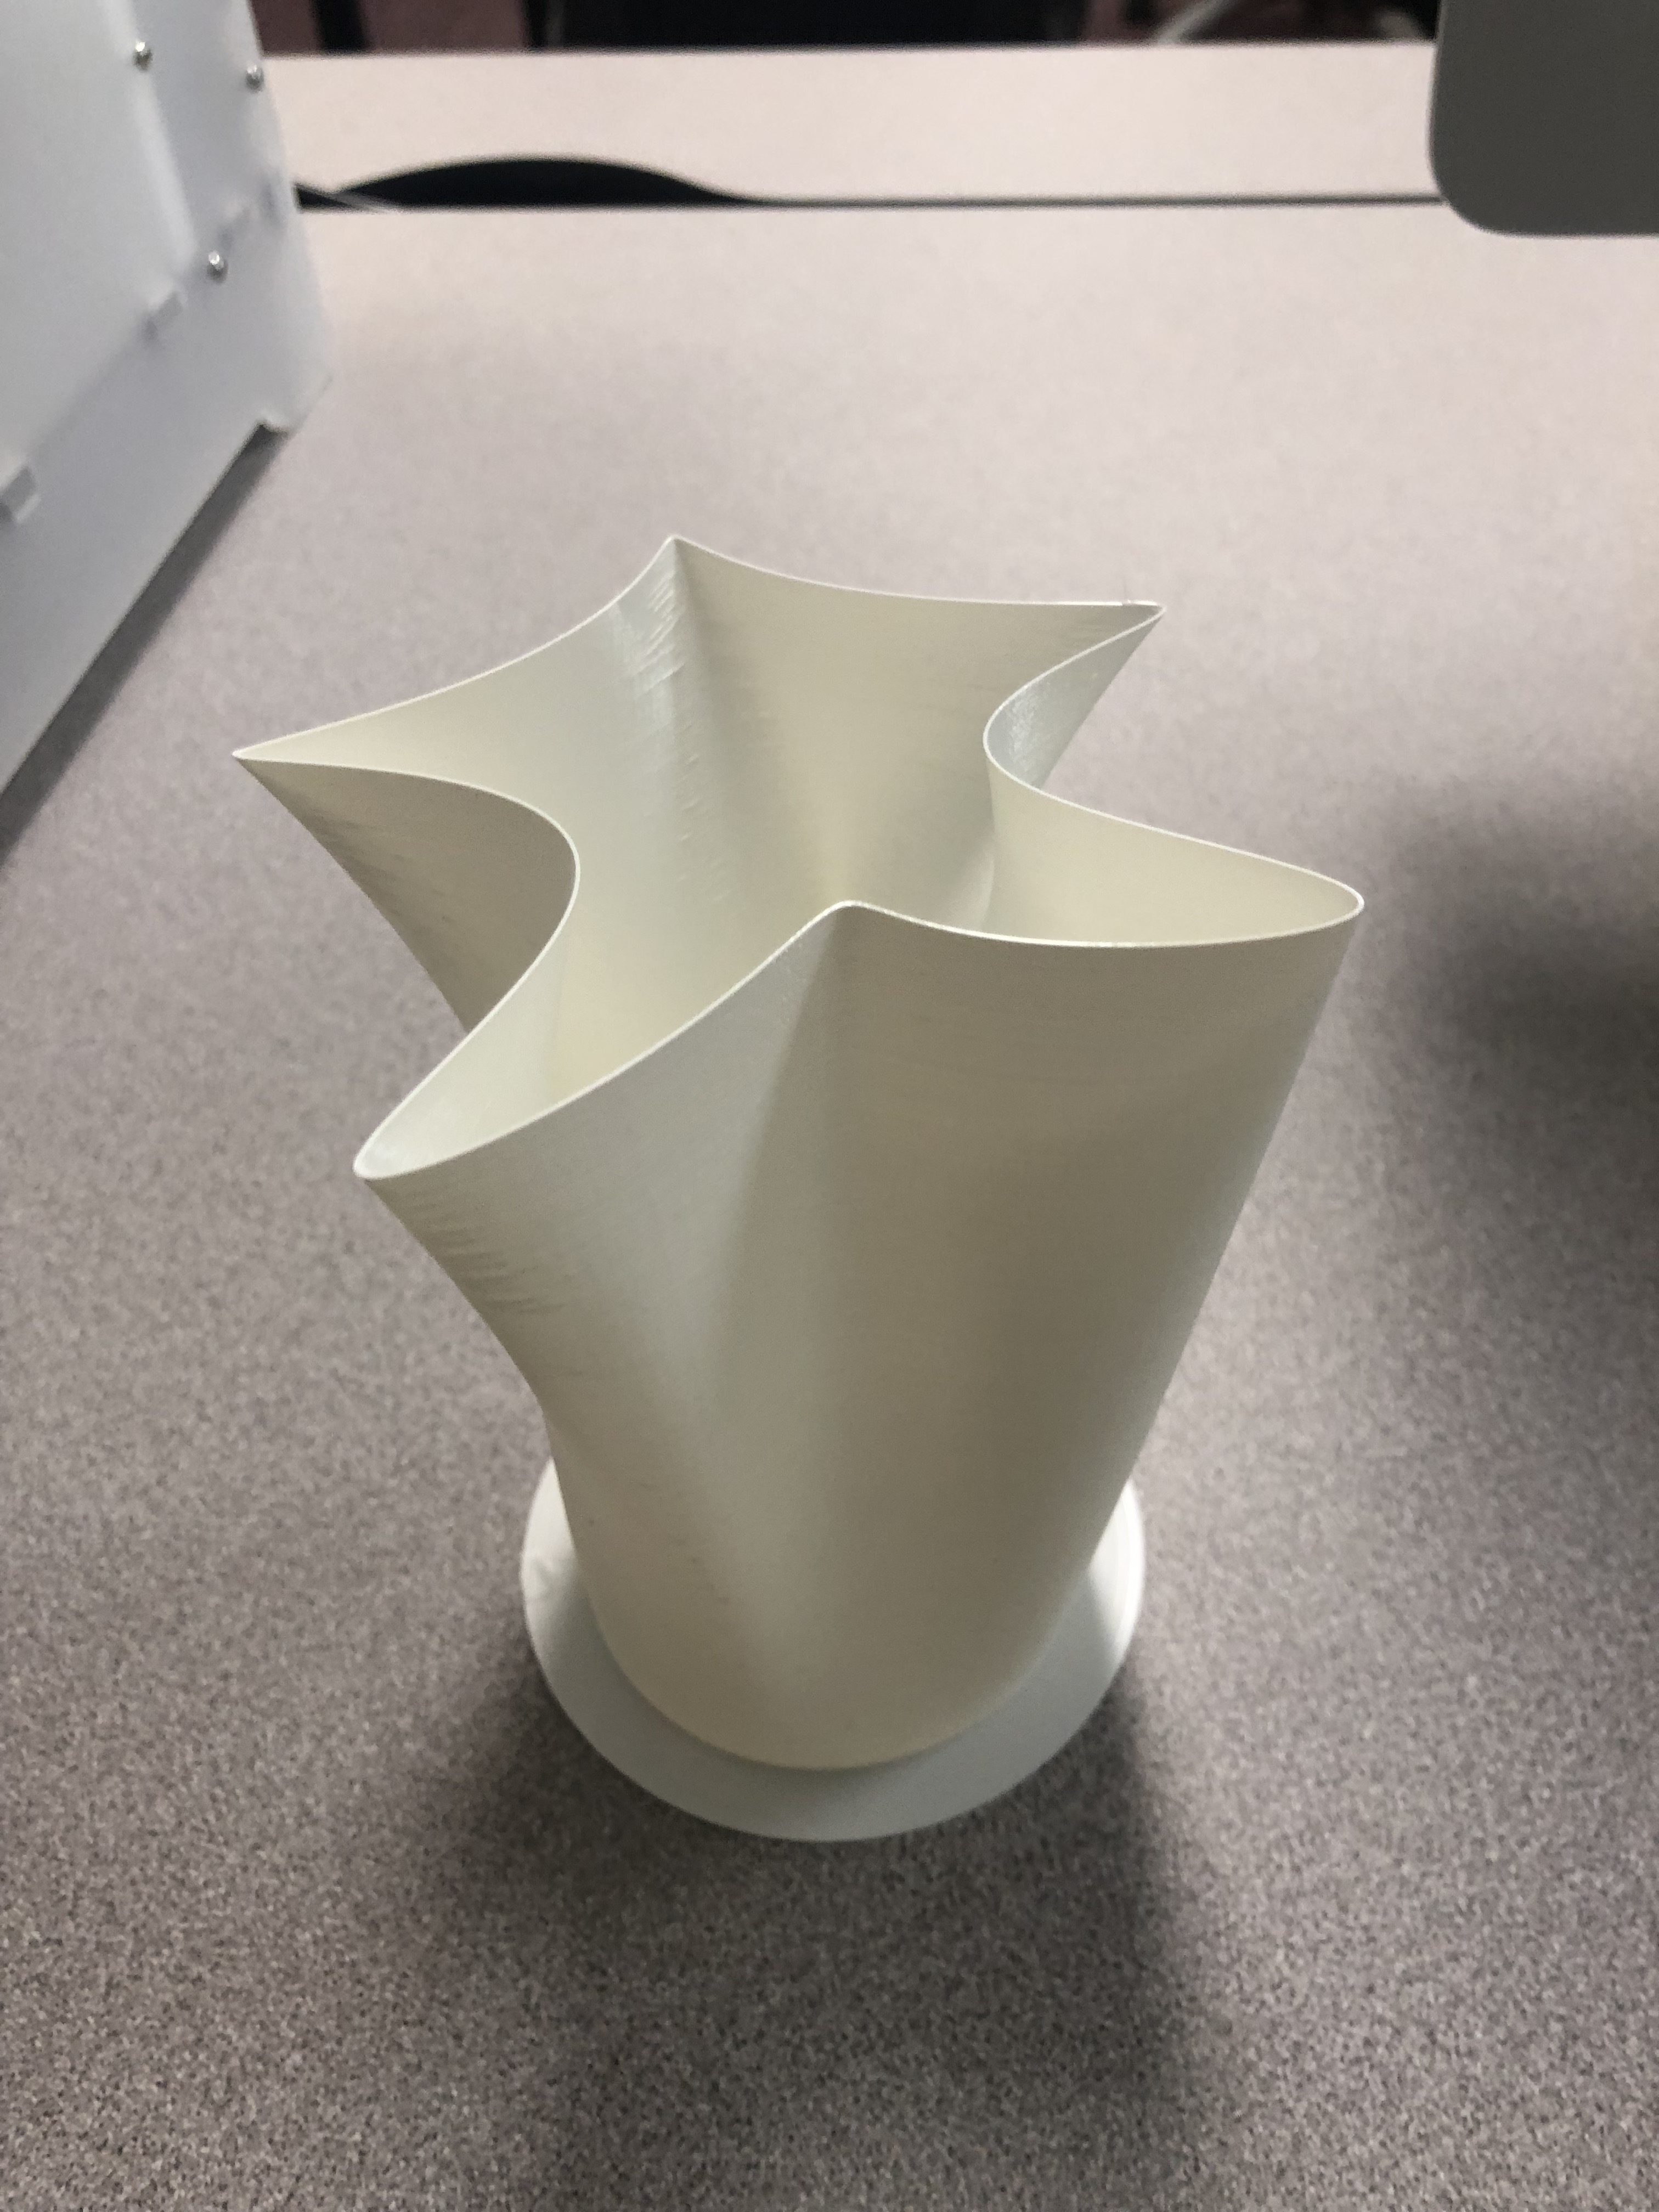
- The first picture is the print of small vase demo, testing whether the model printed successfully or not. It printed successfully as we can see above.
- The second picture is the final print of the vase. It is the exact same vase as the demo but larger in size. It also printed successfully.
- Thingiverse Link
20 Forms in OpenSCAD

- The first picture is taken form the user manual of OpenSCAD but I modified the distance(translate) just to test. It came out pretty cool therefore, I included that in the forms.
- The second picture is the most basic form, using the sphere and cube(rectangle) and use the “difference” to cut out the cube part.
- The third picture created by using the “Extruding a Polygon” code, I put it because, it has new function “rotate_extrude”. To form this model. we have to make point first, there are six angles when drawing the 2D form (polygon), then we use “rotate_extrude” to get this picture. If we modified the points, the shape of polygon will change and overall shape will change too.
- The fourth picture is also create using “rotate_extrude” code, with the circle (r=1).
- The fifth picture is using the “center” and “union” to form the model. As we use (Center=true) before the another cylinder code, we will see this model.
- The sixth picture, vase is from the youtube tutorial and I modified the radius, base height, body twist, body flare and sides.
- The seventh picture has been generated when I was trying to figure out how to use the code “Loop” from the user manual. From this code, the got some basic idea how to change color of cube but with this code: {translate([x,y*5-10,z]} , I was confuse with the multiplication part in y. I change some color into (yellow, green, purple, black, red).
- The eighth picture is formed using the code, “intersection_for()”. I modified some number and rotate the (i) and change the cube (length, width, height) and make the model center (center=true).
- The ninth picture is the using vector of vectors form the user manual, I changed some degree of rotation and the cube size.
** All the codes except vase were copied and make a few changes form user manual**
From these pictures above, I learned how some codes work, therefore I wrote some codes by myself in the second picture.
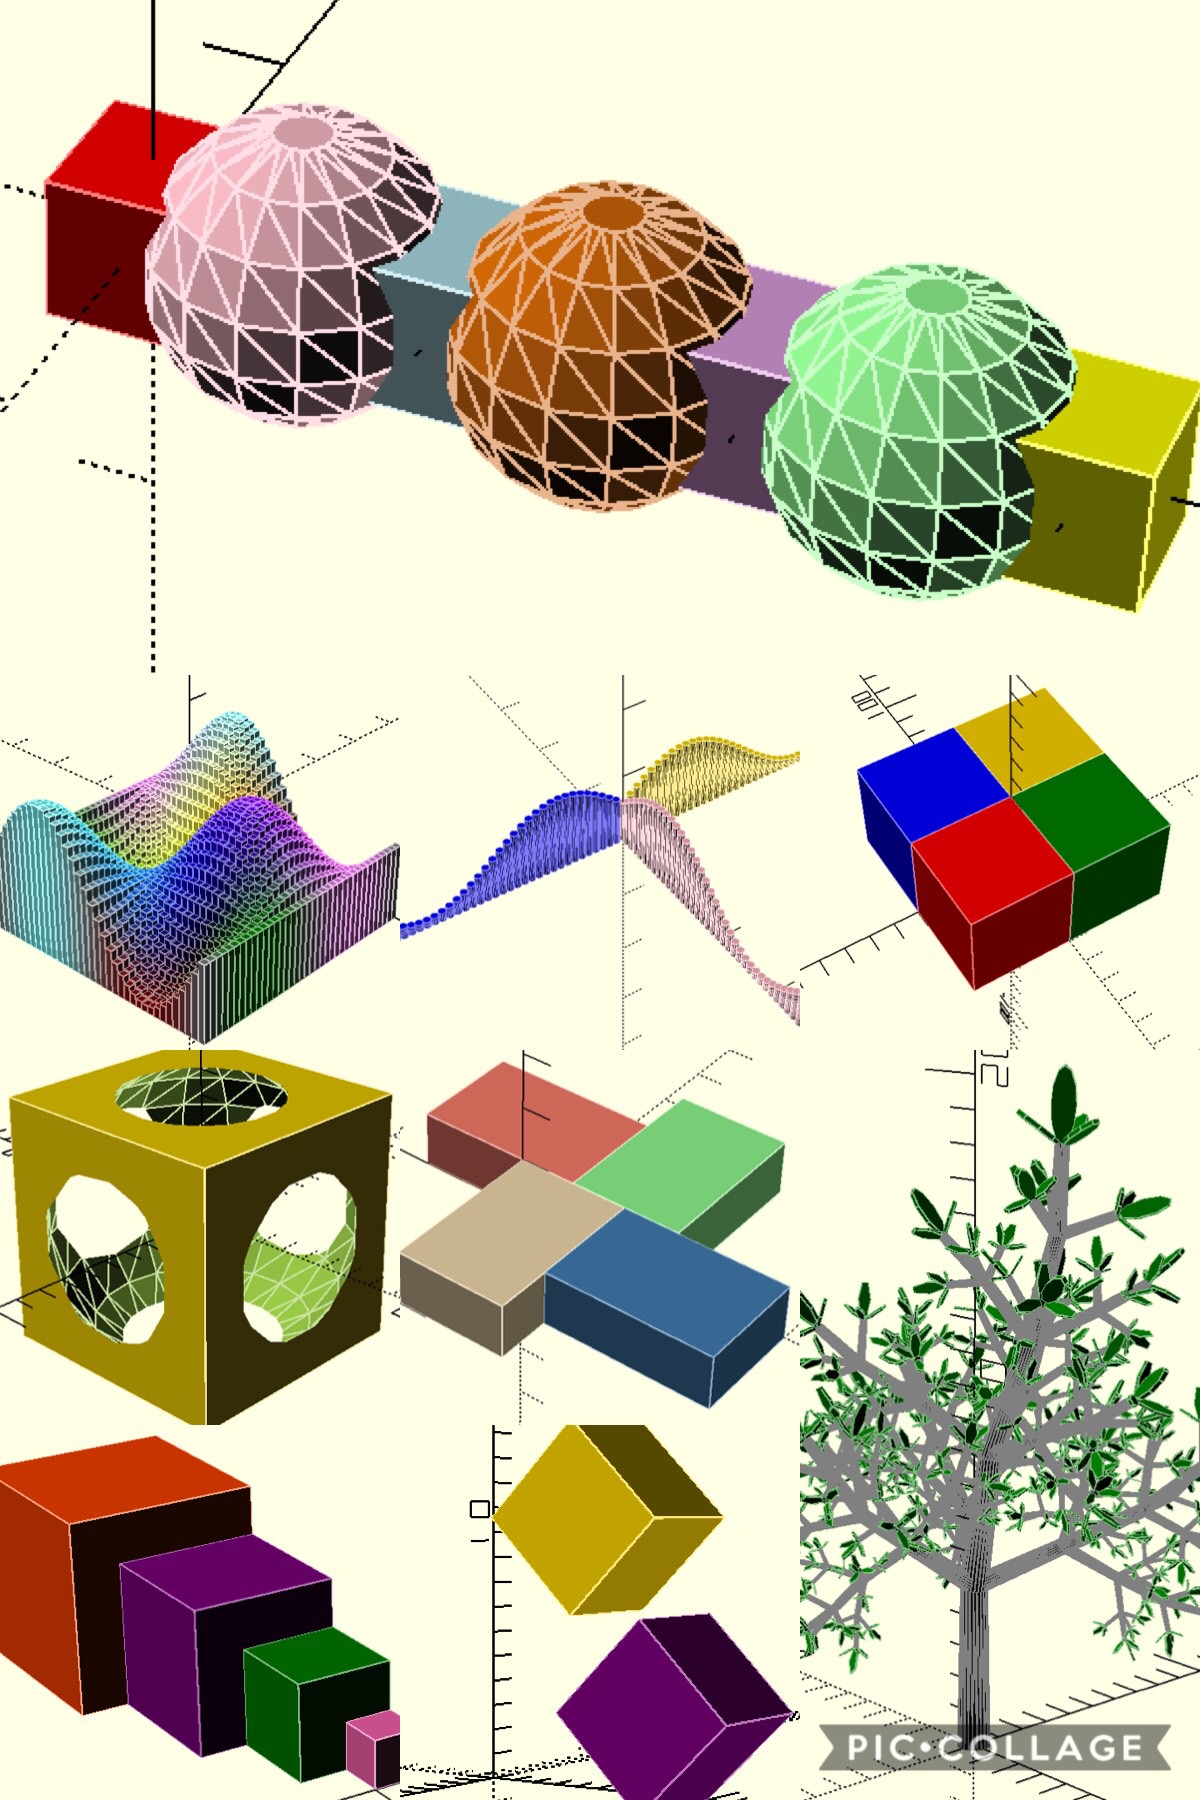
- The first picture’s code is written by myself. It is very simple. While doing some forms for the very first screenshot, I learned how to use the “translate”code works. I also use the different colors for sphere and cube. I used some new colors like “palegreen” and others . that we can find in the user manual.
- The second picture’s code is from the user manual and I put it because it is interesting and looks cool. The code use some sin and cos function in varying the color, cube to form a 3-D multicolor sine wave.
- For the third picture, I used the Sin function with cylinder to get the one form first then I rotate the other two and add colors.
- This fourth picture’s code is written by myself. I used the cube, color, rotate to get this form.
- The fifth picture has the idea of how to create a penny trap. I used the cube and sphere function and make it center. Then I used the “difference” to cut out the sphere part.
- For the sixth picture, I used the code “mirror, rotate, translate” to create the model. I also used new colors from the user manual.
- The seventh picture is created with four cube with its respective size, using translate and color to get this model.
- The eight picture is the two cube, using rotate, translate and color code.
- The last picture, tree, is created by using the code from the user manual. I modified the color of leave into green and tree trunk to black.
** I created all model separately and collage with the application. Although I know how to use the translate code, it is challenging to combine a few models in one picture, therefore, I screenshot individually and put into one picture. **

- I used the code from the user manual and add different color to each polygon. From this. I got better understanding of the code “translate”
- One thing I learned form creating these form is that it is mostly base on (x,y,z) axis and we need to do some math especially when using the code “translate”.
- It is very challenging when I first used the code and I have no idea about the code. As it goes on I have some basic understanding and idea of how it works.
OpenSCAD Print
- I printed one of the forms that I created with the OpenSCAD, which is the one shown in above. The code was created by myself and it printed beautifully and successfully on my fist trial.
Summary of Group OpenSCAD Project
Title – Desk Accessory
Partner – Chris Traynor
https://geekhaus.com/isci104_spring2019/2019/02/12/openscad-project-outline-2/
- This project is different from the project that we did before. We have to code in openSCAD and had additional customizer in Thingiverse so that people can create their own desk accessory by simply changing some variables such as length and width of an object.
- From the printing above, it is the Mario cartoon, but it can easily change the cartoon character. The poly bowl in the middle can be customized too! We believe that this desk accessory can be very useful to put on the office desk.
- I learned a lot from this project and preferred openSCAD compared to fusion 360.
Reflections and Future Projects
- From this 3D printing class, I have learned new materials and got hands on experience with 3D printer and software. I really liked to play around with the software and try new stuffs. I do not regret taking this 3D printing class. Although we have assignment due every class, I have managed successfully to complete all my assignment.
- In the future, I really want to have my own 3D printer. So that I can create new models and play around with other 3D software. As I am graduating, I wont be able to use the campus 3D printing, thats one of the reason I want to have my own 3D printer. Overall, this 3D printing class has been one of the greatest classes that I have taken in JMU.