Hello

Hello! I’m Ashley Boylan, and I’m from Leesburg, Virginia. I’m currently studying mathematics to become a high school math teacher. I love being around students and watching them realize they can be successful. I have 2 younger siblings – a 14 year old brother and a 17 year old sister. Sometimes they see me around their school since I’m work as a substitute teacher over the breaks.
I have no prior experience in 3D printing, so I’m really excited about taking this class. I’m looking forward to learn about these new technologies and designing things to print. I love seeing how technology evolves over time. Plus, I love creating and designing. My goals for the class are to successfully learn how to 3D print and have fun.
Thingiverse: aboylan97
Thingiverse Model
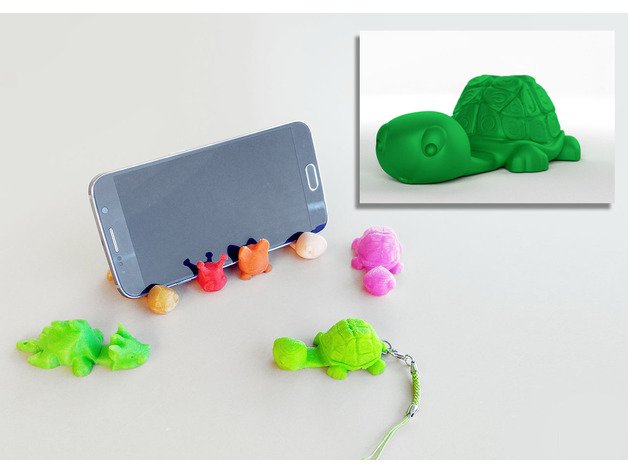
Title: Tortoise Keychain / Smartphone Stand
Designer: Shira
I like things that have a purpose. So, I can easily prop my phone up at night when it’s charging. Also, I could use it to watch videos while having it hold up my phone while I’m sitting at my desk or in bed. Plus, I think turtles are cute. So, I think it’ll be a nice accessory.
Thingiverse Print
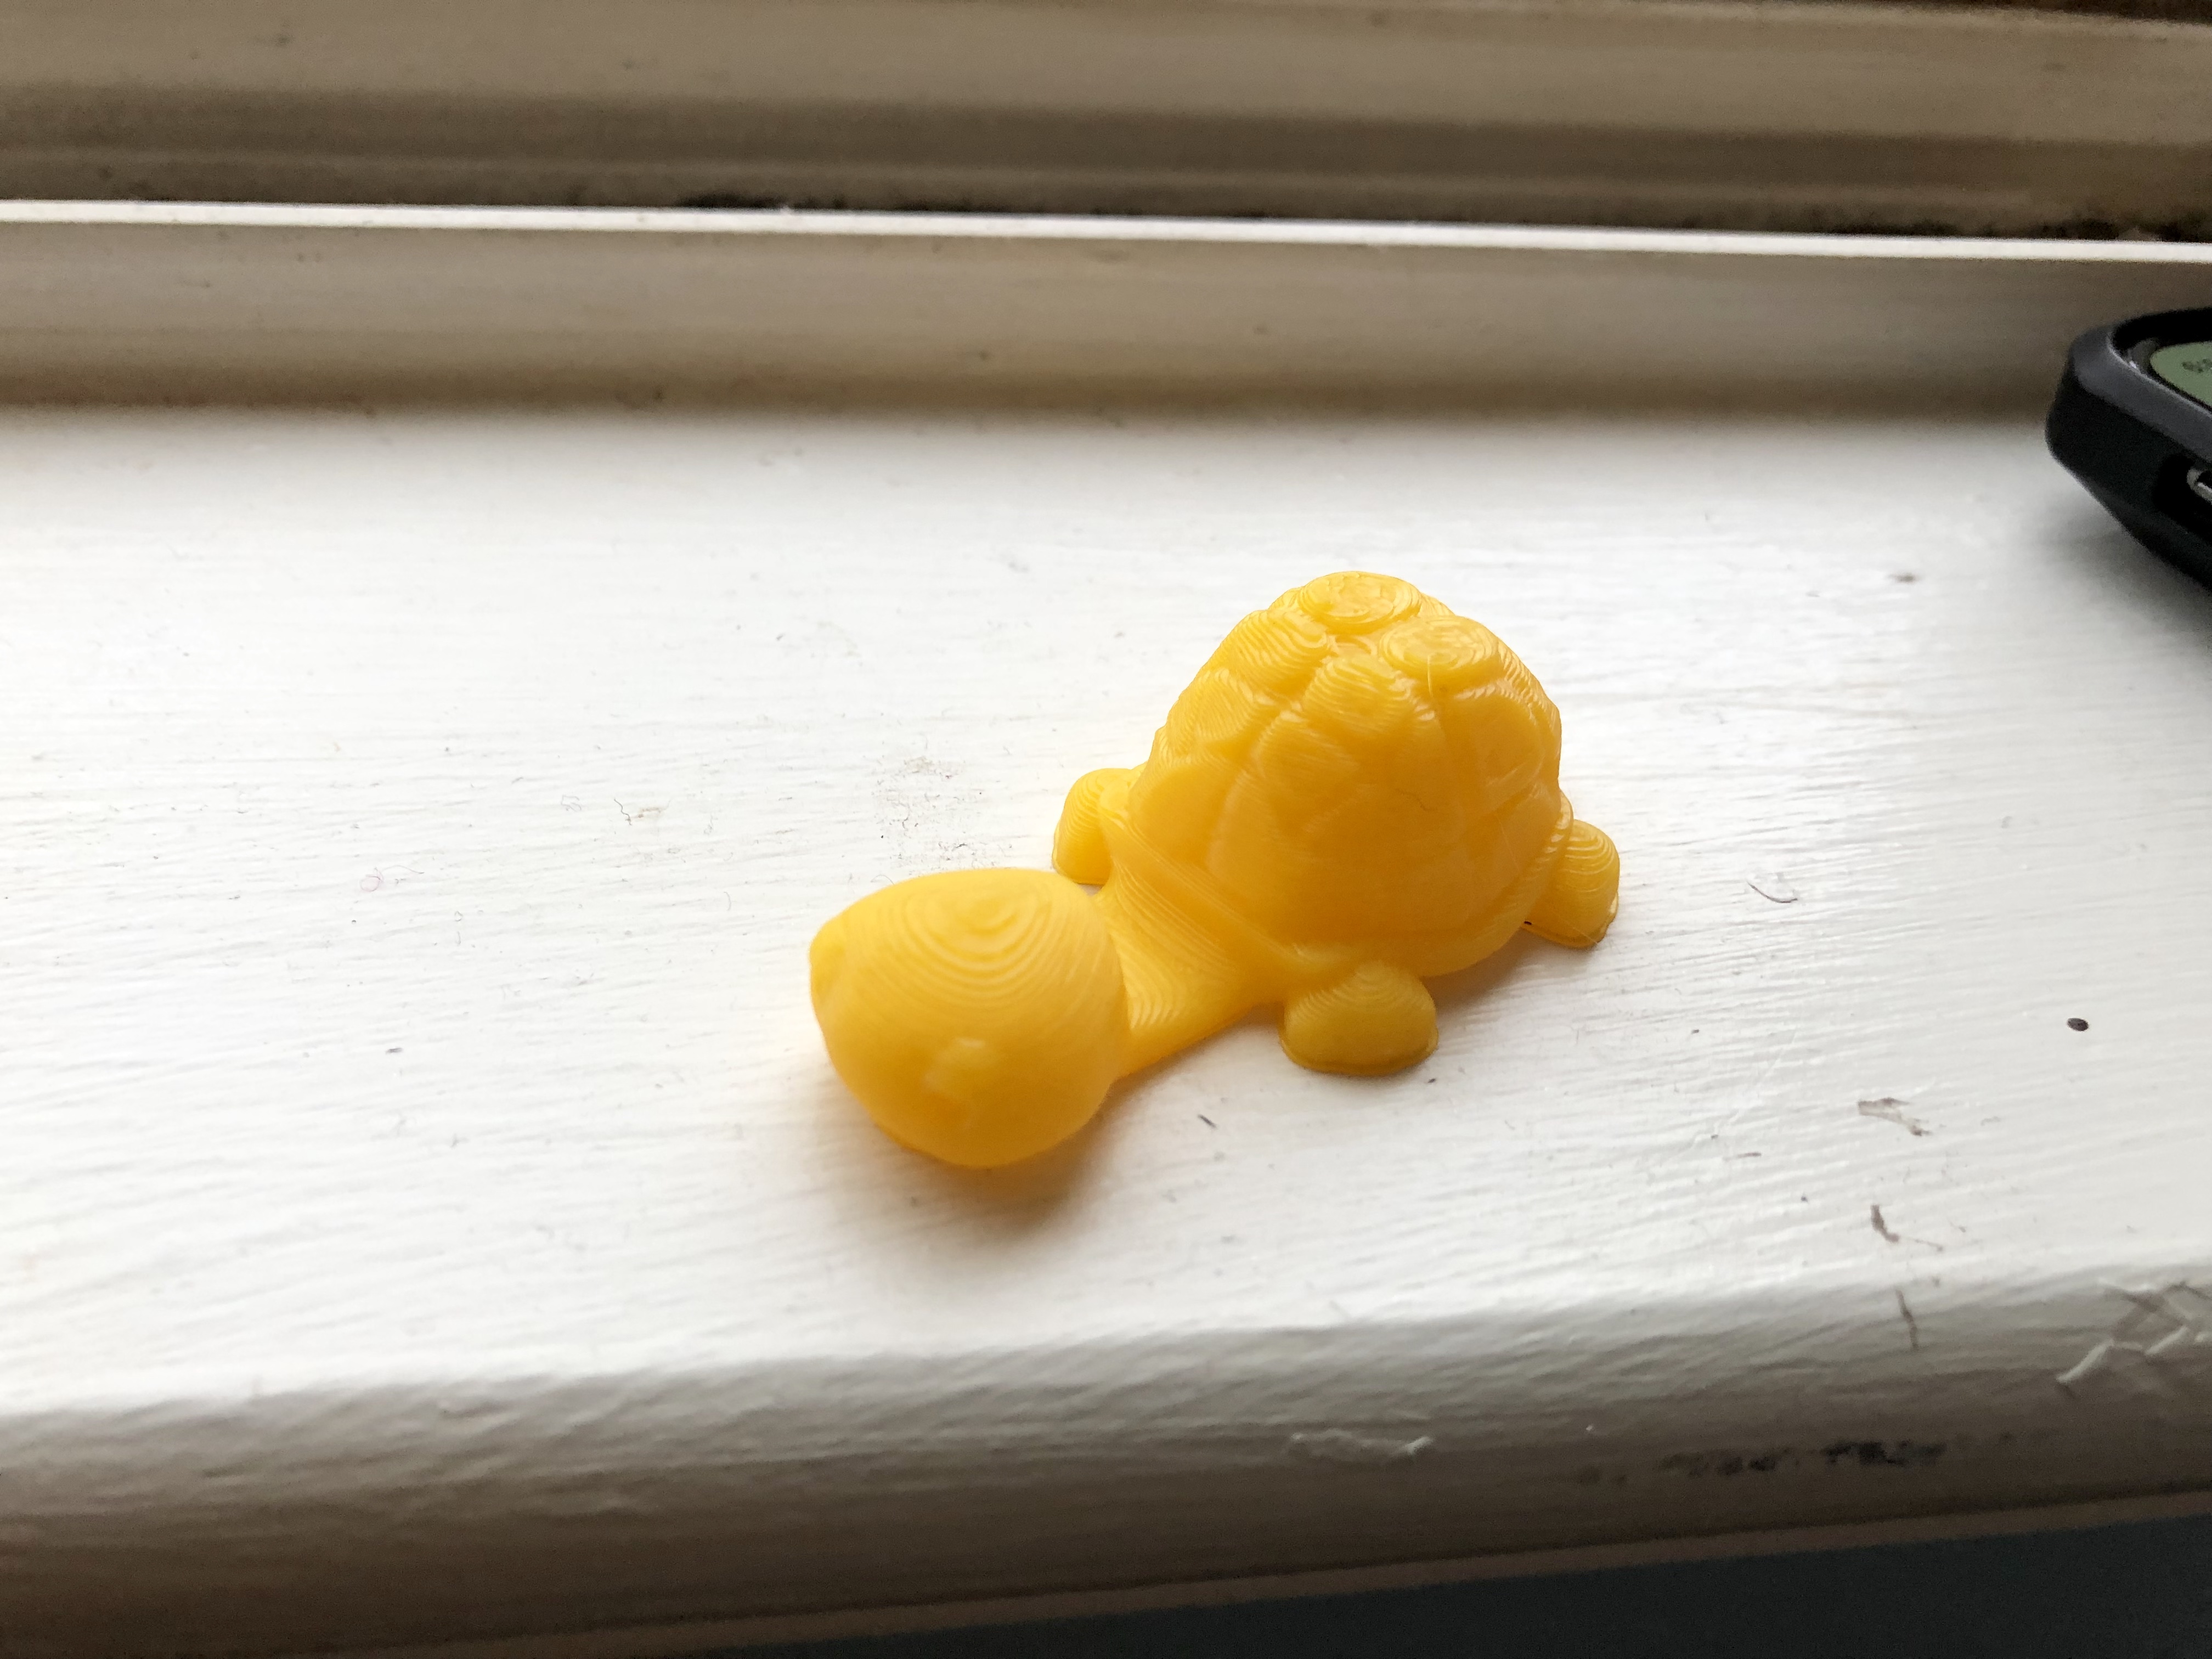
This 3D printed turtle keychain/smartphone stand printed really well. There was no complications when I was watching it print off today. I’m really happy with the way it turned out today. I ended up using it to hold my notecards instead of my intended purpose as a phone holder. I was amazed that even something this small took about an hour to print.
20 Forms in Tinkercad
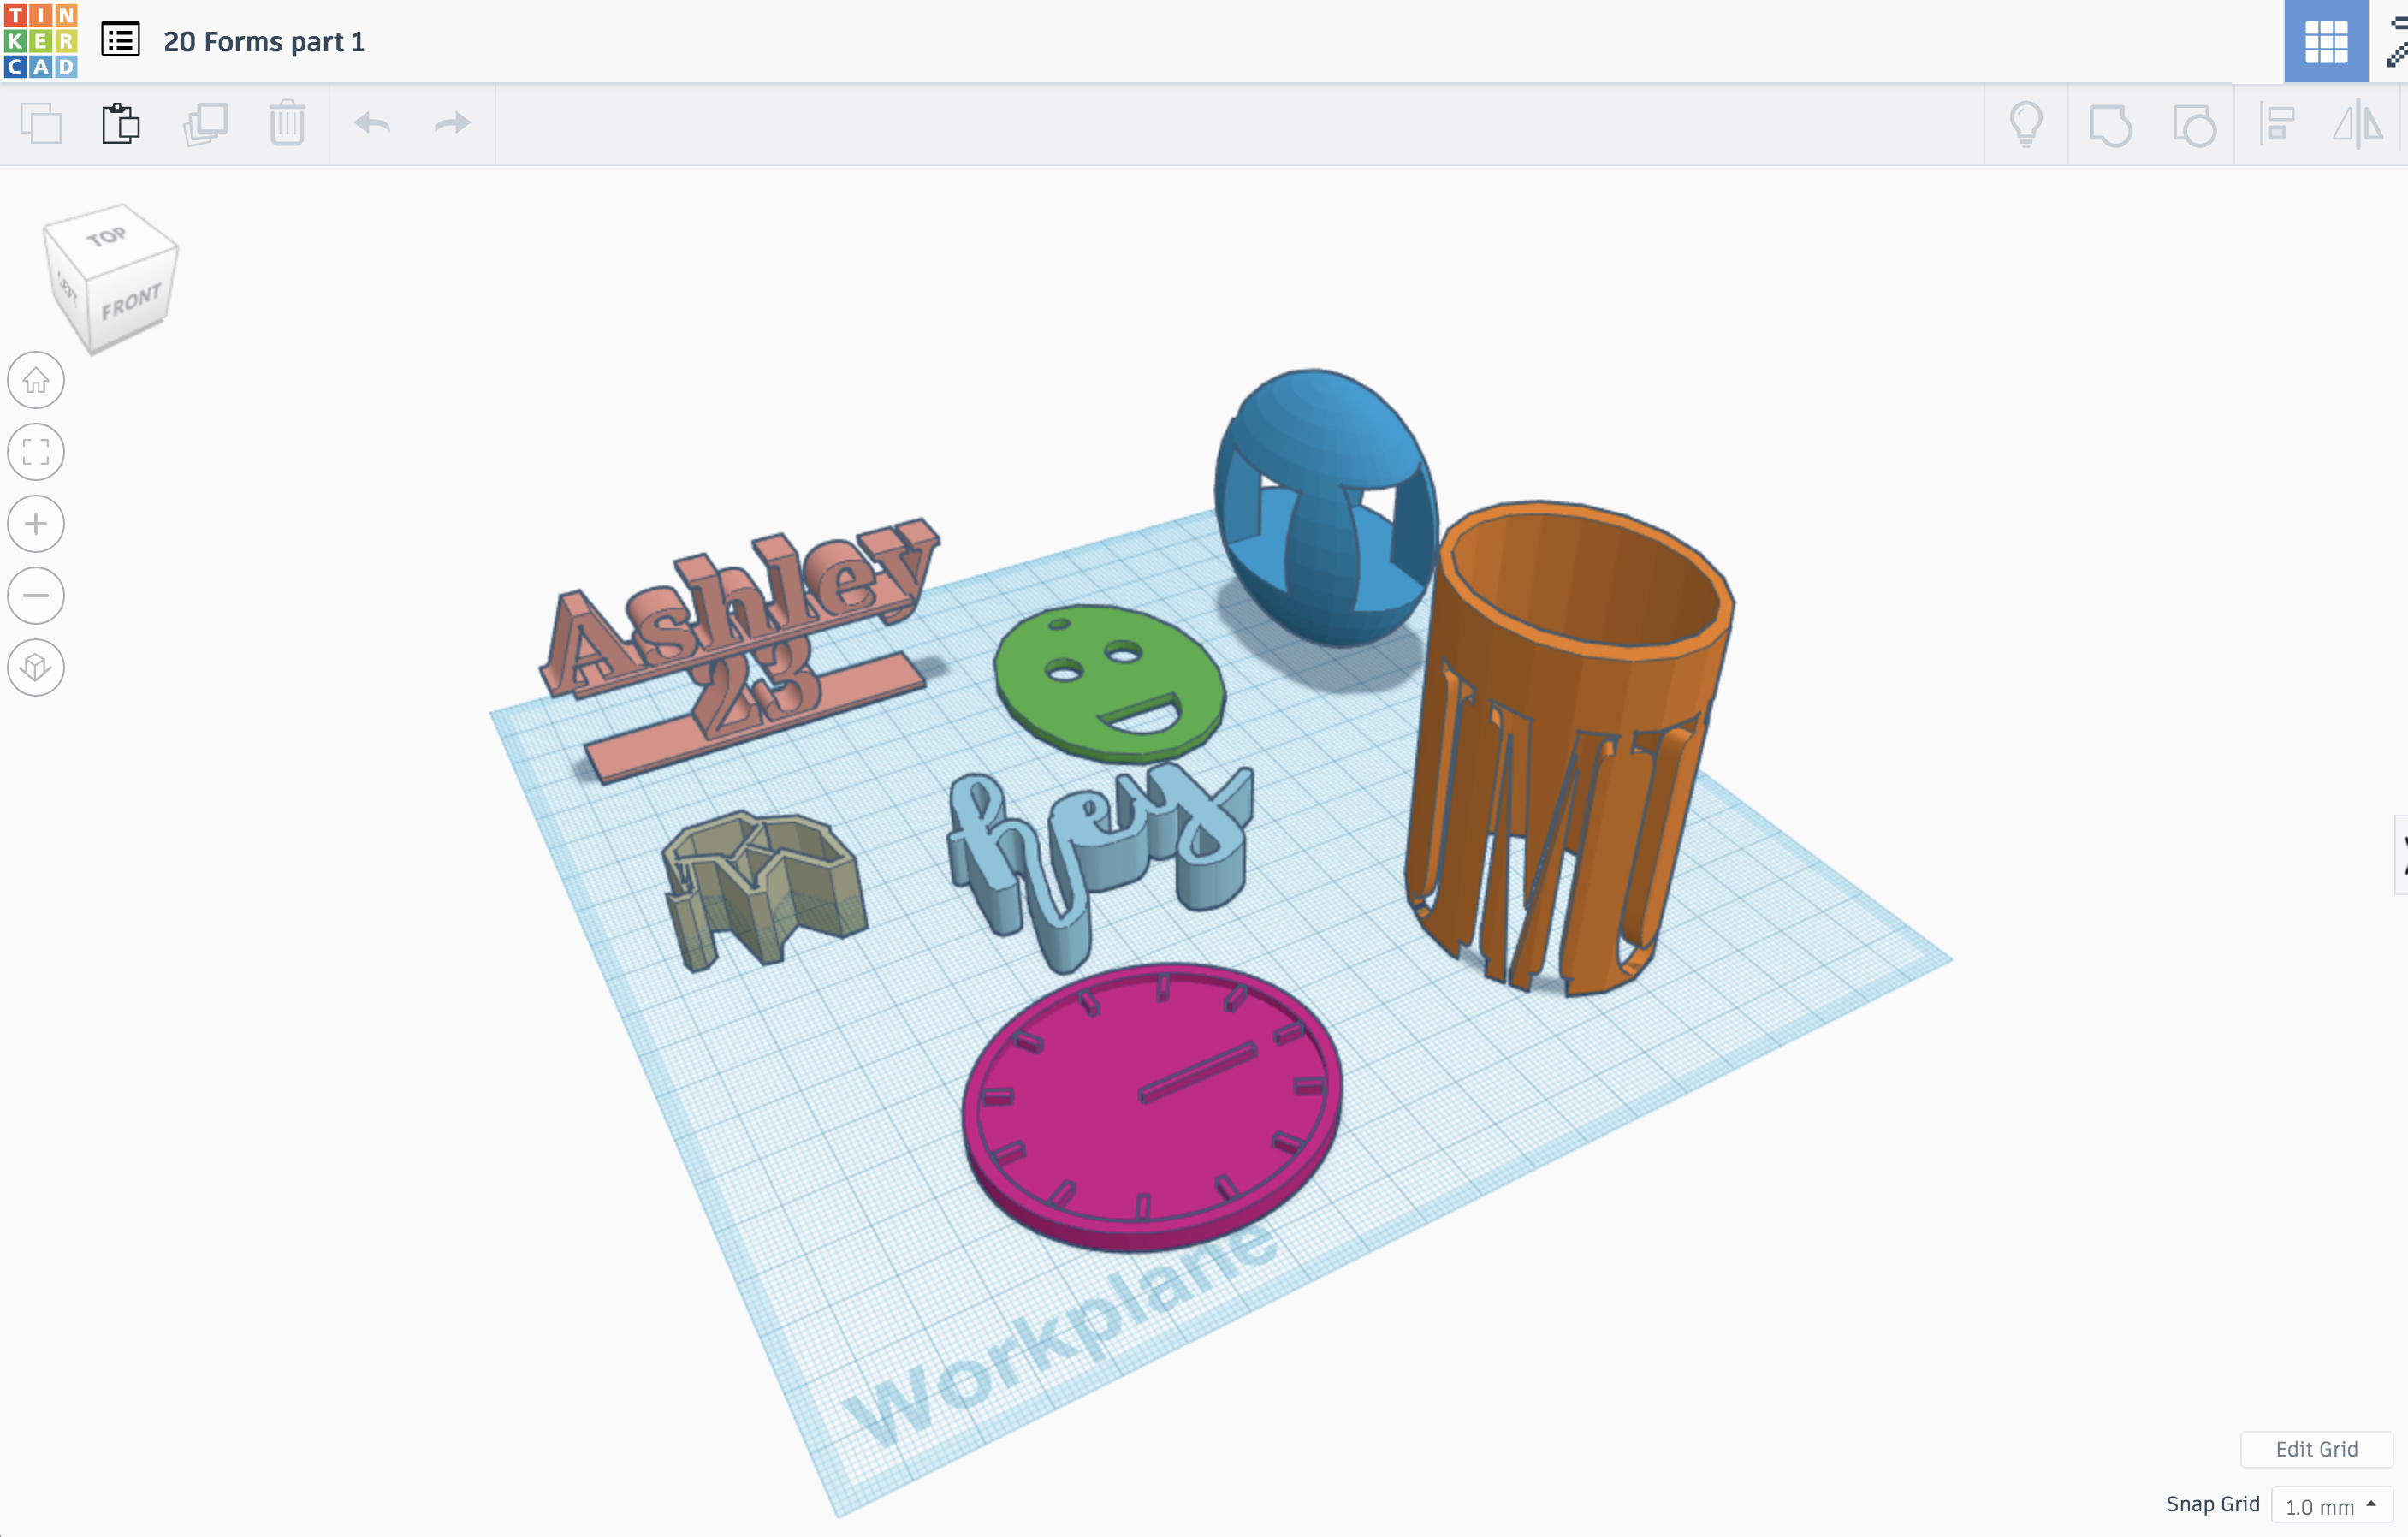

- Ashley 23 Figure: used Tinkercad to work with words and numbers to combine platforms
- used rectangular prism to use as base
- entered number above the base
- copy pasted the same rectangular prism above the number
- entered in my name above that
- Smiley Face Keychain: used Tinkercad to explore shapes (cylinders and half circles)
- first entered in cylinder to make face shape
- entered in another smaller cylinder for eye
- copy and pasted for second eye
- make keychain hole
- entered in half circle for the mouth
- Blue Sphere with Rectangles: used Tinkercad to work with sphere and rectangular prisms
- entered in sphere
- inserted another rectangular prism, which I then created as a hole
- did the exact same thing but at a perpendicular angle
- Elephant Figurine: inserted STL import “Elephant Necklace” from Thingiverse designed by VastaAesthetics
- downloaded file from Thingiverse
- import image on Thinkercad
- “Hey”: used Tinkercad to draw shape
- drew scribble figure in a cursive font
- JMU Cylinder: used Tinkercad to put JMU hole in cylinder
- Inserted Cylinder
- Inserted another cylinder inside of the previous cylinder to create a hole
- Used letters to create the holes that says JMU
- Clock Figurine: used Tinkercad code blocks
- used code block in Tinkercad to learn how to make a clock
- exported the clock file
- inserted into my designs
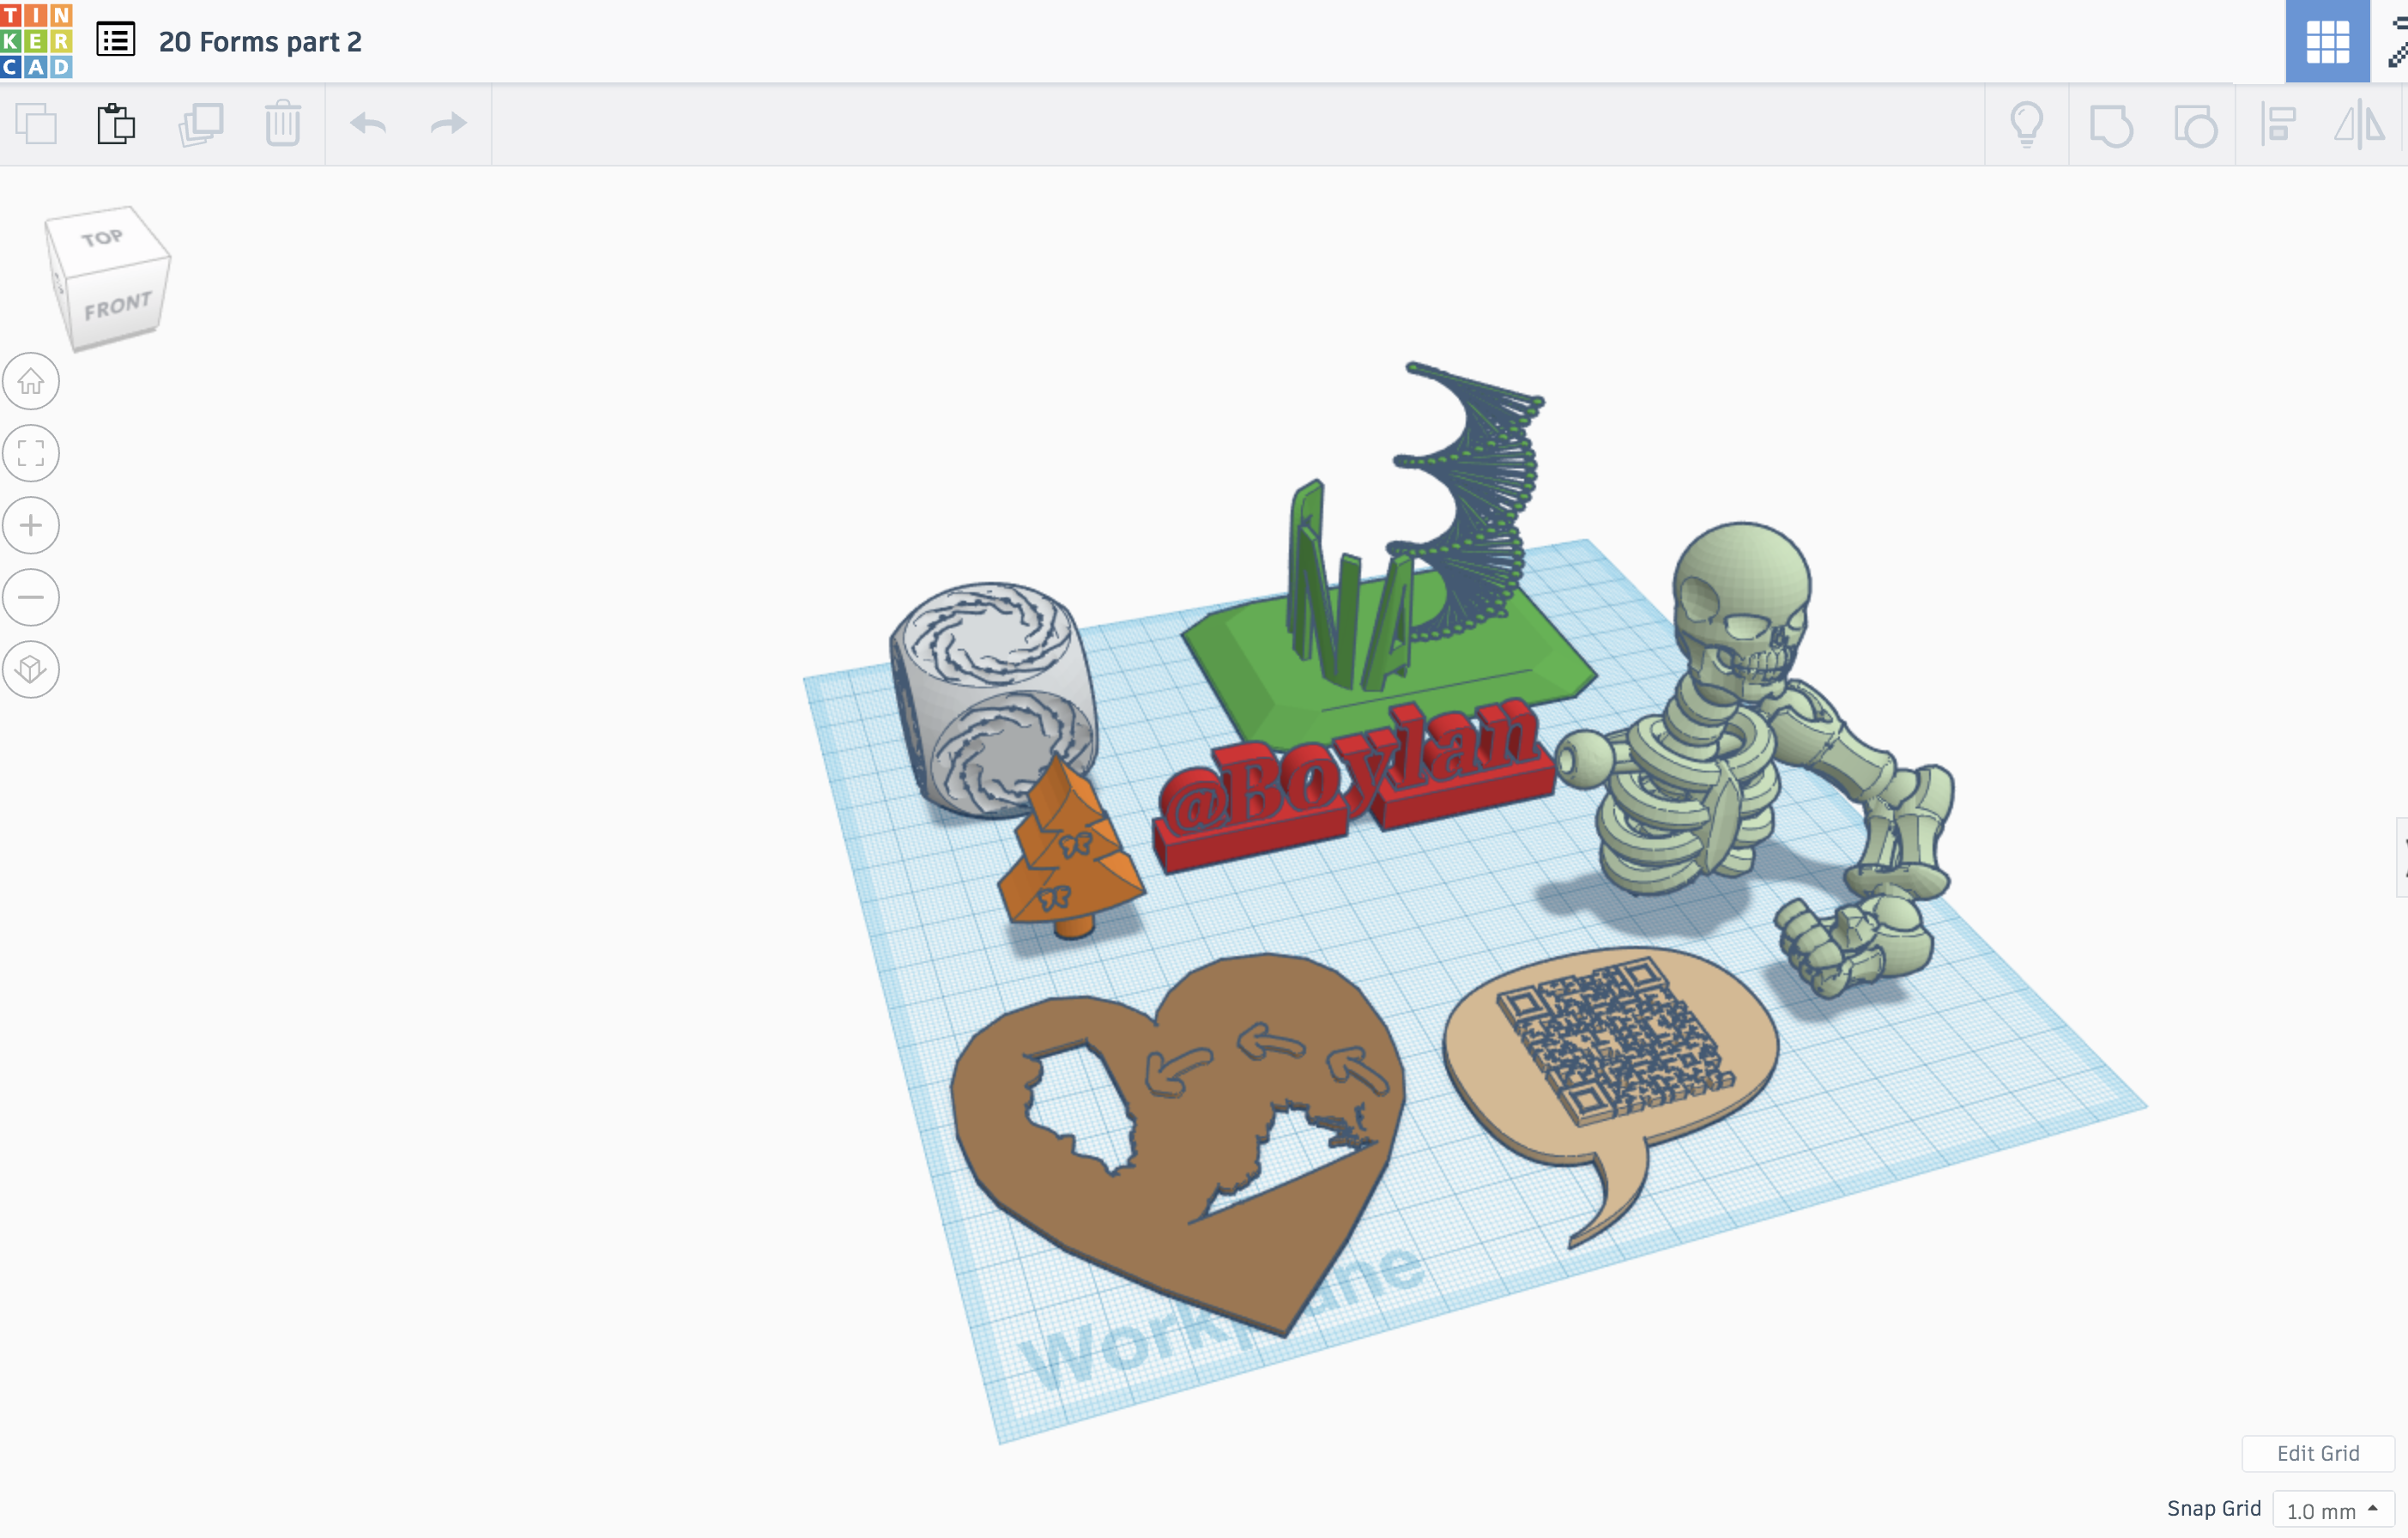
- DNA Stand: used Tinkercad to add in a special DNA figure
- added in DNA special figure
- put it on top of block
- added special curved font spelling “DNA”
- Imprinted 6 Sided Dice: used Tinkercad to imprint spiral image onto dice
- inserted dice
- inserted twist figure
- aligned to where it was a slight imprint of the twist
- copied twist design and put them on the other 4 sides (did all but the bottom)
- Tree with Butterflies: used Tinkercad to make tree
- put in tree shape
- added cylinder to act as a trunk
- added in butterflies on the tree
- @Boylan: used Tinkercad to create handle
- added in 2 rectangular prisms
- added in special figure @
- inserted text with my last name to create a handle
- Top Half of Skeleton with One Arm: used Tinkercad to have one arm skeleton
- added in preset skeleton parts – skull, rib cage, shoulder, elbow, and hand
- aligned them all to show basic human skeleton
- VA to IL Heart Figurine: used Tinkercad to create state shapes with arrows
- inserted heart figure
- added in VA shape and IL state
- hallowed out to create a hole in the heart
- sketched an arrow to make it look like traveling to destination
- QR Code Chat: Used Tinkercad to create chat bubble
- inserted chat bubble
- added in QR Code saying, “Hello World”
- Double Sided Blue Heart: used Tinkercad to create double sided heart
- sketched a double sided heart design to practice drawing shapes on the computer
- Person Driving a Car: used Tinkercad to create a person driving
- inserted 4 wheels
- added rectangular prism on top of the car
- added a wedge to create slanted window
- added two rectangular prism holes for side profile windows
- added another rectangular prism for front and back window
- inserted human figurine to look like person is driving the car
- added in a small ring to create a steering wheel
- Greece Circle: used Tinkercad to create country on circle
- inserted small cylinder
- inserted the preset country Greece
- hallowed it out to create a small coin figure
- Yellow Bridge: used Tinkercad to create bridge
- inserted two arches
- aligned trapezoid on top of the arches to create a bridge
- Paraboloid inside a Paraboloid: used Tinkercad to create a bowl
- inserted one paraboloid
- copy and pasted another paraboloid, shrunk it, and hallowed it out
- Bunny Face: used Tinkercad to create a bunny face
- inserted sphere
- inserted in preset bunny ear
- copy and pasted another bunny ear
- inserted roof for nose
- scribbled the whiskers and put them behind the nose
Tinkercad Print
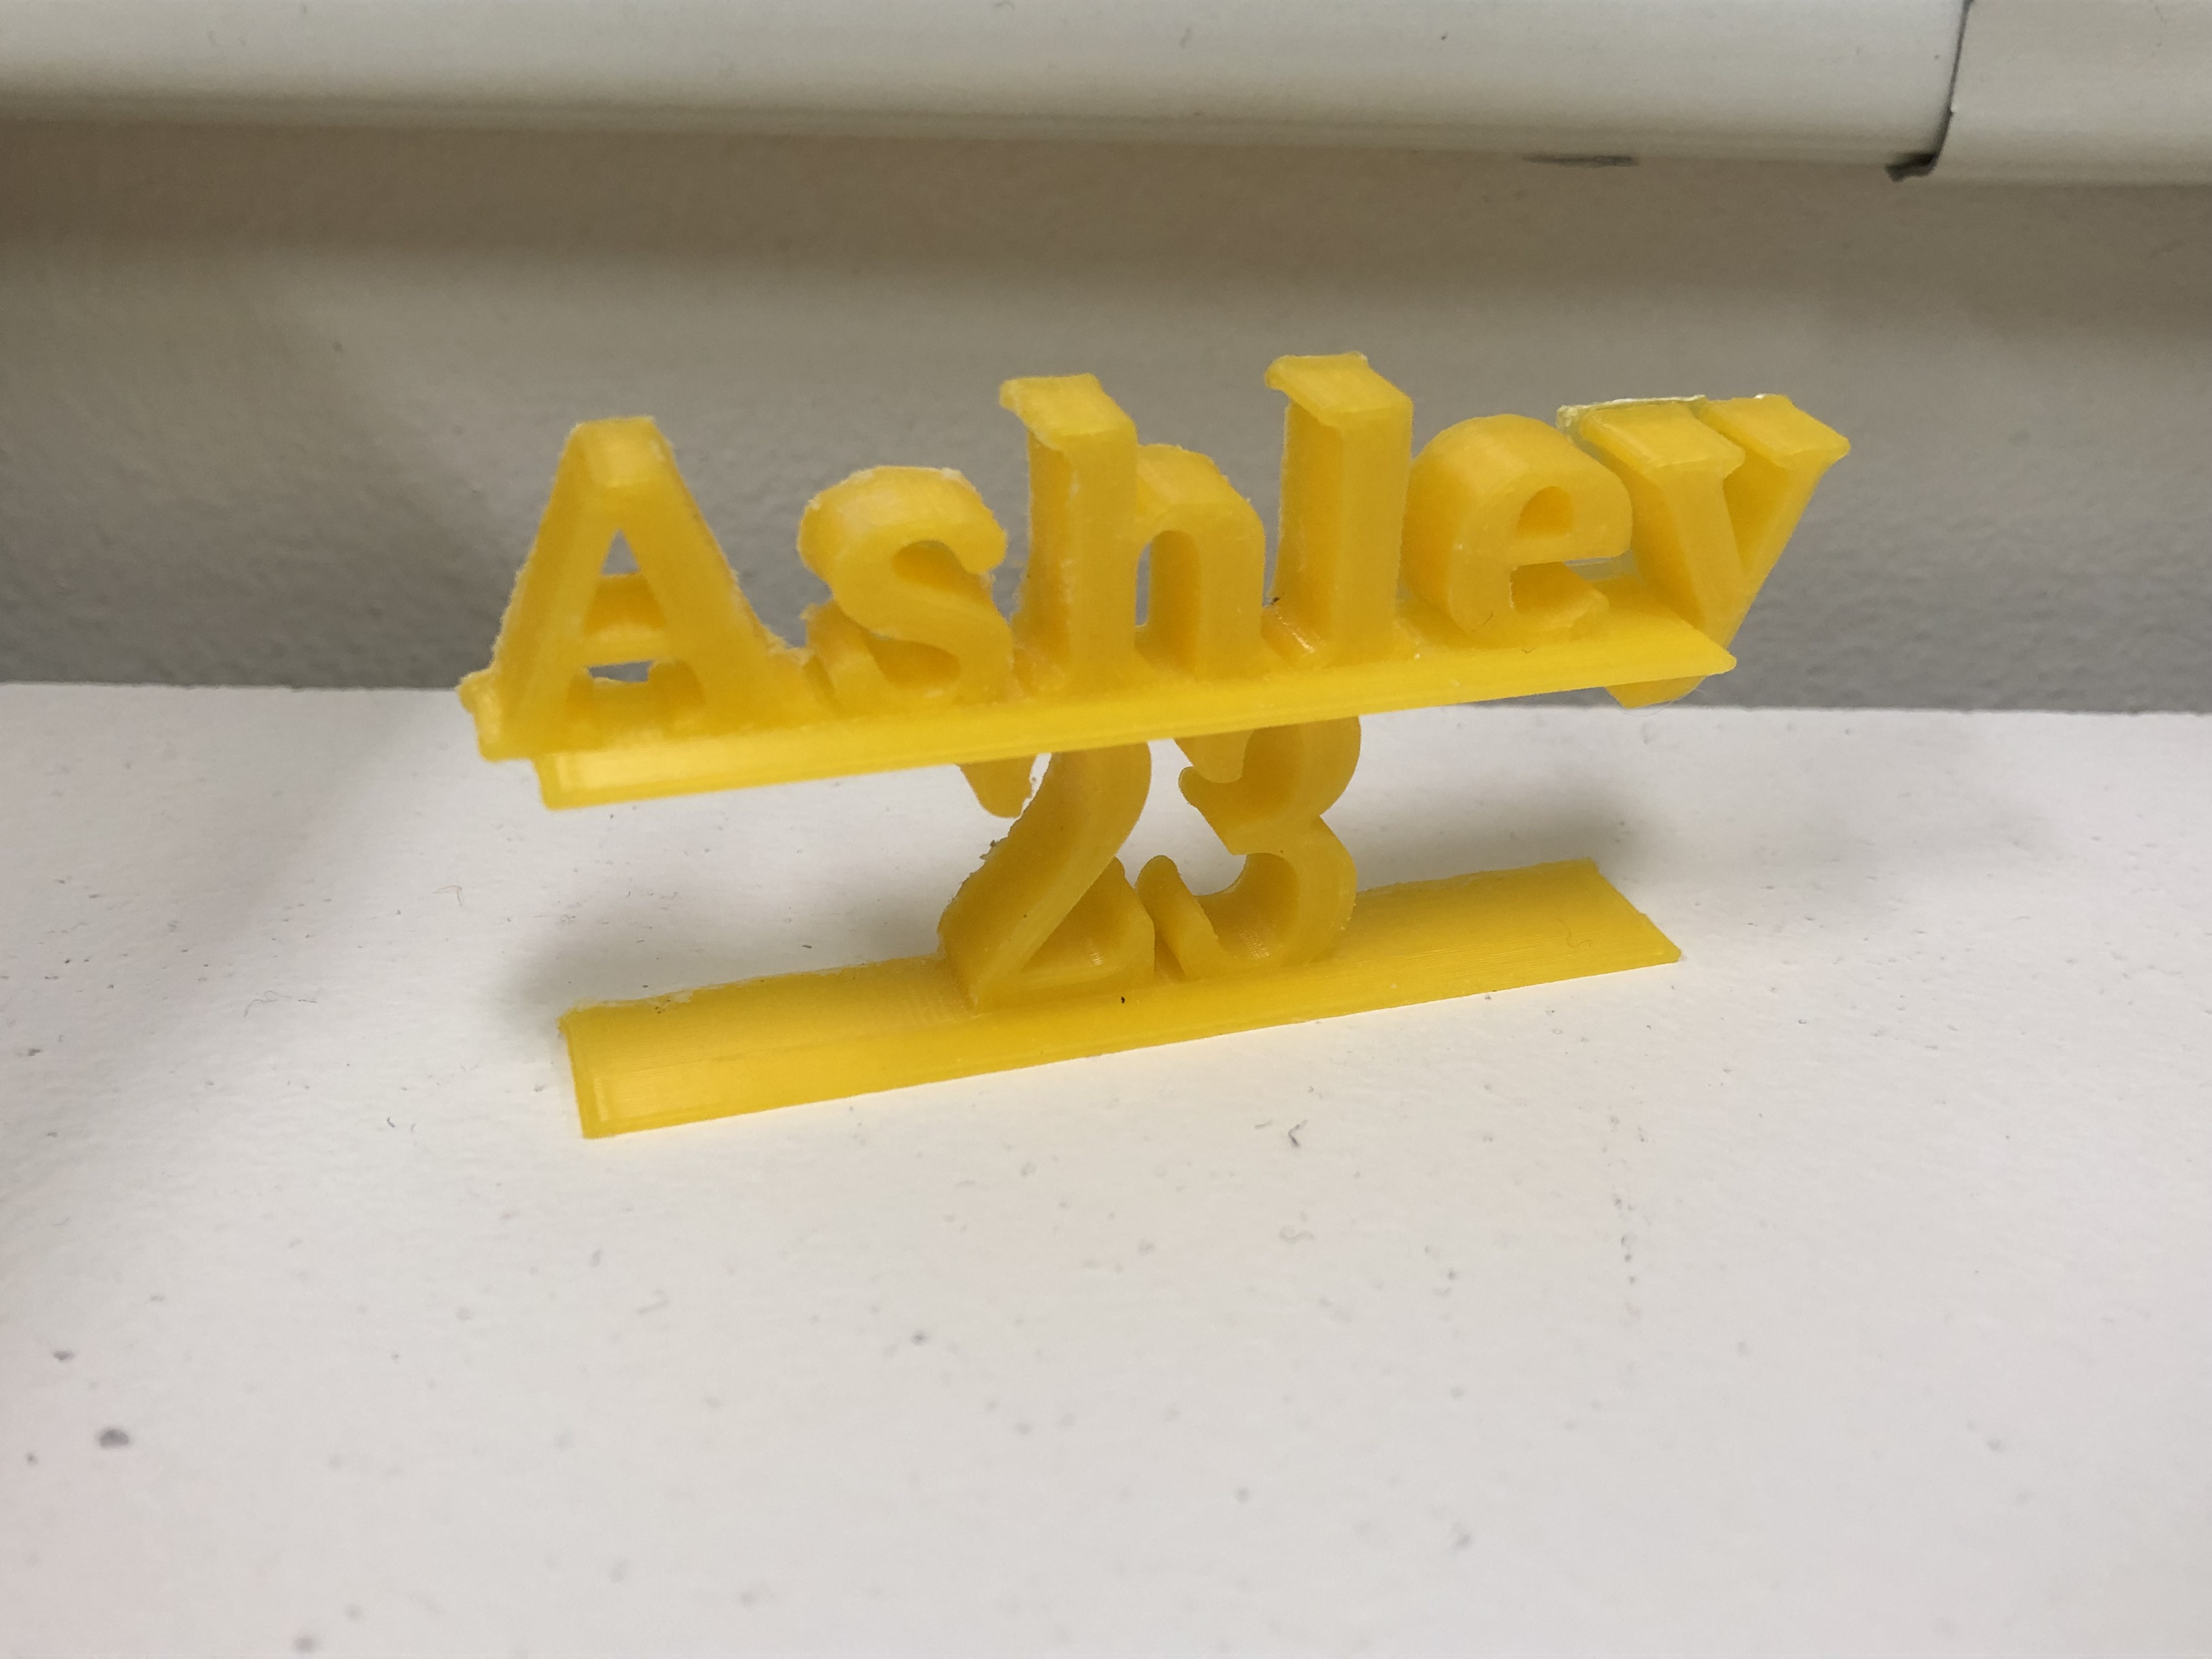
I think my designed Tinkercad print printed well. I used a brim to make sure the letters and numbers built upright. When it was done printing, I had to shave a lot of the brim off through because it was a little difficult to rip off. It was hard to shave the figurine down because I thought I would accidentally break off a letter.
I did have to modify by Tinkercad print before I printed it. In the first screenshot, the image is upright. Before I printed it out, I tilted it at a 90 degree angle so that the back of the old image became the new bottom. I think that was a good change because it would have been really hard to print the letters then without anything to stabilize them.
Summary of Group Tinkercad Project
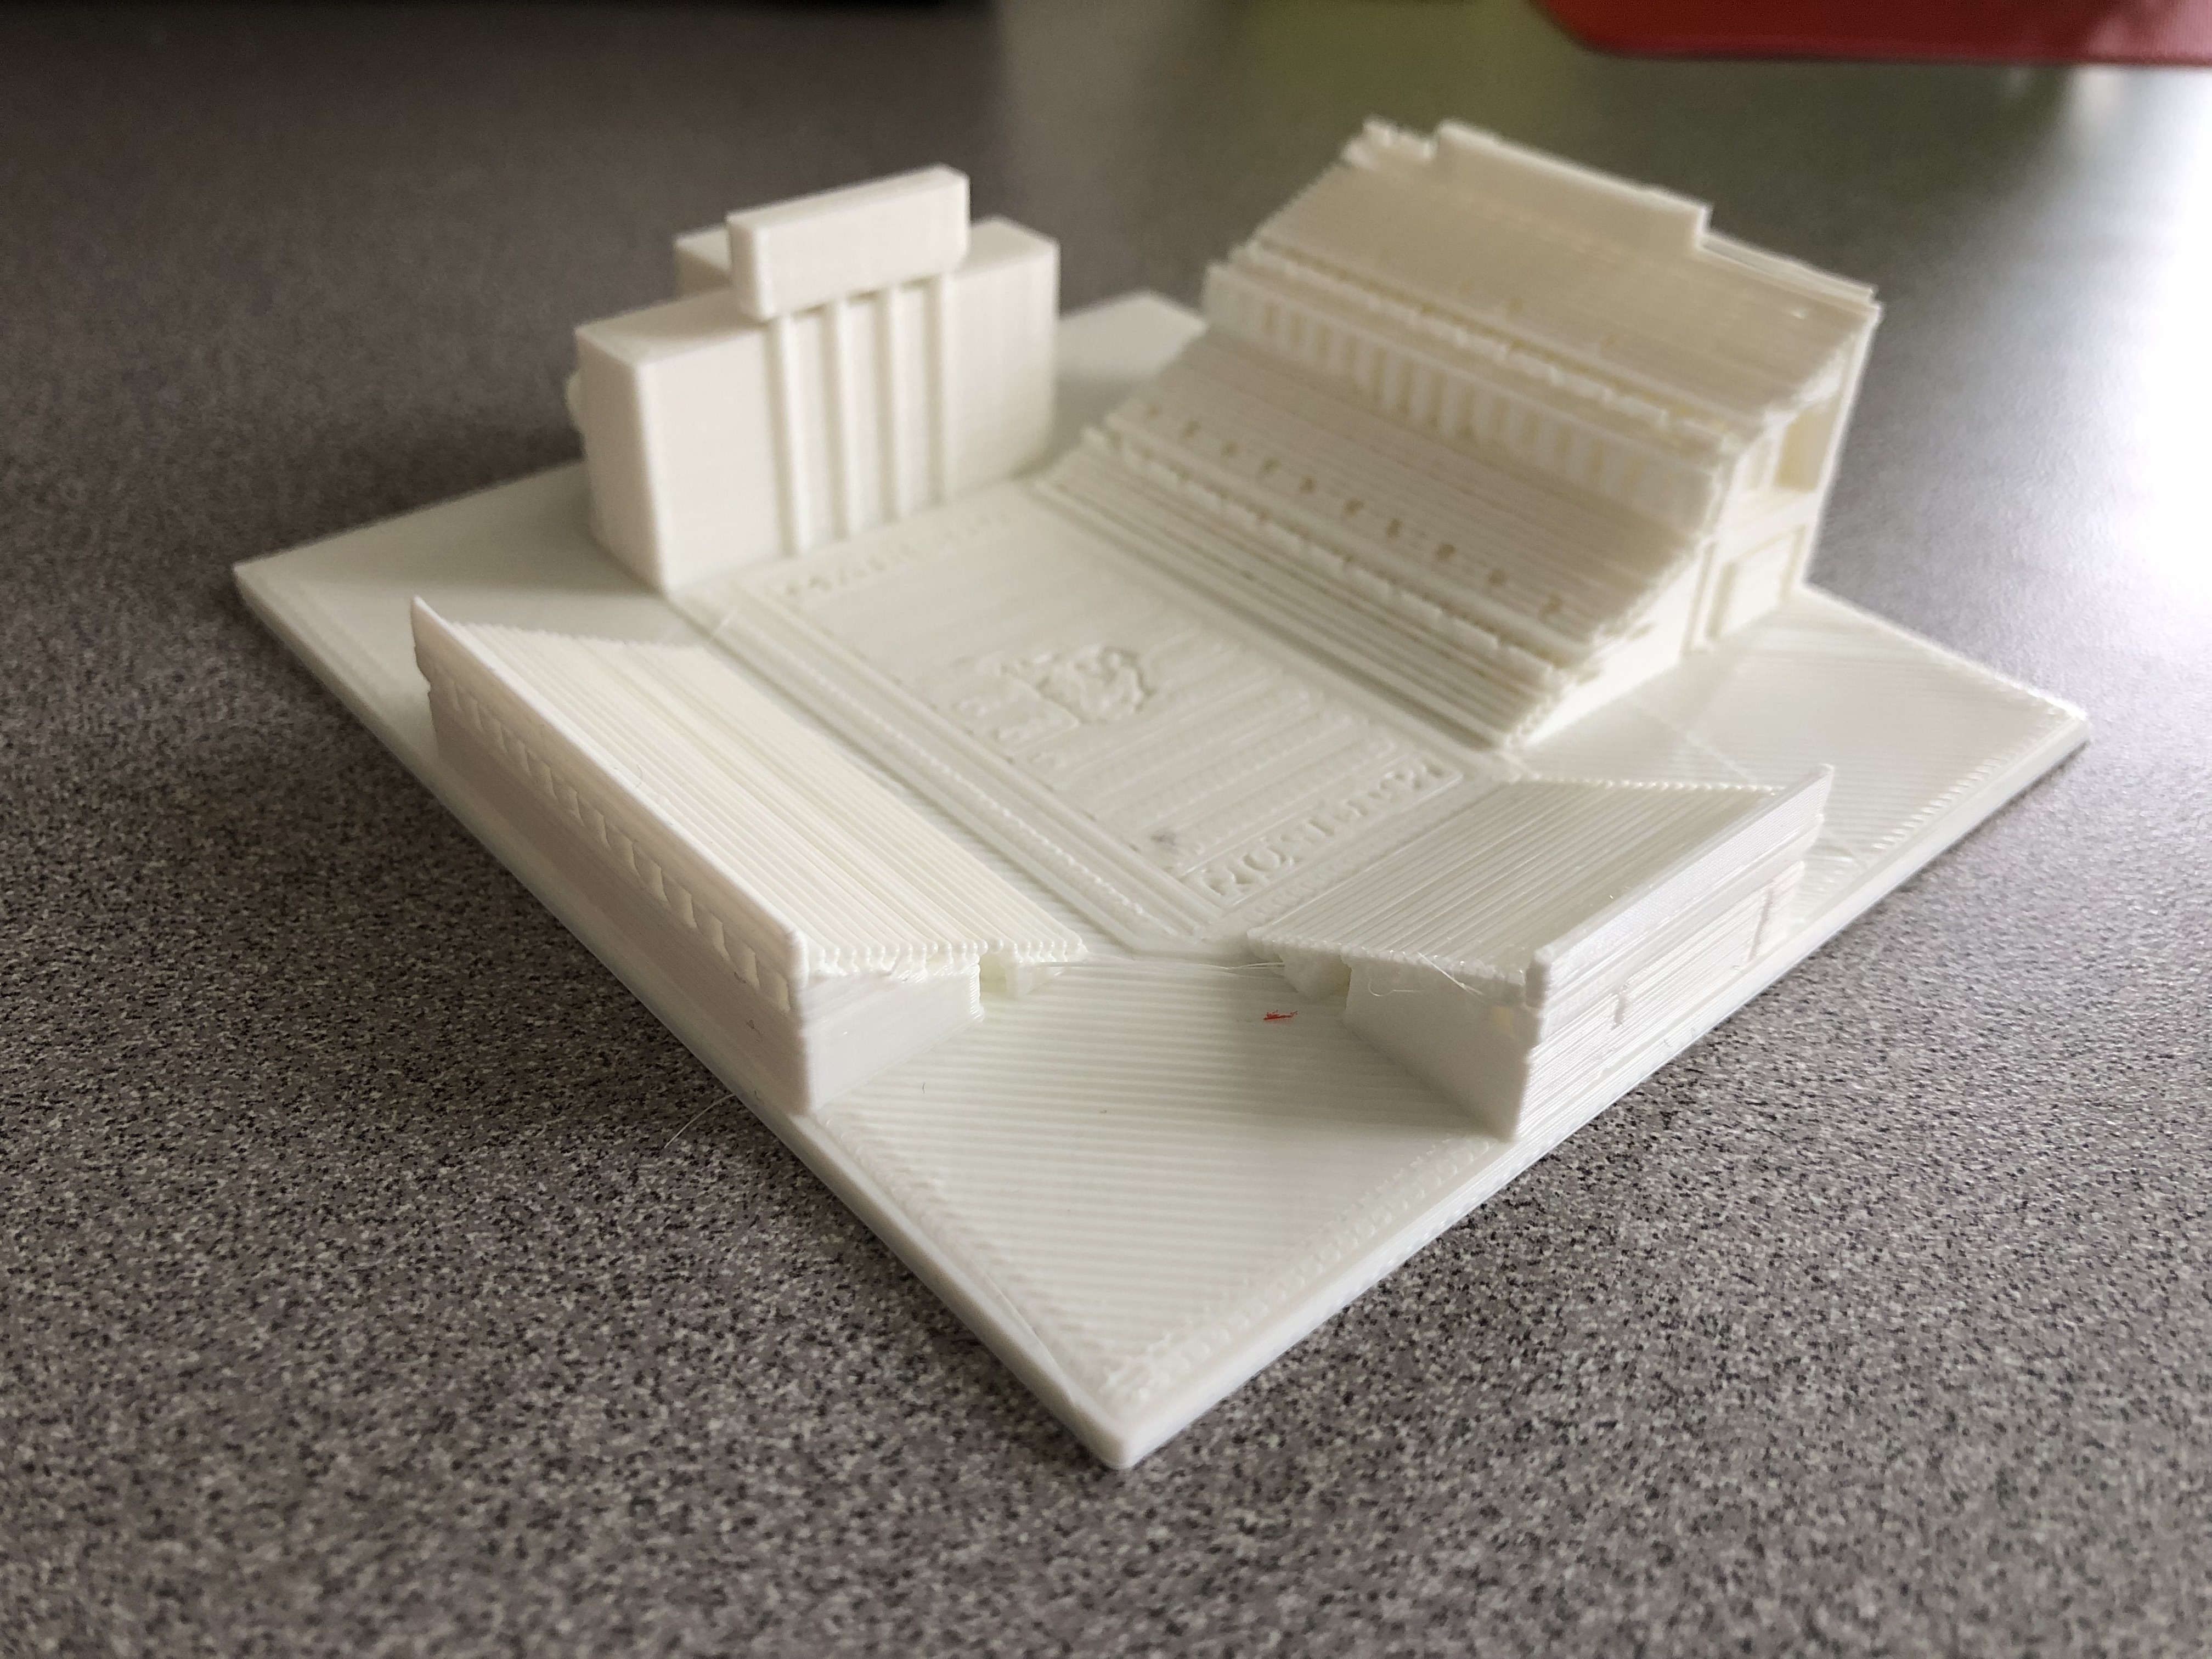
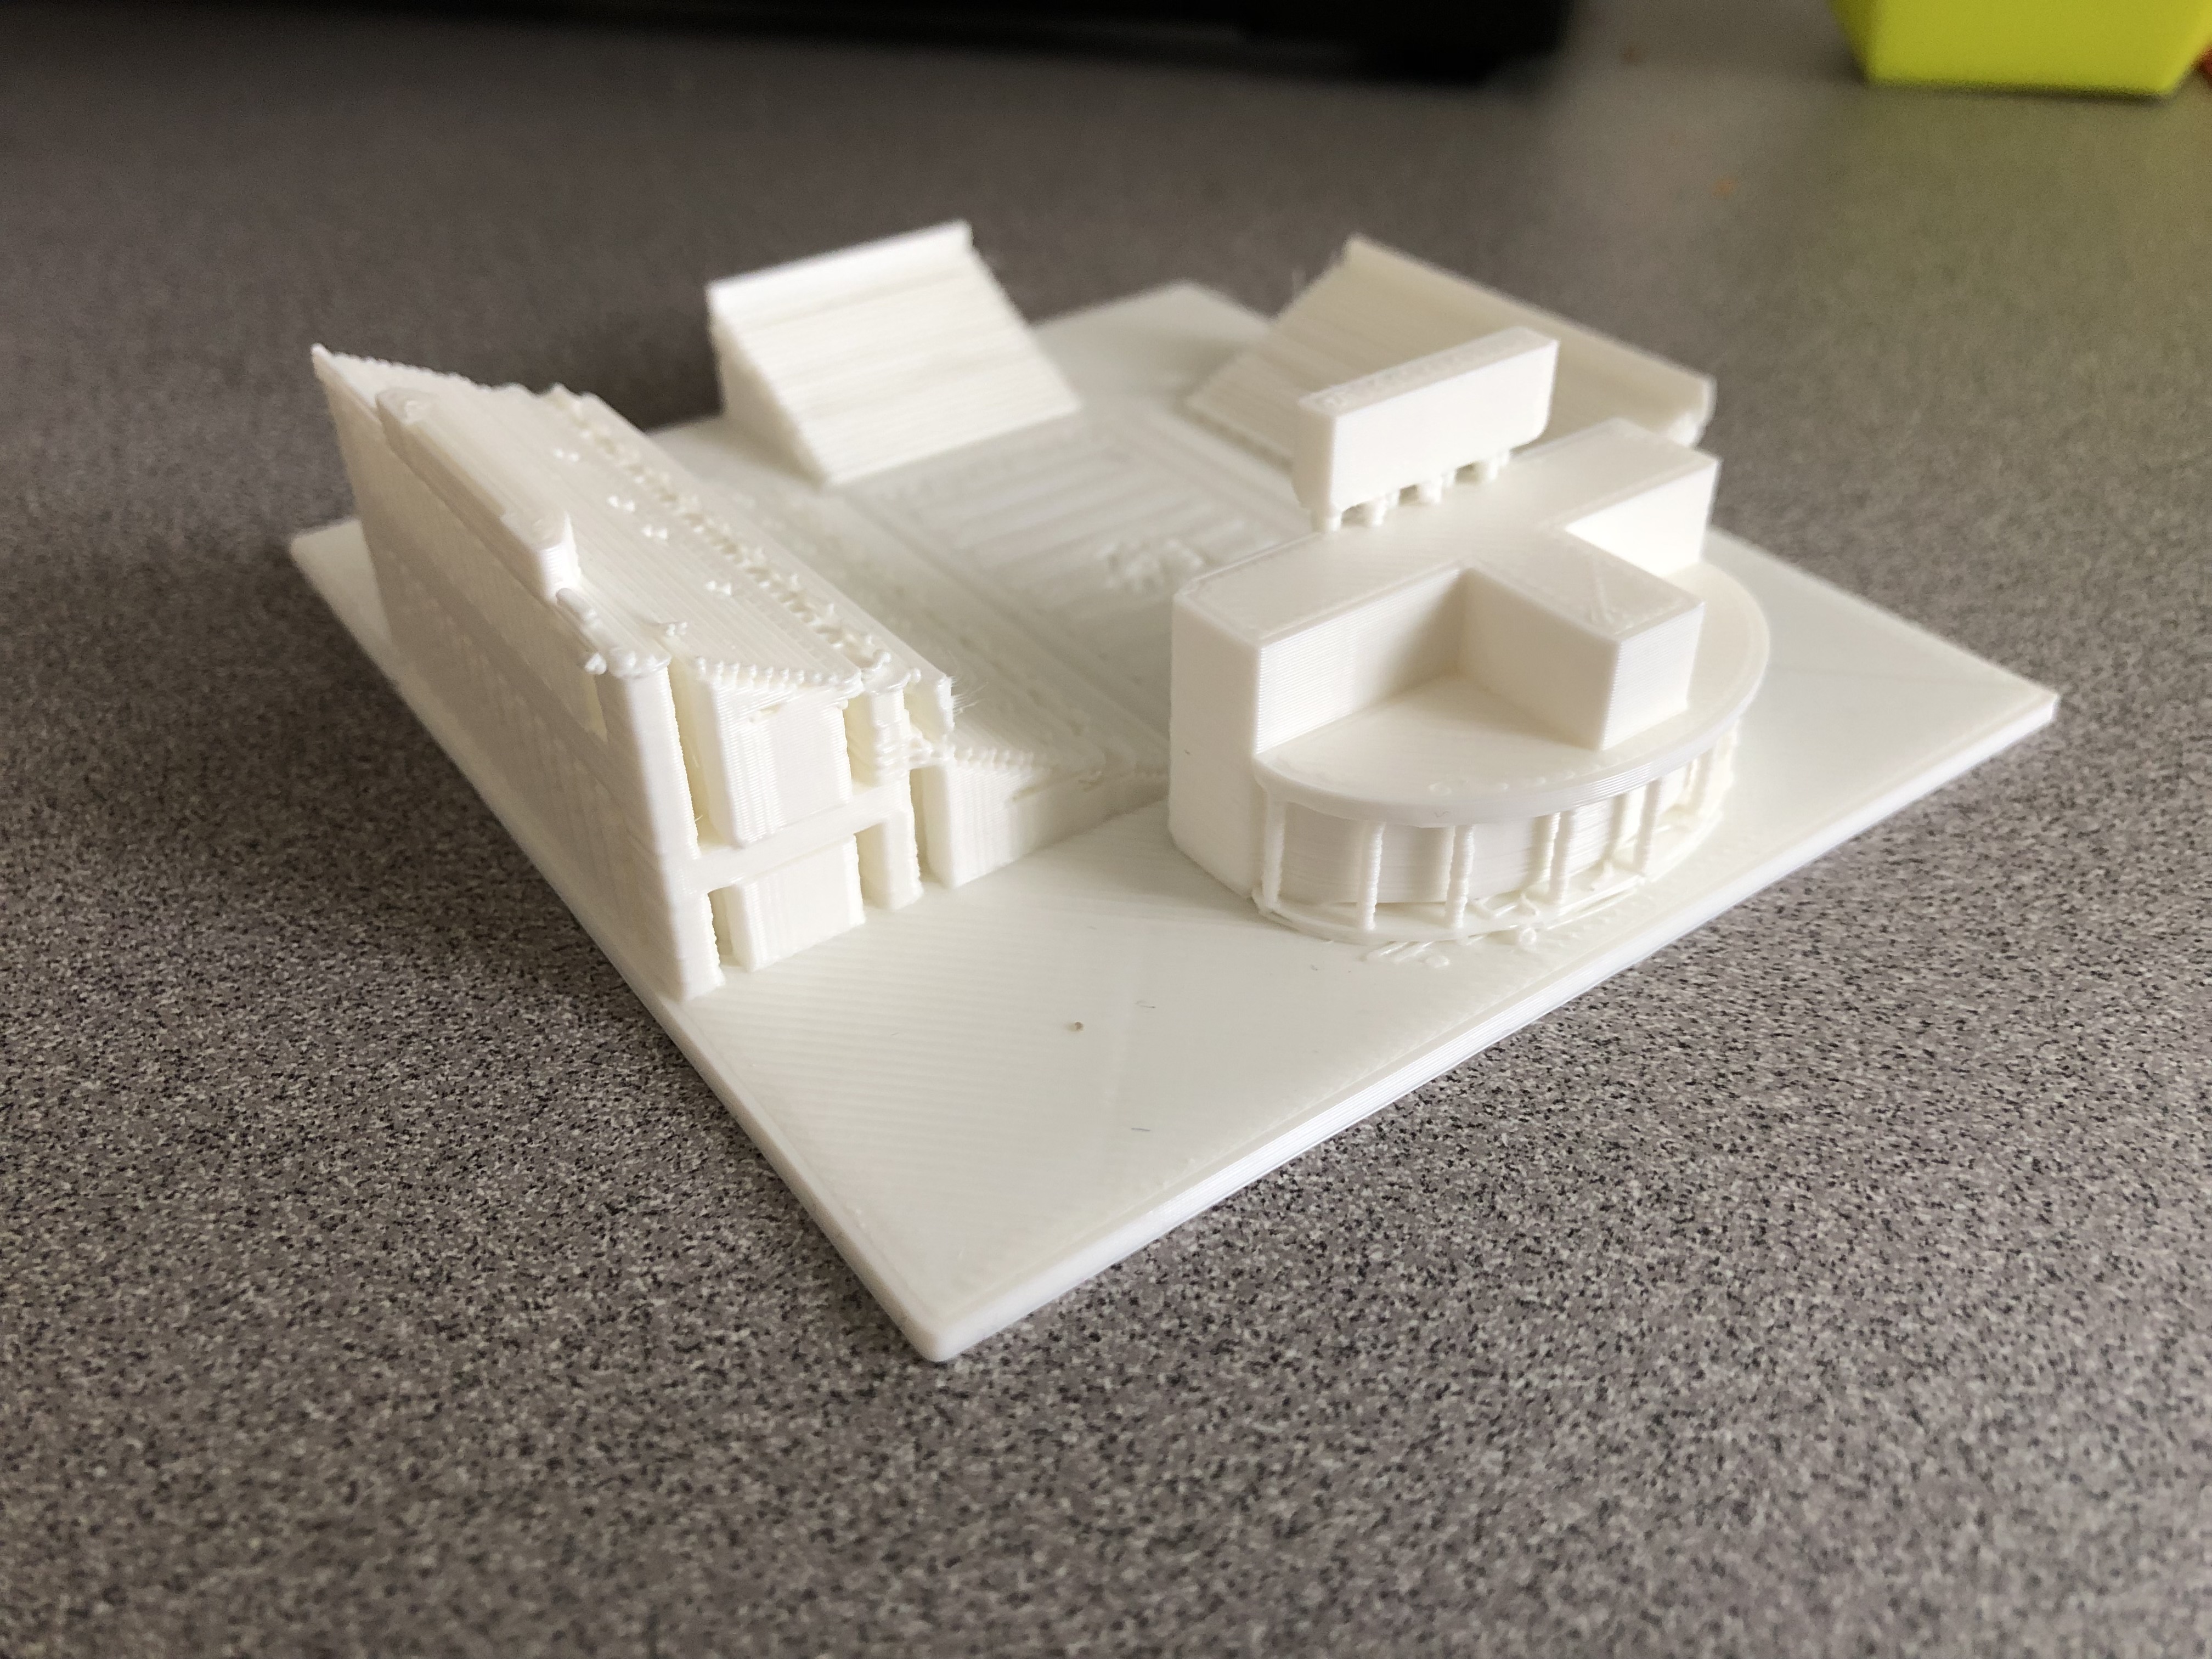
For the Group Tinkercad Project, Austin Lam and I worked on the Bridgeforth Stadium Group Project. We recreated a small model of James Madison University’s Bridgeforth Stadium.
It was a challenge to recreate the stadium. I thought it would be relatively easy to recreate this building on campus. But, I quickly realized I was wrong. It is hard to use Thingiverse to create this model since it was a drag and drop method. So, we took advantage of copy and paste for a couple things – mainly the bleachers. This project required us to go back and print it a couple times because we learned what worked and what did not work. We had the most issues printing columns, the letters “Madison” and the duke dog, the back of the student section, and the bleachers themselves. It was successful in the end because we were able to fix most of the things we found as challenges. The only thing that is still an area of improvement would be getting the support out of the overhang section. I discussed a method to try and overcome it in the Group Project design link labeled “Group Work” below. Overall, it was really cool to use Thingiverse to create something that gave us a challenge because it ended up looking really well. I am very happy with the overall design and print.
Read more about Group Project Design: Group Work
Download: Thingiverse
20 Forms in Fusion 360

Going back left to right…
- Coil: I inserted this using the create, coil button.
- Rib: I created a rib to hold the two rectangular prisms
- Box with holes: I inserted a box then extruded three cylinders to create a box with holes.
- Torus: I inserted a torus using the create, torus button.
- Loft: I first made a 2d sketch of a rectangle and a circle, then joined then together with the loft button.
- Cylinder: I inserted a cylinder then put a sphere on top. Then, I made the sphere have a hole on top to create this rounded inward top.
- Ellipse figure: I created a 2d sketch of an ellipse. Then, extruded a piece of the middle of the ellipse figure.
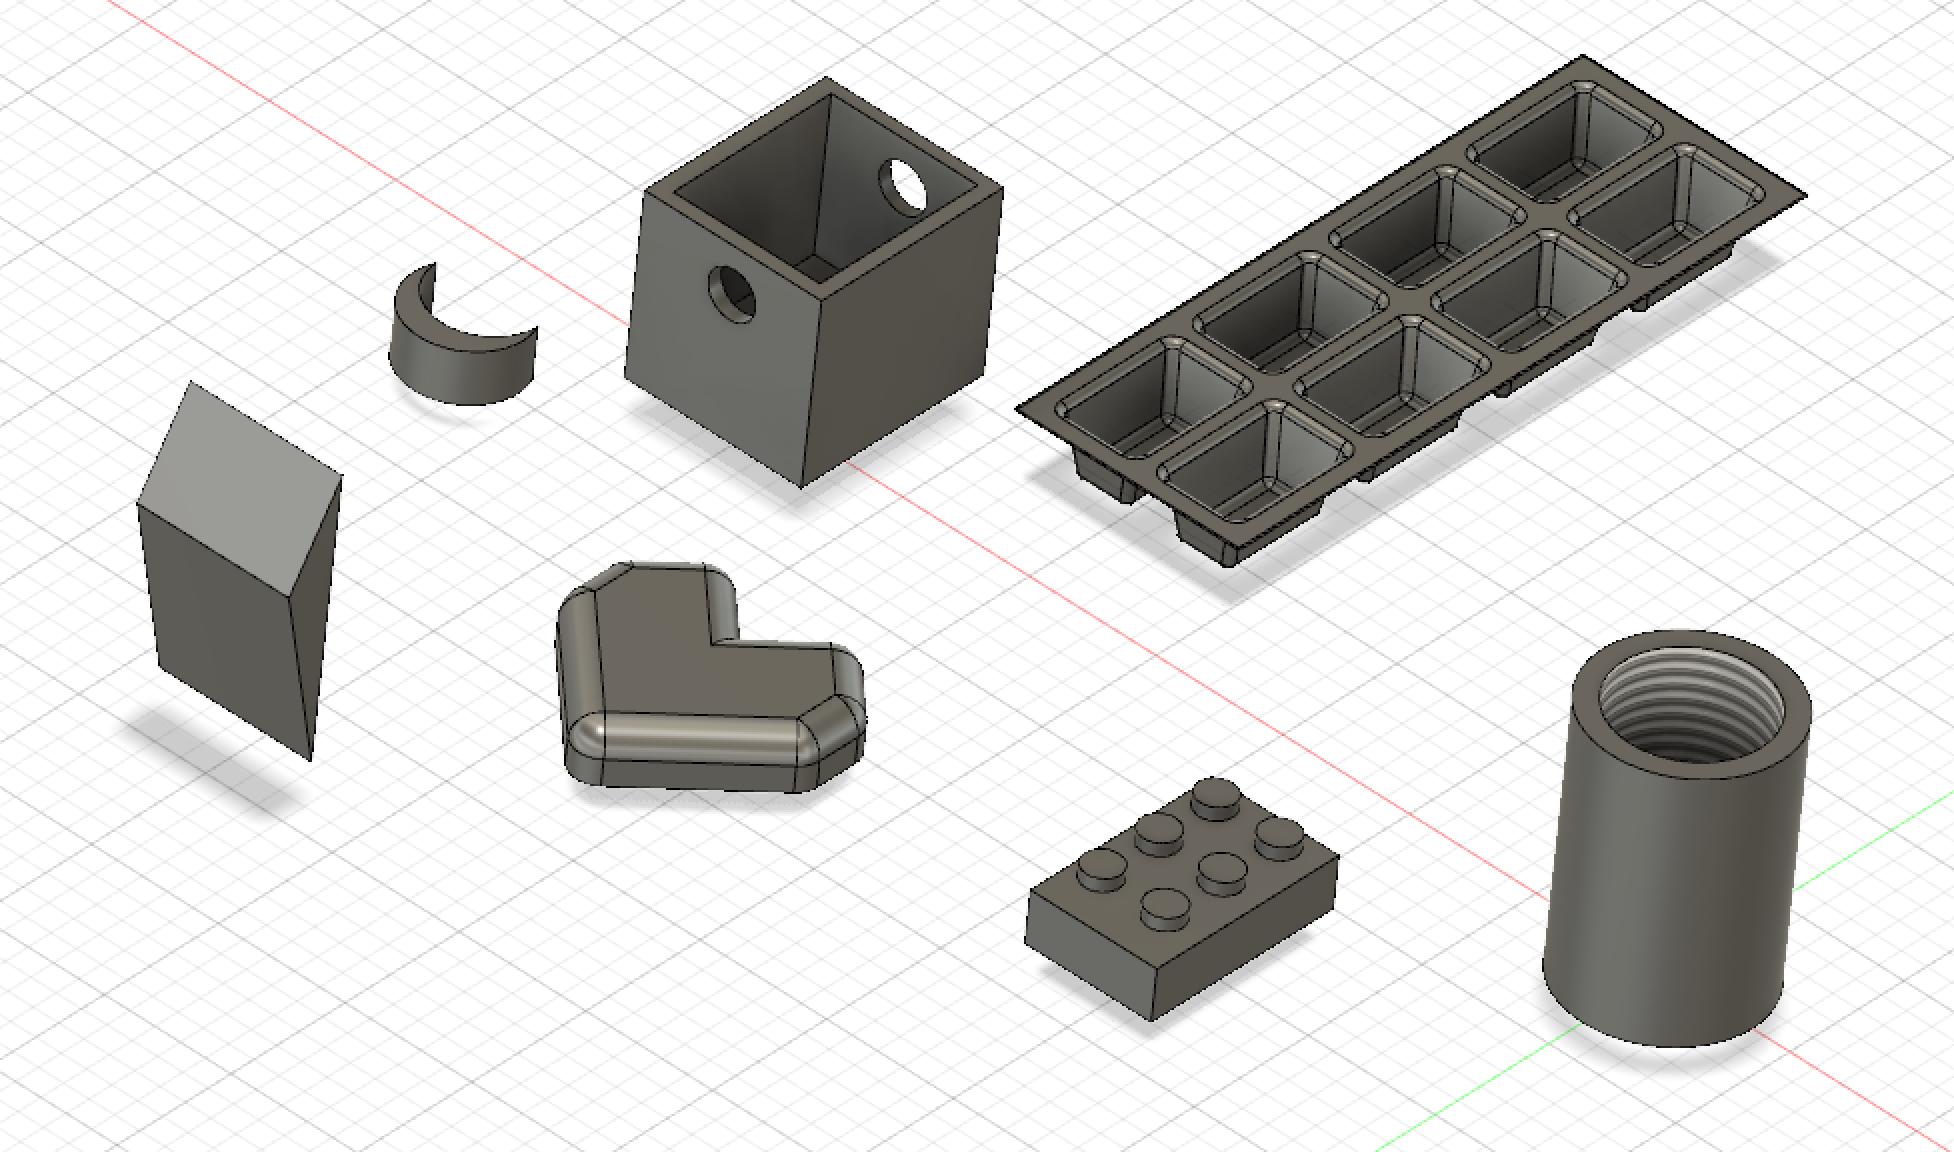
- Rotated Triangle: I drew a 2D triangle then extruded the figure.
- Moon: I drew a two 2D arcs and extruded the figure.
- Box: I made a box with a hole. Then, I put a cylinder through the top to give it handles.
- Heart: I connected lines to create the outline of the heart. Then, rounded the edges by using the fillet feature.
- Ice Cube Tray: I watched a youtube video to create the ice cube tray – which was a little difficult to do. Here’s where I found the video. This used a lot of techniques like using the fillet, sweep, and rectangular patterns functions.
- Lego: Again, I watched a youtube video for this one to learn to learn how to make a pattern. Here’s where I found the video
- Cylinder: I created a cylinder then gave it a hole. Then, I used the thread feature to give it that interesting texture on the inside.
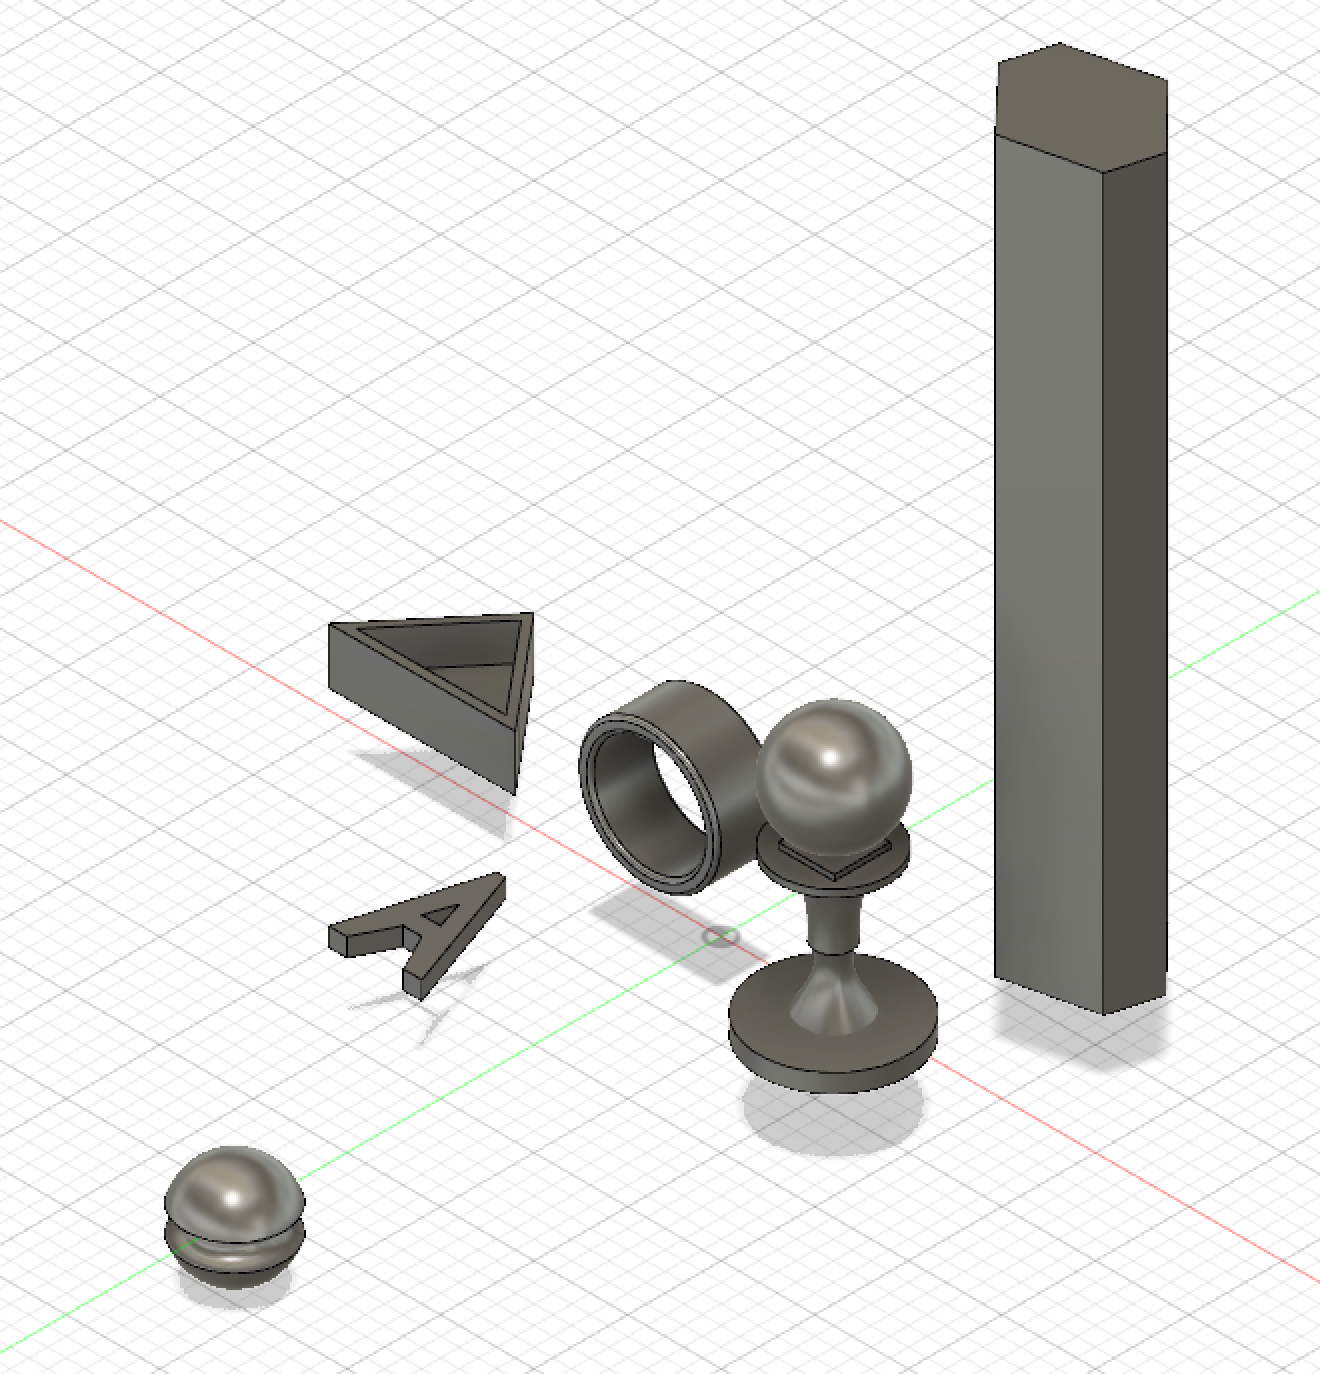
- Triangle: I created a triangle using the lines. I created another triangle right on top of that extruded line, then created a small triangle inside of the previous triangle. I extruded that to make the walls.
- A: I used the lines to outline the letter A, then extruded it.
- Ring: I created drew a rectangle on the plane. Then, used the revolve function to create the ring figure. Then, put used fillet around the edges to make it smooth.
- Sphere: I created the sphere. Then, put the torus shape around it and cut that out.
- Chess piece: I inserted a cylinder for the base. Then, created the first loft to make the middle curve inward. Then, created another loft to have the top curve outward. I put another small cylinder on top and then a small rectangle. On the top, I put a sphere.
- Tower: I made a polygon figure and extruded it.
Fusion 360 Print
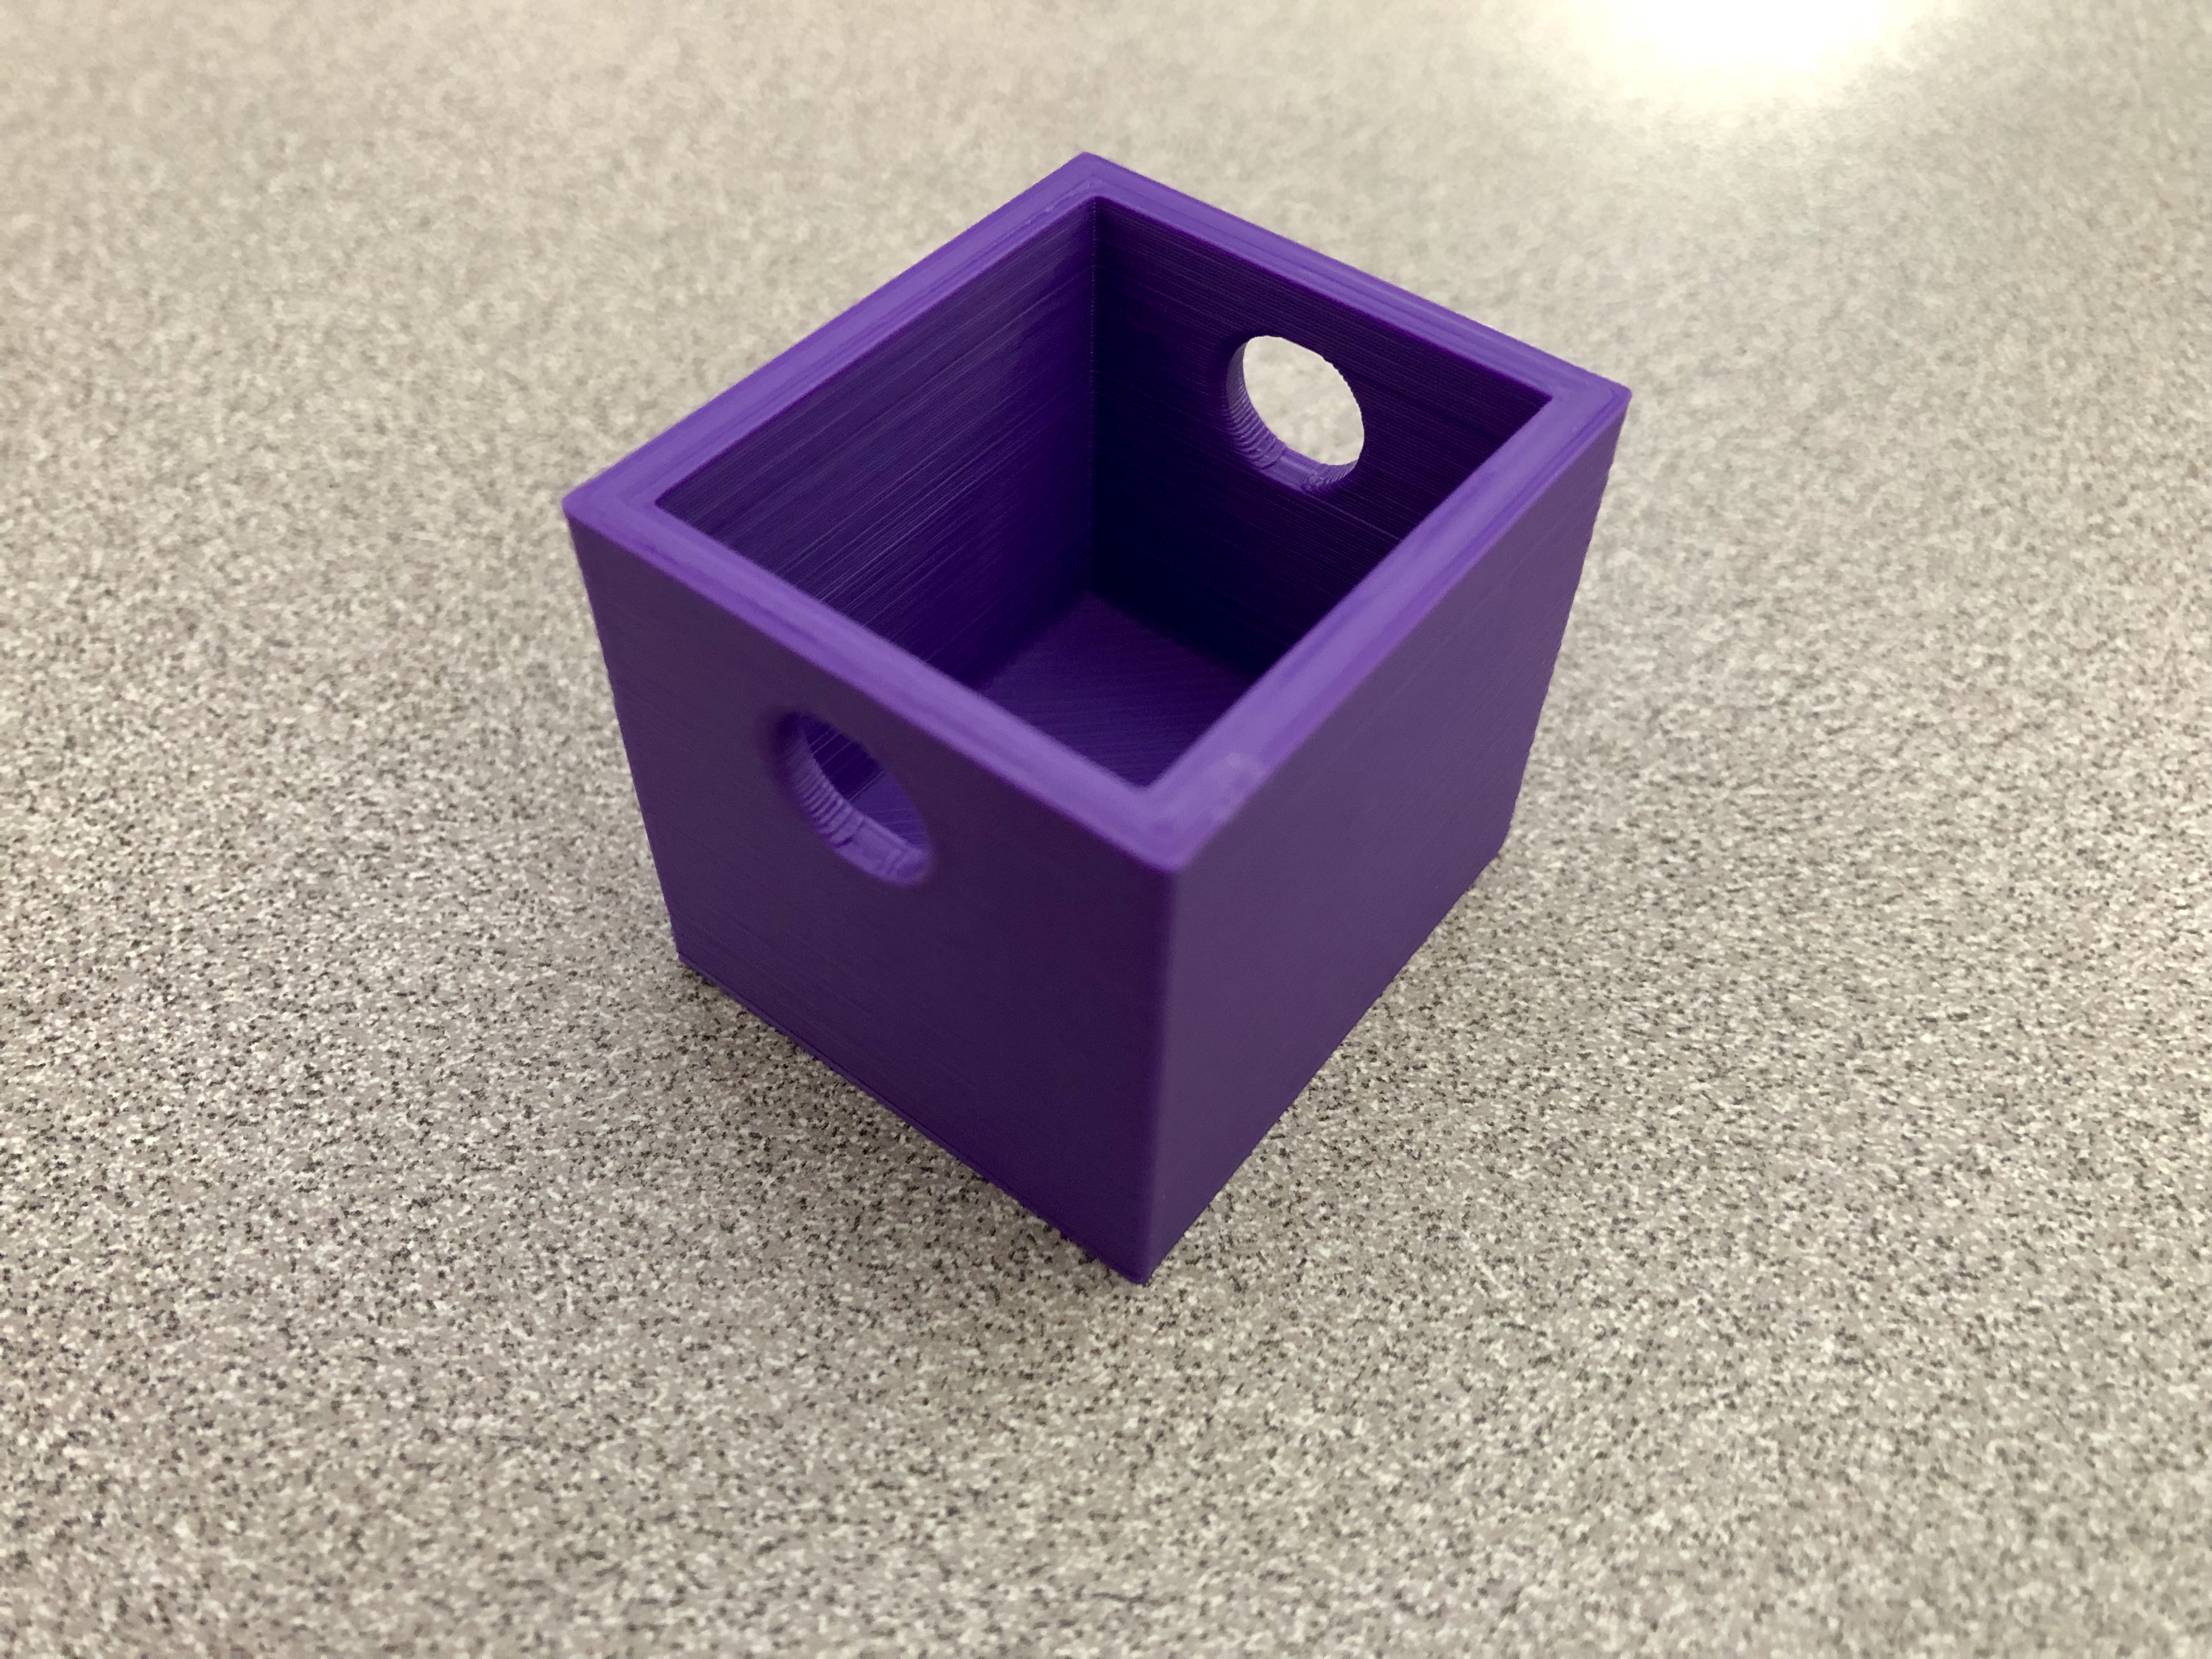
The Fusion 360 print of this box turned out well. It turned out as a success. I forgot to print it with support because I thought that the holes for the box might have collapsed inwards without it. However, it still turned out well. I was a bit frustrating to use Fusion 360 to make something as easy a box because I could do this with ease in Tinkercad in less than 10 mins. But, the design for this took me around 30 minutes. It took me longer to figure out how to create a hole in the box. Plus, I did not realize until after some practice I could make the cylinder on the face of one of the sides of the box rather than trying to learn to rotate the cylinder.
Fusion 360 Vase Design

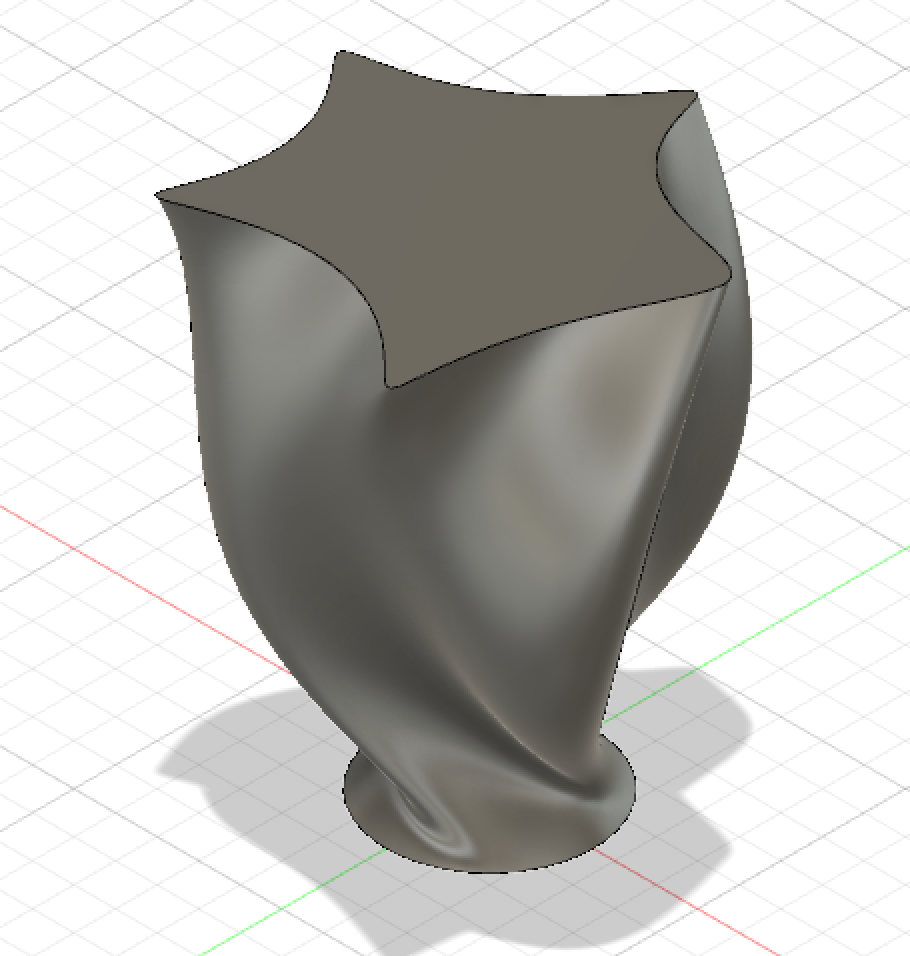
This above screenshots are the design for the large vase. Since I created this model on Thursday, Fusion 360 wouldn’t really allow me to get rid of my loft without getting rid of the whole image. So, these are the best screenshots of the model. The large vase had two offset planes, which then had splines created on them. After the splines were made, I attached all three layers through a loft. Then, I twisted the guide rail that the model suggested. This goes beyond the basics of the video because I was able to create two offsets planes and attach them successfully using a loft.
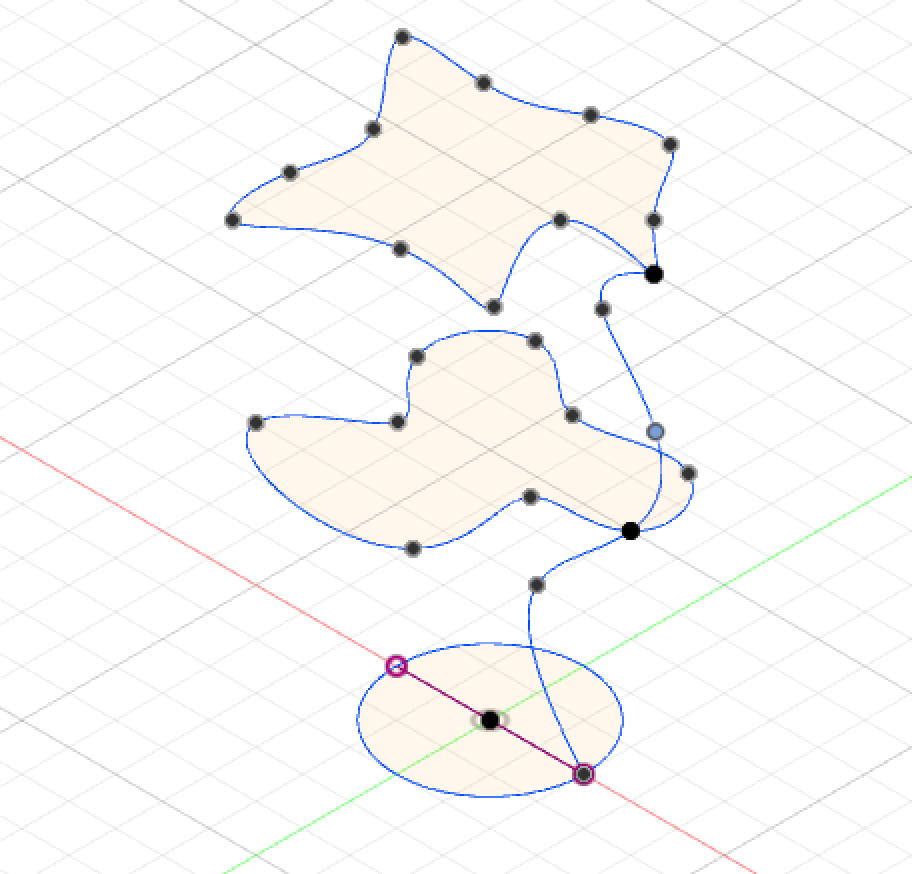
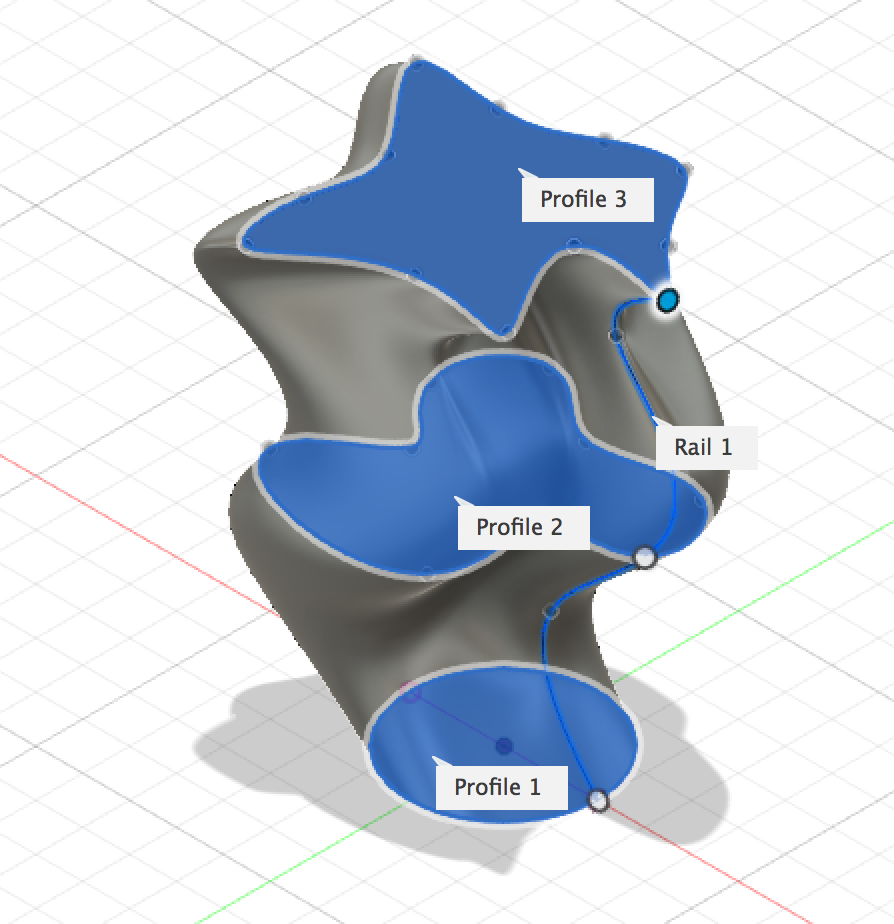

The above screenshots are the design process for the smaller vase. The design process is very similar to the large vase. I still created two offset planes. Then, created a circle on the bottom and two splines on each of the offset planes. To take this model one step further, I added my own guide rail this time. This goes beyond the basic design in the video because this posed more of a challenge. It took a couple tries to successfully connect the guide rail to the 2D shapes since they had to be successfully aligned. I was not able to twist the guide rail on this model because of the sharp edge.
Fusion 360 Vase Prints

Above is the small vase demo for the large vase.
I think the demo printed successfully, so I’m going to print the larger version for the final large vase. The sides of the small print were not flimsy.
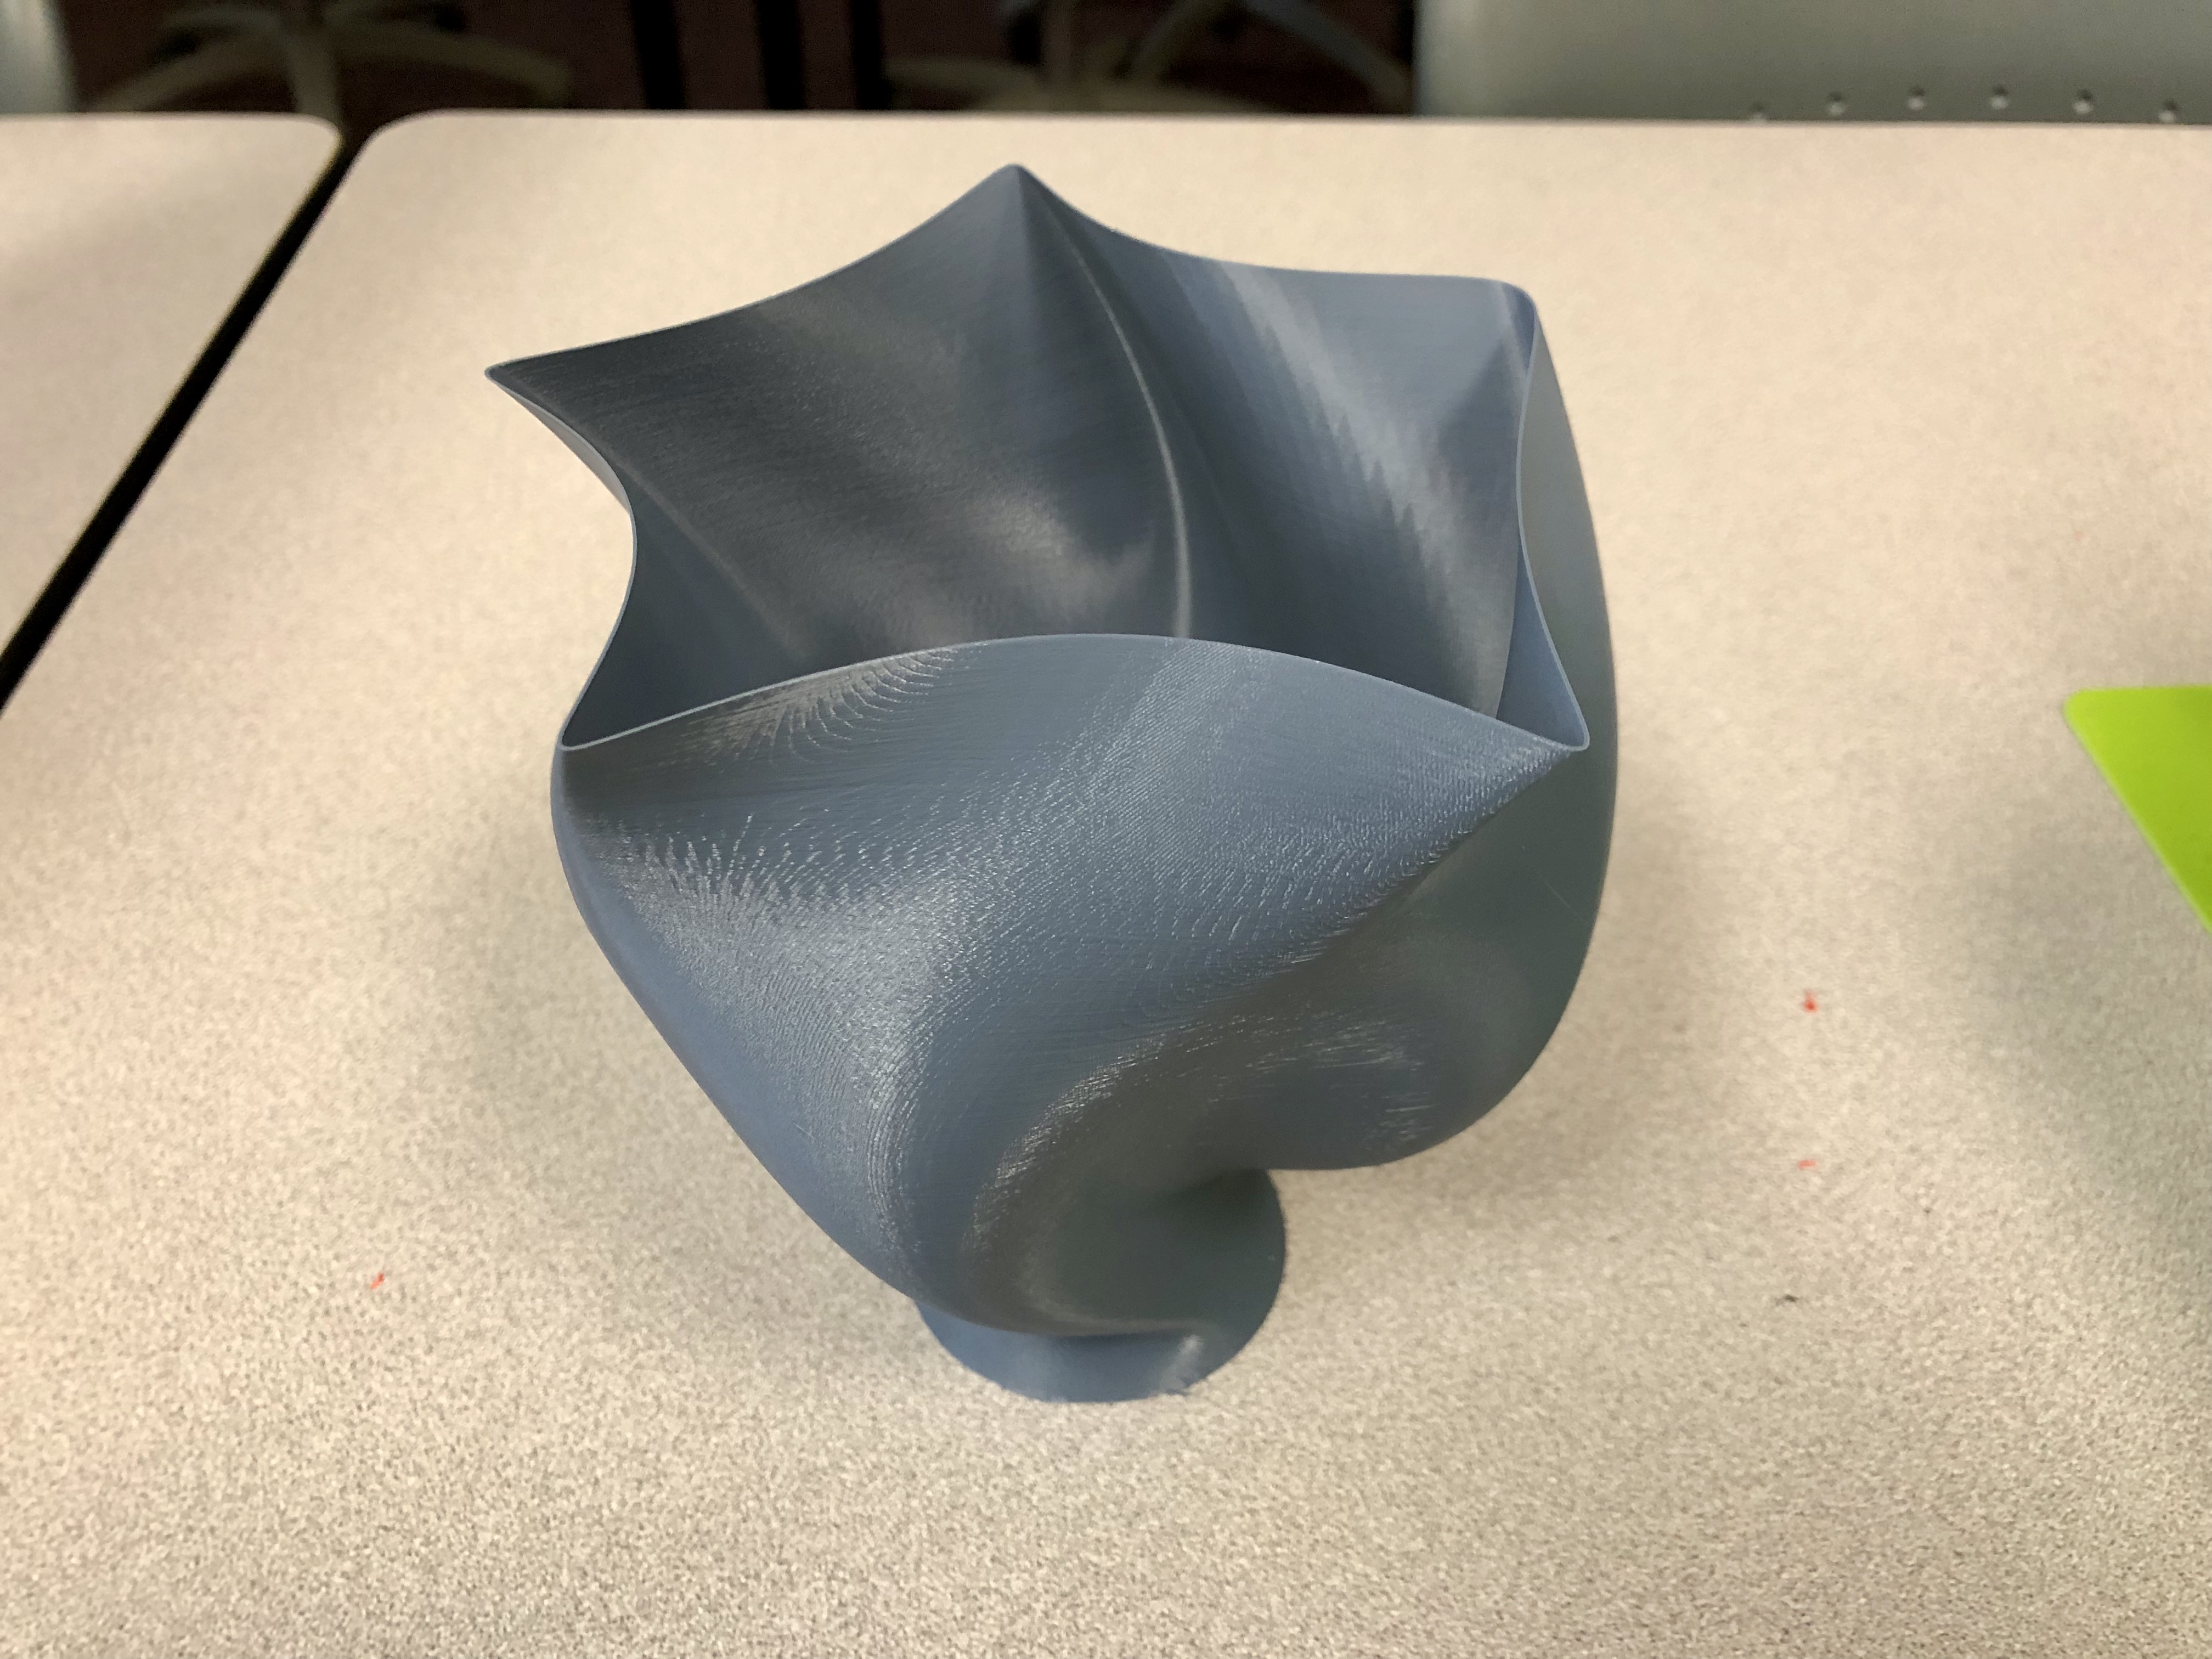
Above is the a picture of the final print for the large vase.
The large version of the vase printed really well. The vase is able to sit upright without falling over. The filament does not show through any of the parts. I was surprised how thin the sides of the vase are. I definitely thought it would be able to hold stuff inside. After printing it I don’t think it can now.
Link: Thingiverse
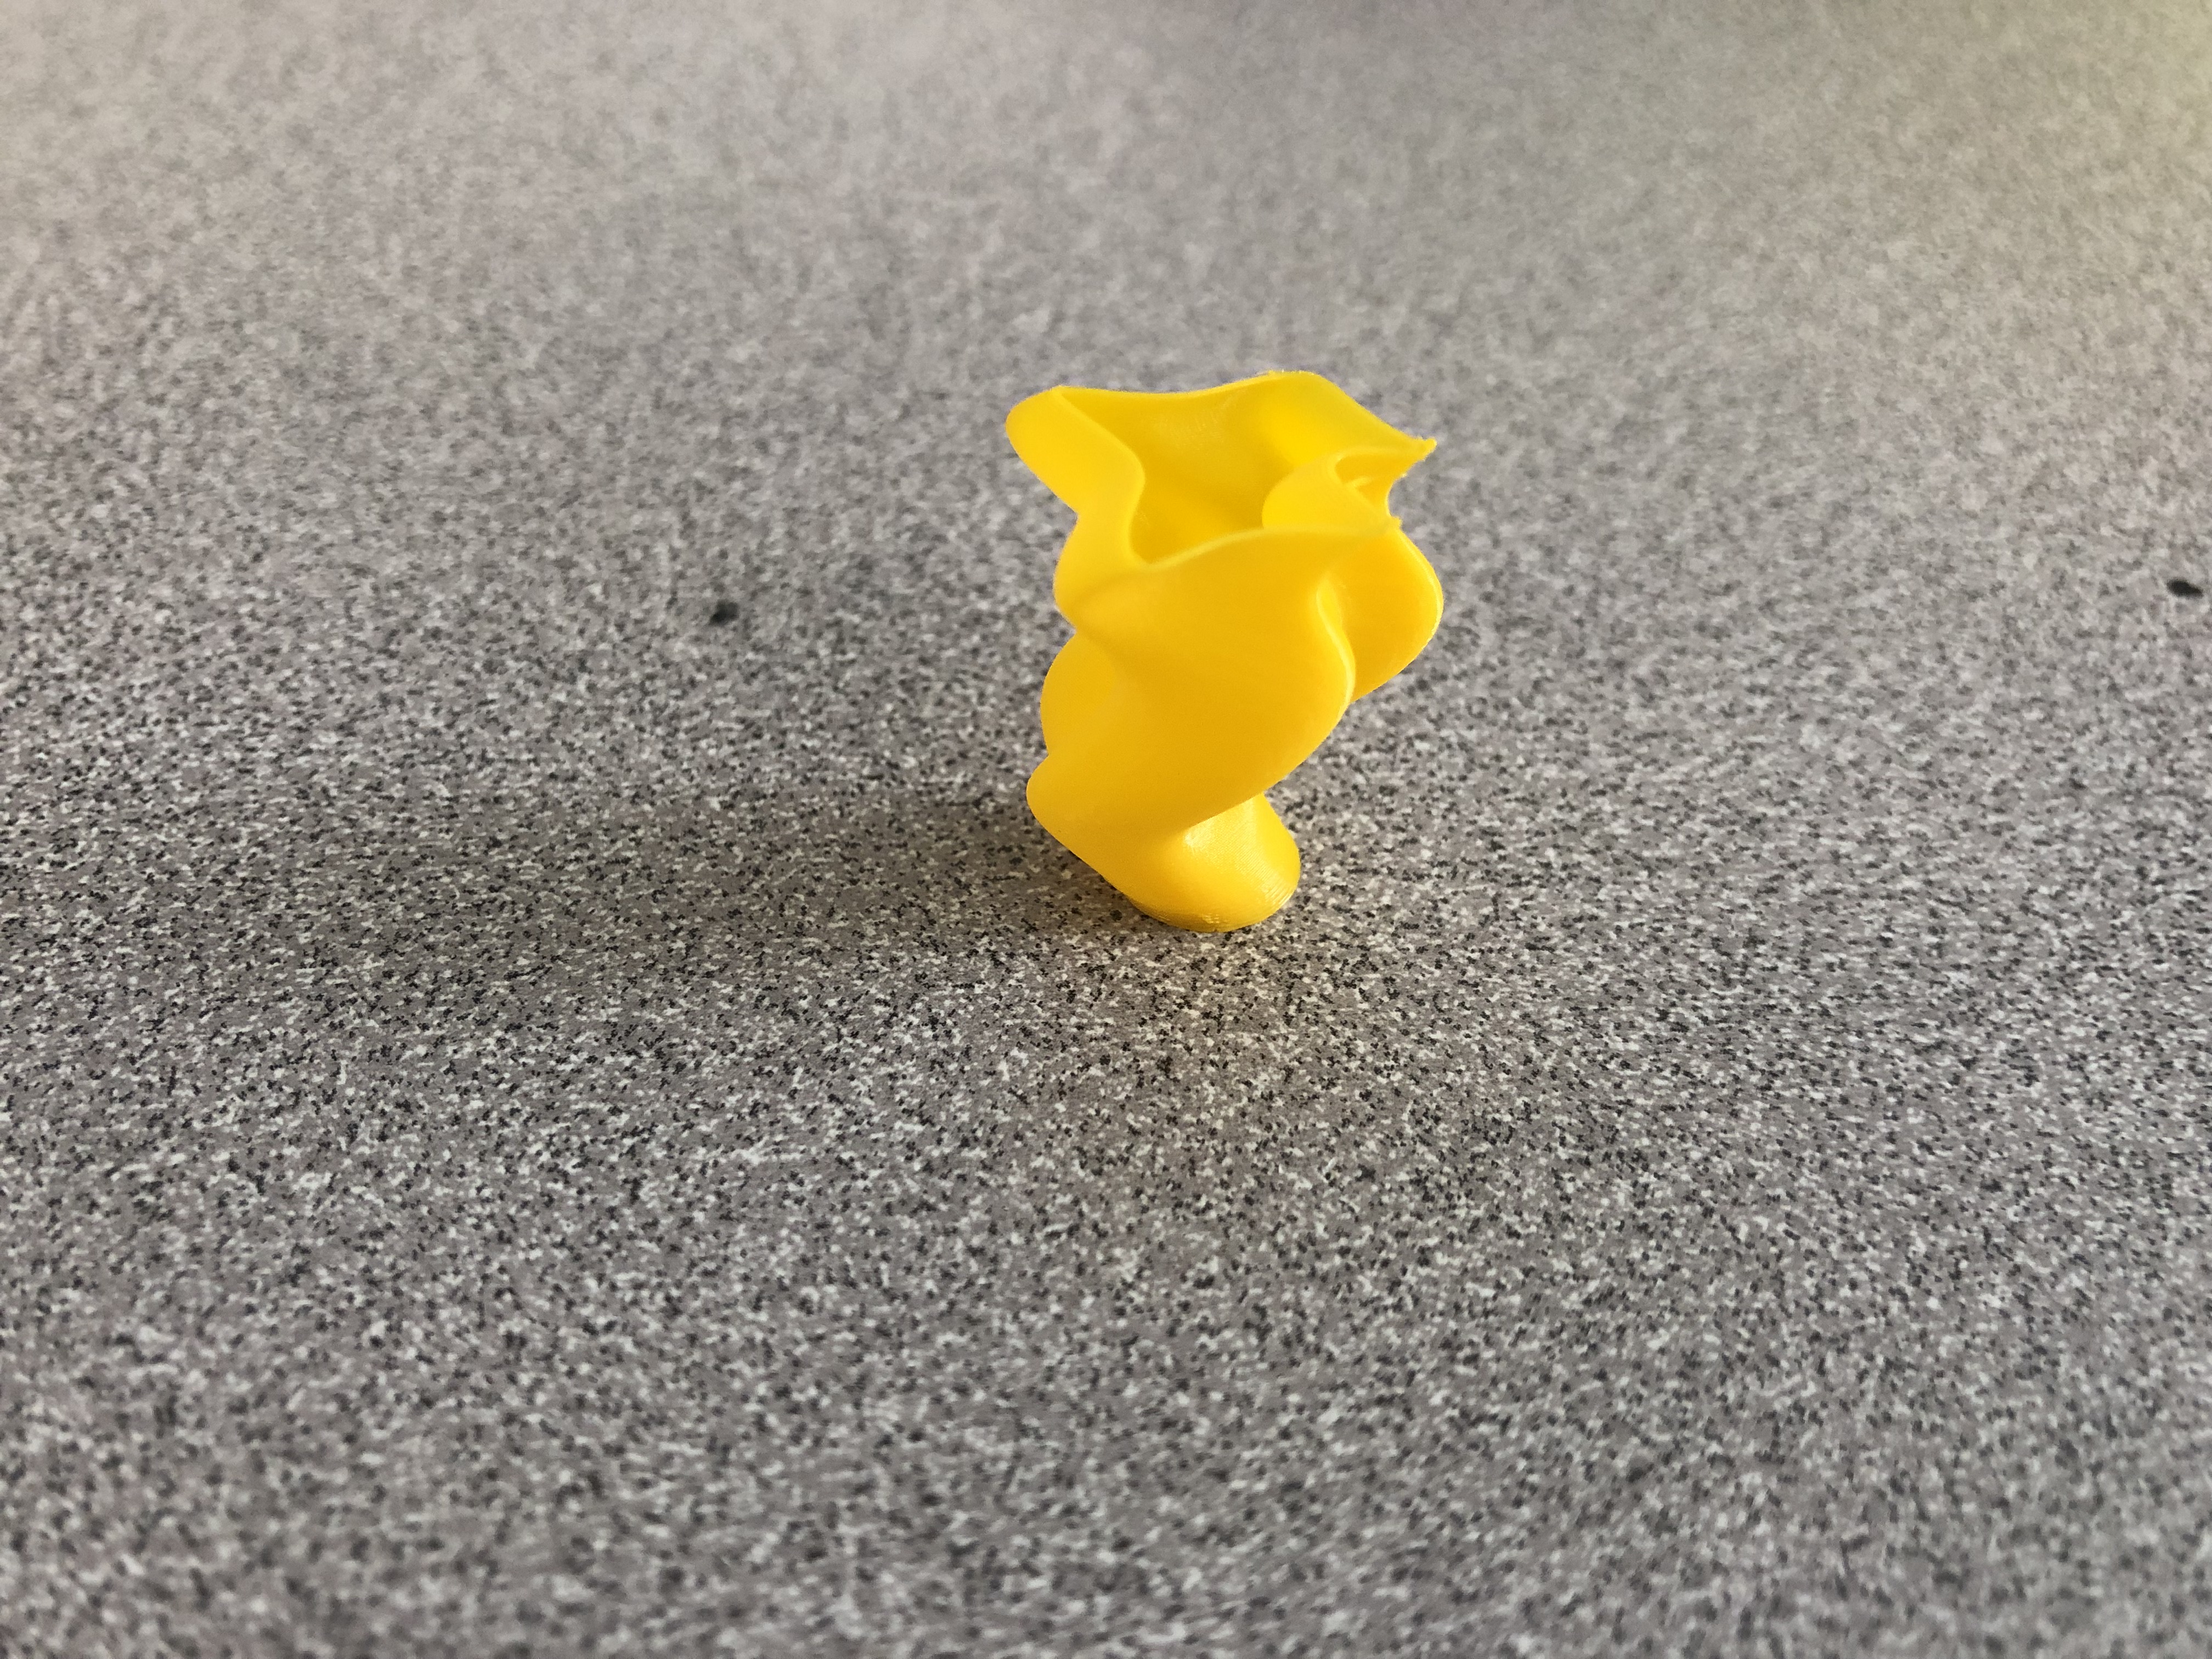
This is the small vase I printed different than the one above.
I think this printed really well. I’m surprised at how well it is able to stand on its own since it is very curved at the base. This did not take long to print at all on the machine. It took a little less than 20 minutes to print.
Link: Thingiverse
20 Forms in OpenSCAD
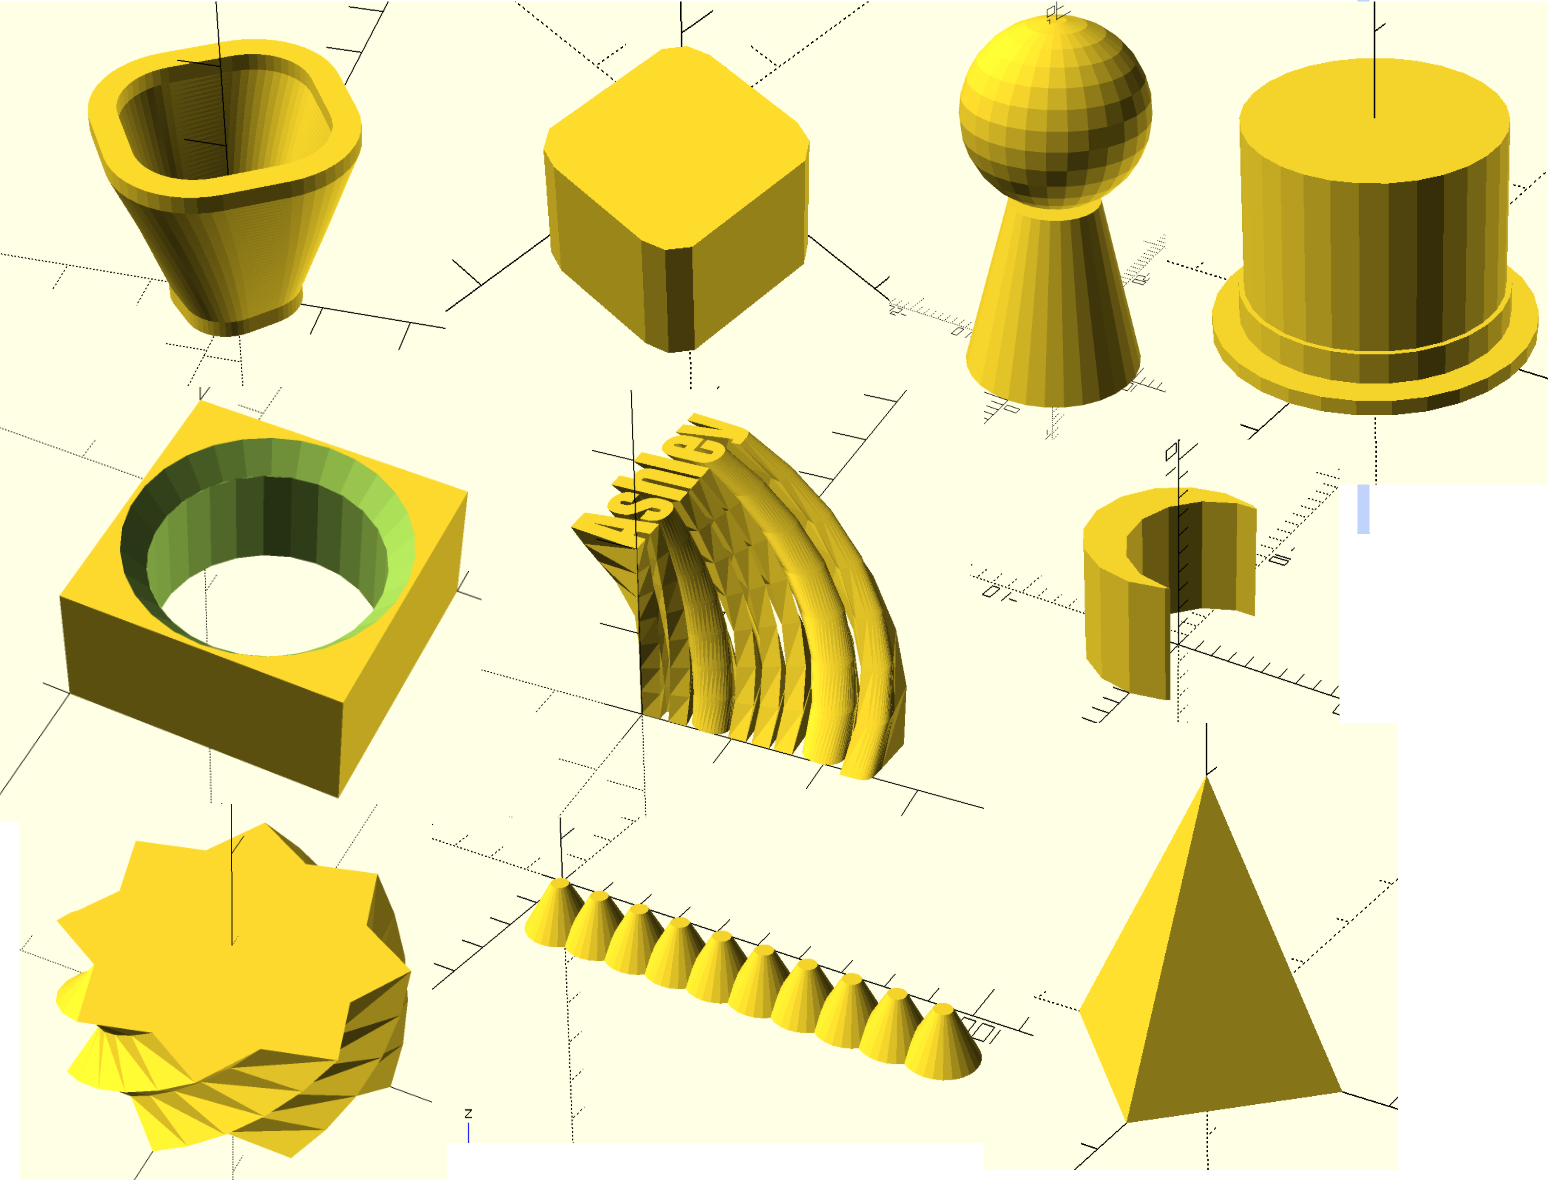
Going top left to right…
- Modified PolyBowl: adjusted the settings in the PolyBowl video to create a new version of the bowl
- Rounded Cube: watched a video to recreate a rounded cube
- created what looks like blocky cylinders
- joined the four cylinders together using the hull function
- Sphere and Cylinder: created a sphere and cylinder and used the translate function to move the sphere along the z axis
- Hat: created 3 cylinders
- first created a general cylinder for the base of the hat
- created another cylinder for the height of the hat
- created another cylinder and translated it upward to create a ribbon-like design around the hat
- Rectangle with Hole: used the difference function to create a hole
- created a cube
- created a cylinder and translated it over to the middle of the cube
- watched this video to learn how to create a chamfered hole
- Reminded me of the Fillet feature in Fusion 360
- essentially created another cylinder on top of the previous cylinder
- Ashley: played around with modifying text
- used text to write my name and change the font
- used linear_extrude to give it height and twisted the text
- Moon: made two cylinders and translated one of them to intersect the previous cylinder, then used the difference function to create a hole
- Star: created a twisted star
- watched video to make a star with a for loop
- used linear_extrude to give the star height and twisted the star
- Multiple Cylinders: used a for loop to create multiple cylinders along the y-axis
- Pyramid: played around with the number of faces for a cylinder to get it in the shape of a pyramid
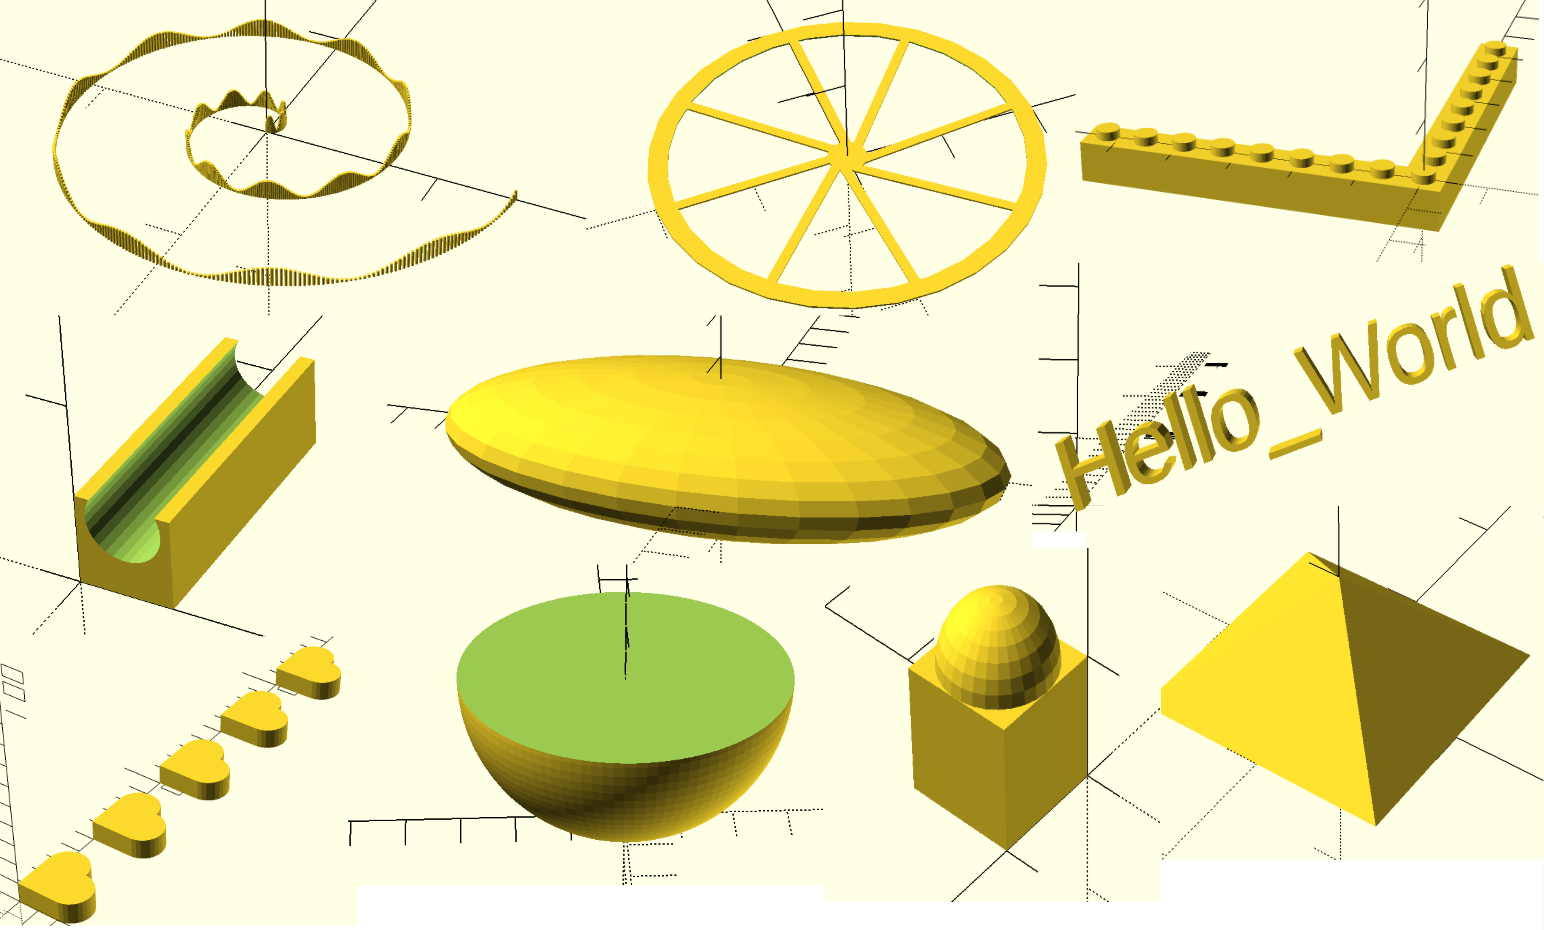
- Spiral: used the code to create the a linear sin(x) model with cylinders and modified it using a for loop and rotated it to create spiral
- Wheel: created a wheel using a for loop
- created a cylinder then subtracted out a smaller cylinder
- created a line using a cube
- twisted the lines by using a for loop with translate and rotate features
- Lego: watched video to learn how to code for a module
- created legos along the x- and y-axis using a for loop
- Half Pipe: created a cube then subtracted out a cylinder
- Flat Circle: modified the code to learn to make this funky shape
- Hello_World: wrote text and rotated it along the x- and z-axis
- Hearts: used code for the individual heart but created own code to make multiple using a for loop
- Semi Circle: created a sphere and subtracted out a cube on top to cut it in half
- Sphere and Cube: created a cube and placed a sphere on top
- Pyramid 2.0: used the polyhedron function to make points to create a pyramid again but using different code
OpenSCAD Print
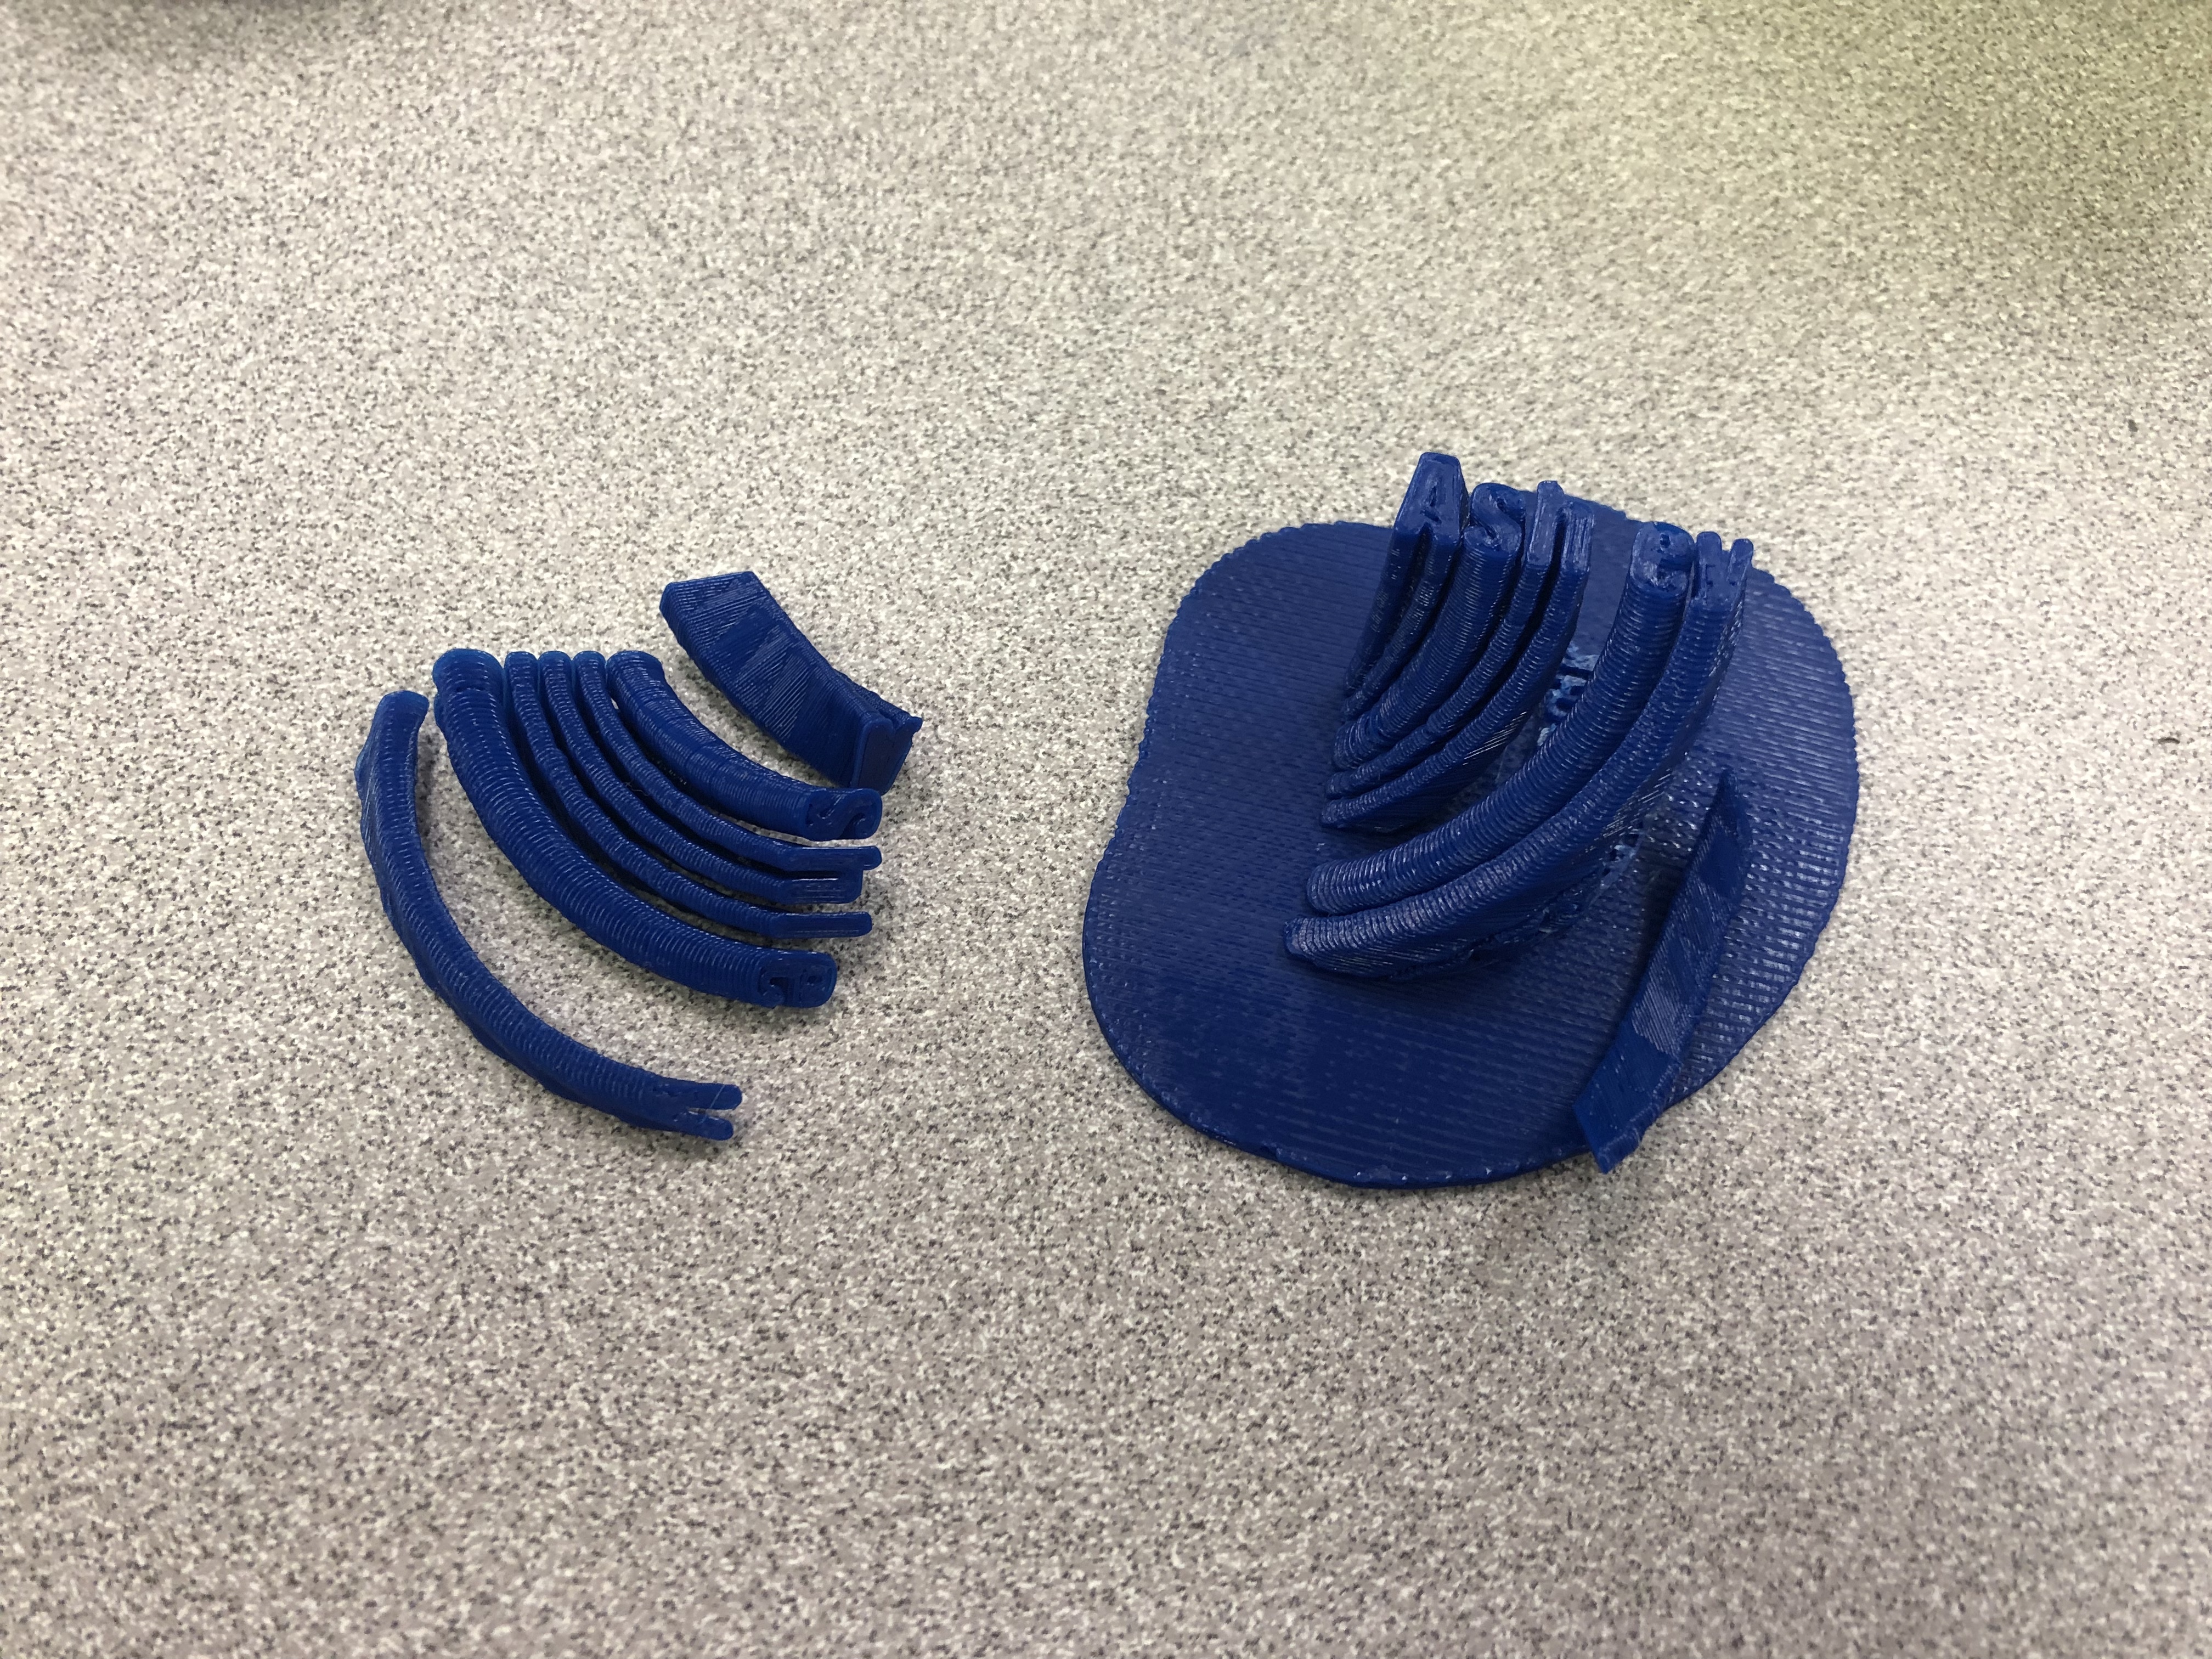
I chose to print the model of my name. This design was hard to print because of the twist. It gave a slight overhang to the model. So, the first two trials were a failure. When I printed it for the first time, the model only had a skirt tracing the design. I did not realize the letters did not stick together. Therefore, when it was time to take the model off the print, the letters came off individually. So, I tried to print it again using a raft to secure the letters. When I printed it the second time with the raft, I thought there would be too much of an overhang, so I used support. After the second model printed, the letters were not secure but I could not successfully take out the support. Two of the letters were ripped off and the support would not fully come off the raft. I printed it for the third time and the result is the picture below.
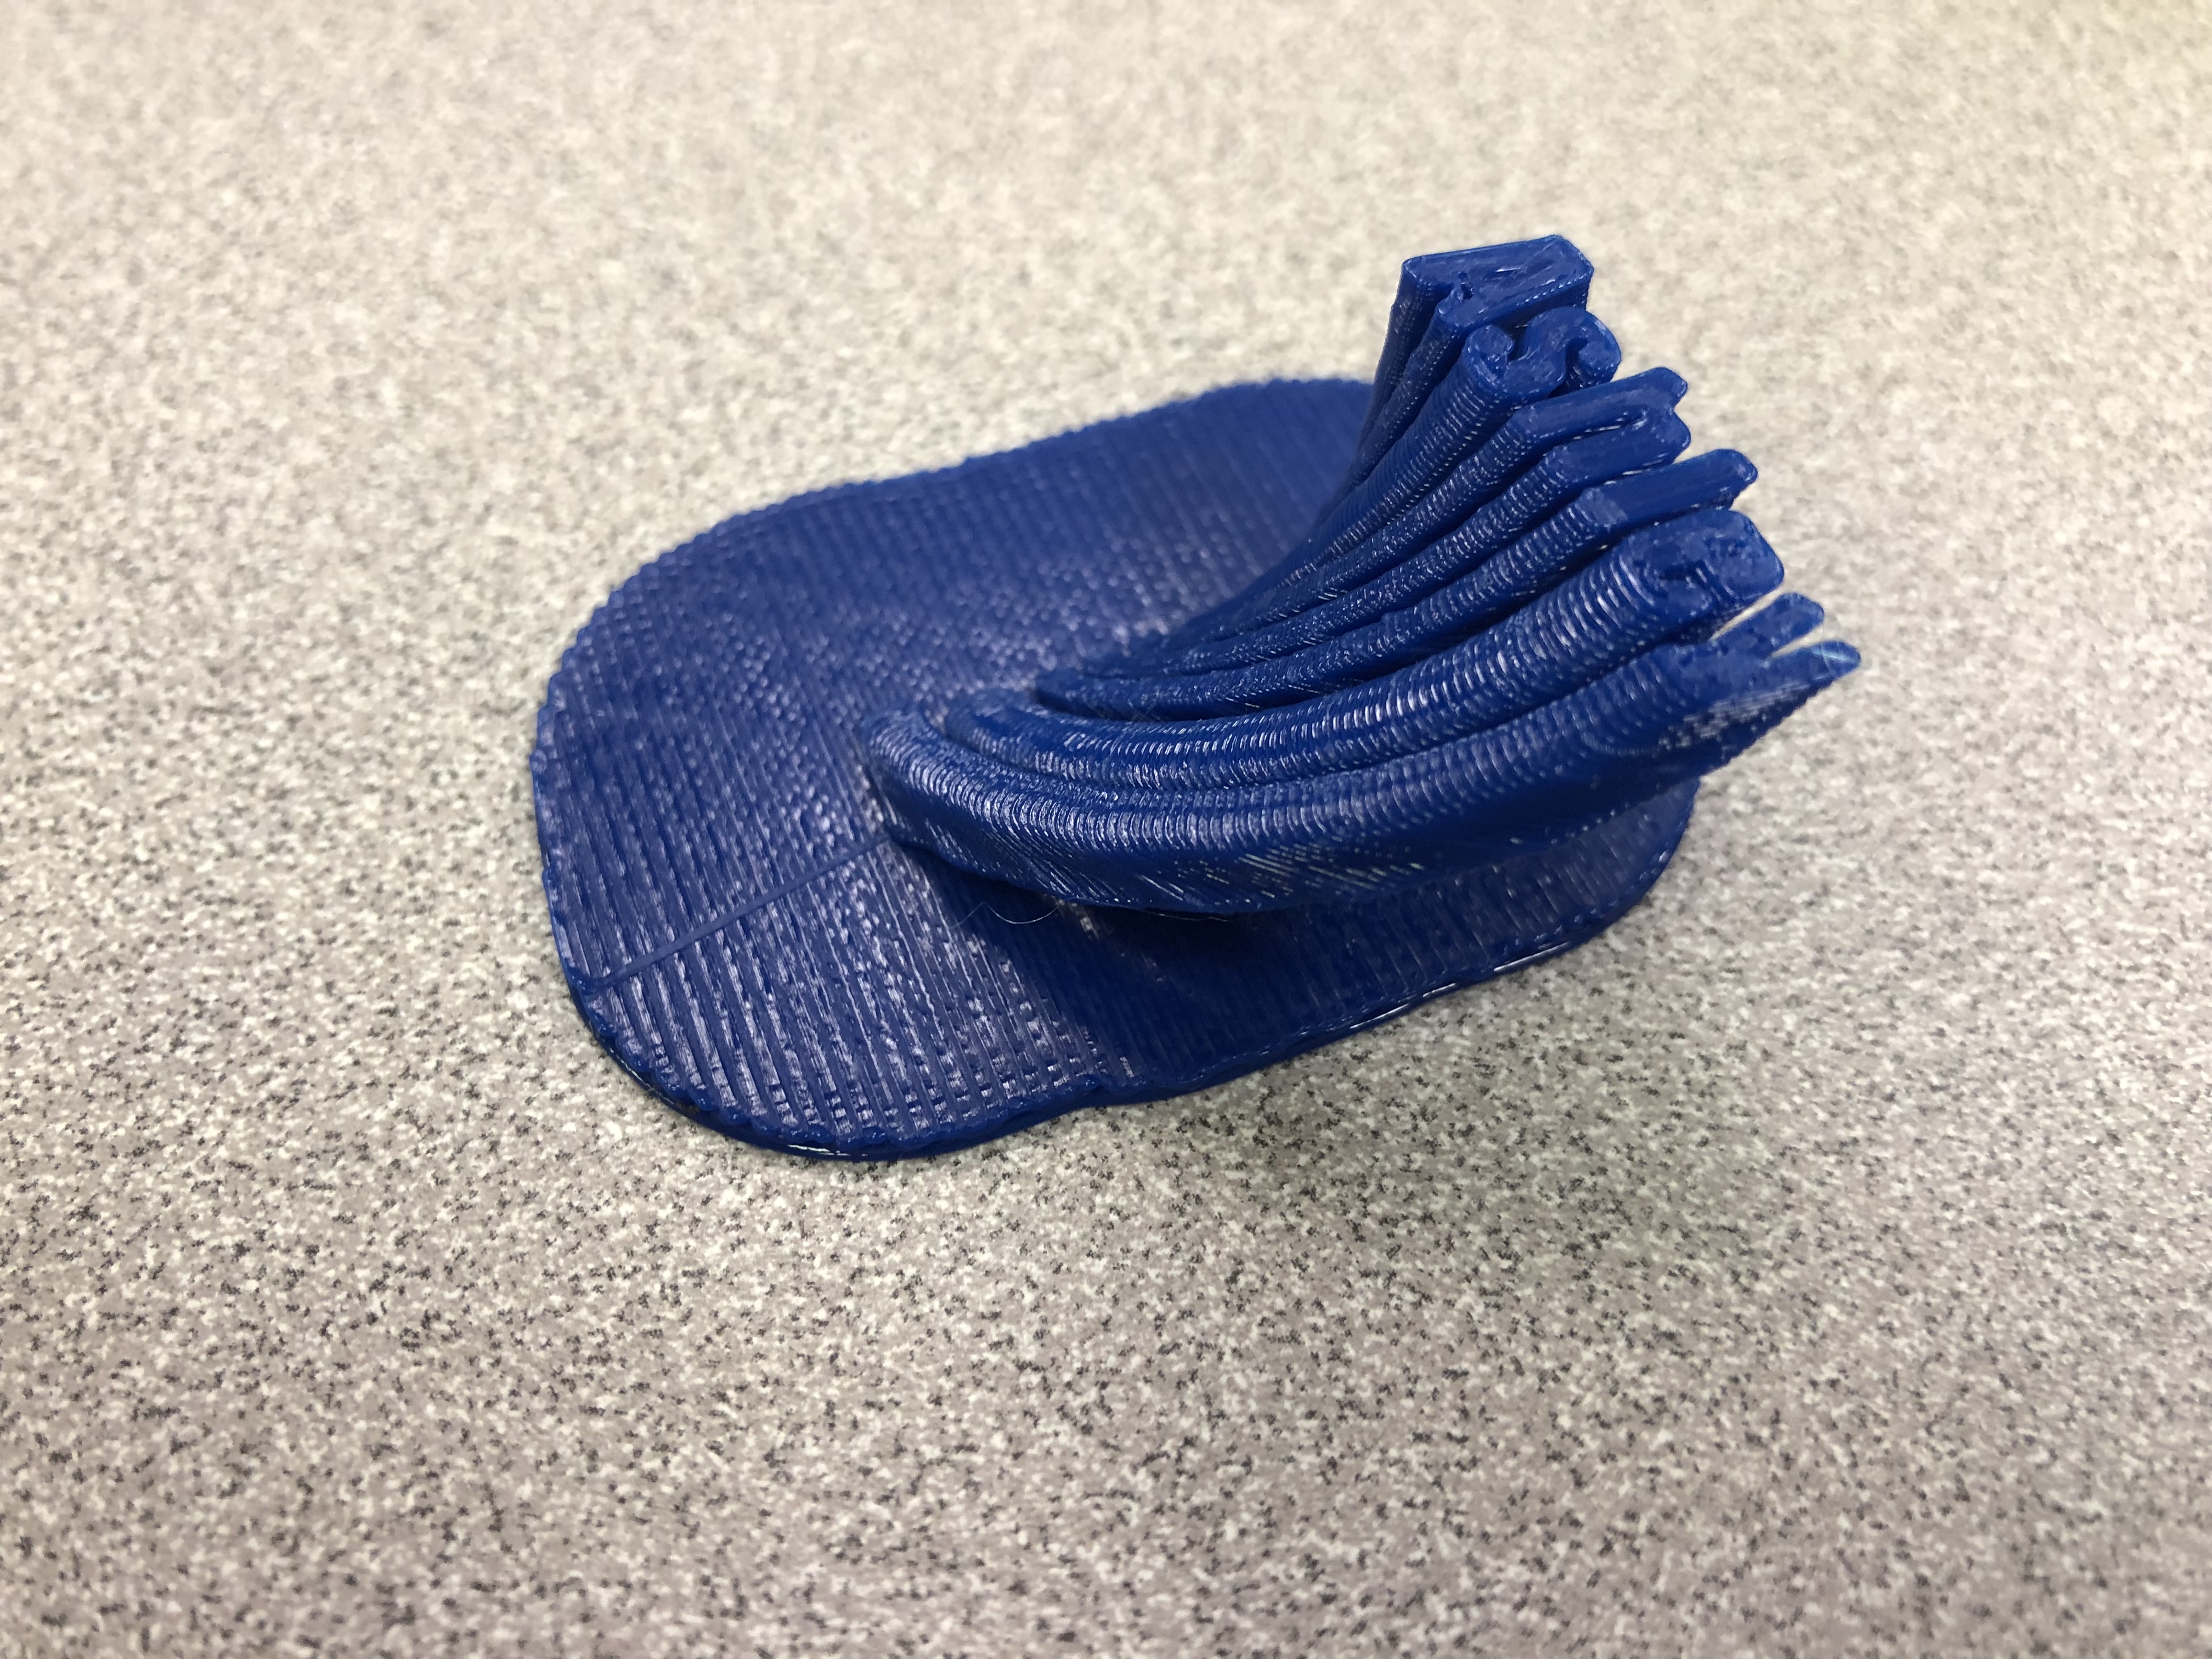
The third trial was success. The brim helped the letters successfully twist. I was able to get the overhang this time. I just made my image larger and did not use a support this time. This was a challenge for me because of the difficulty it was to print. After a couple trial and errors, it eventually worked.
Summary of Group OpenSCAD Project
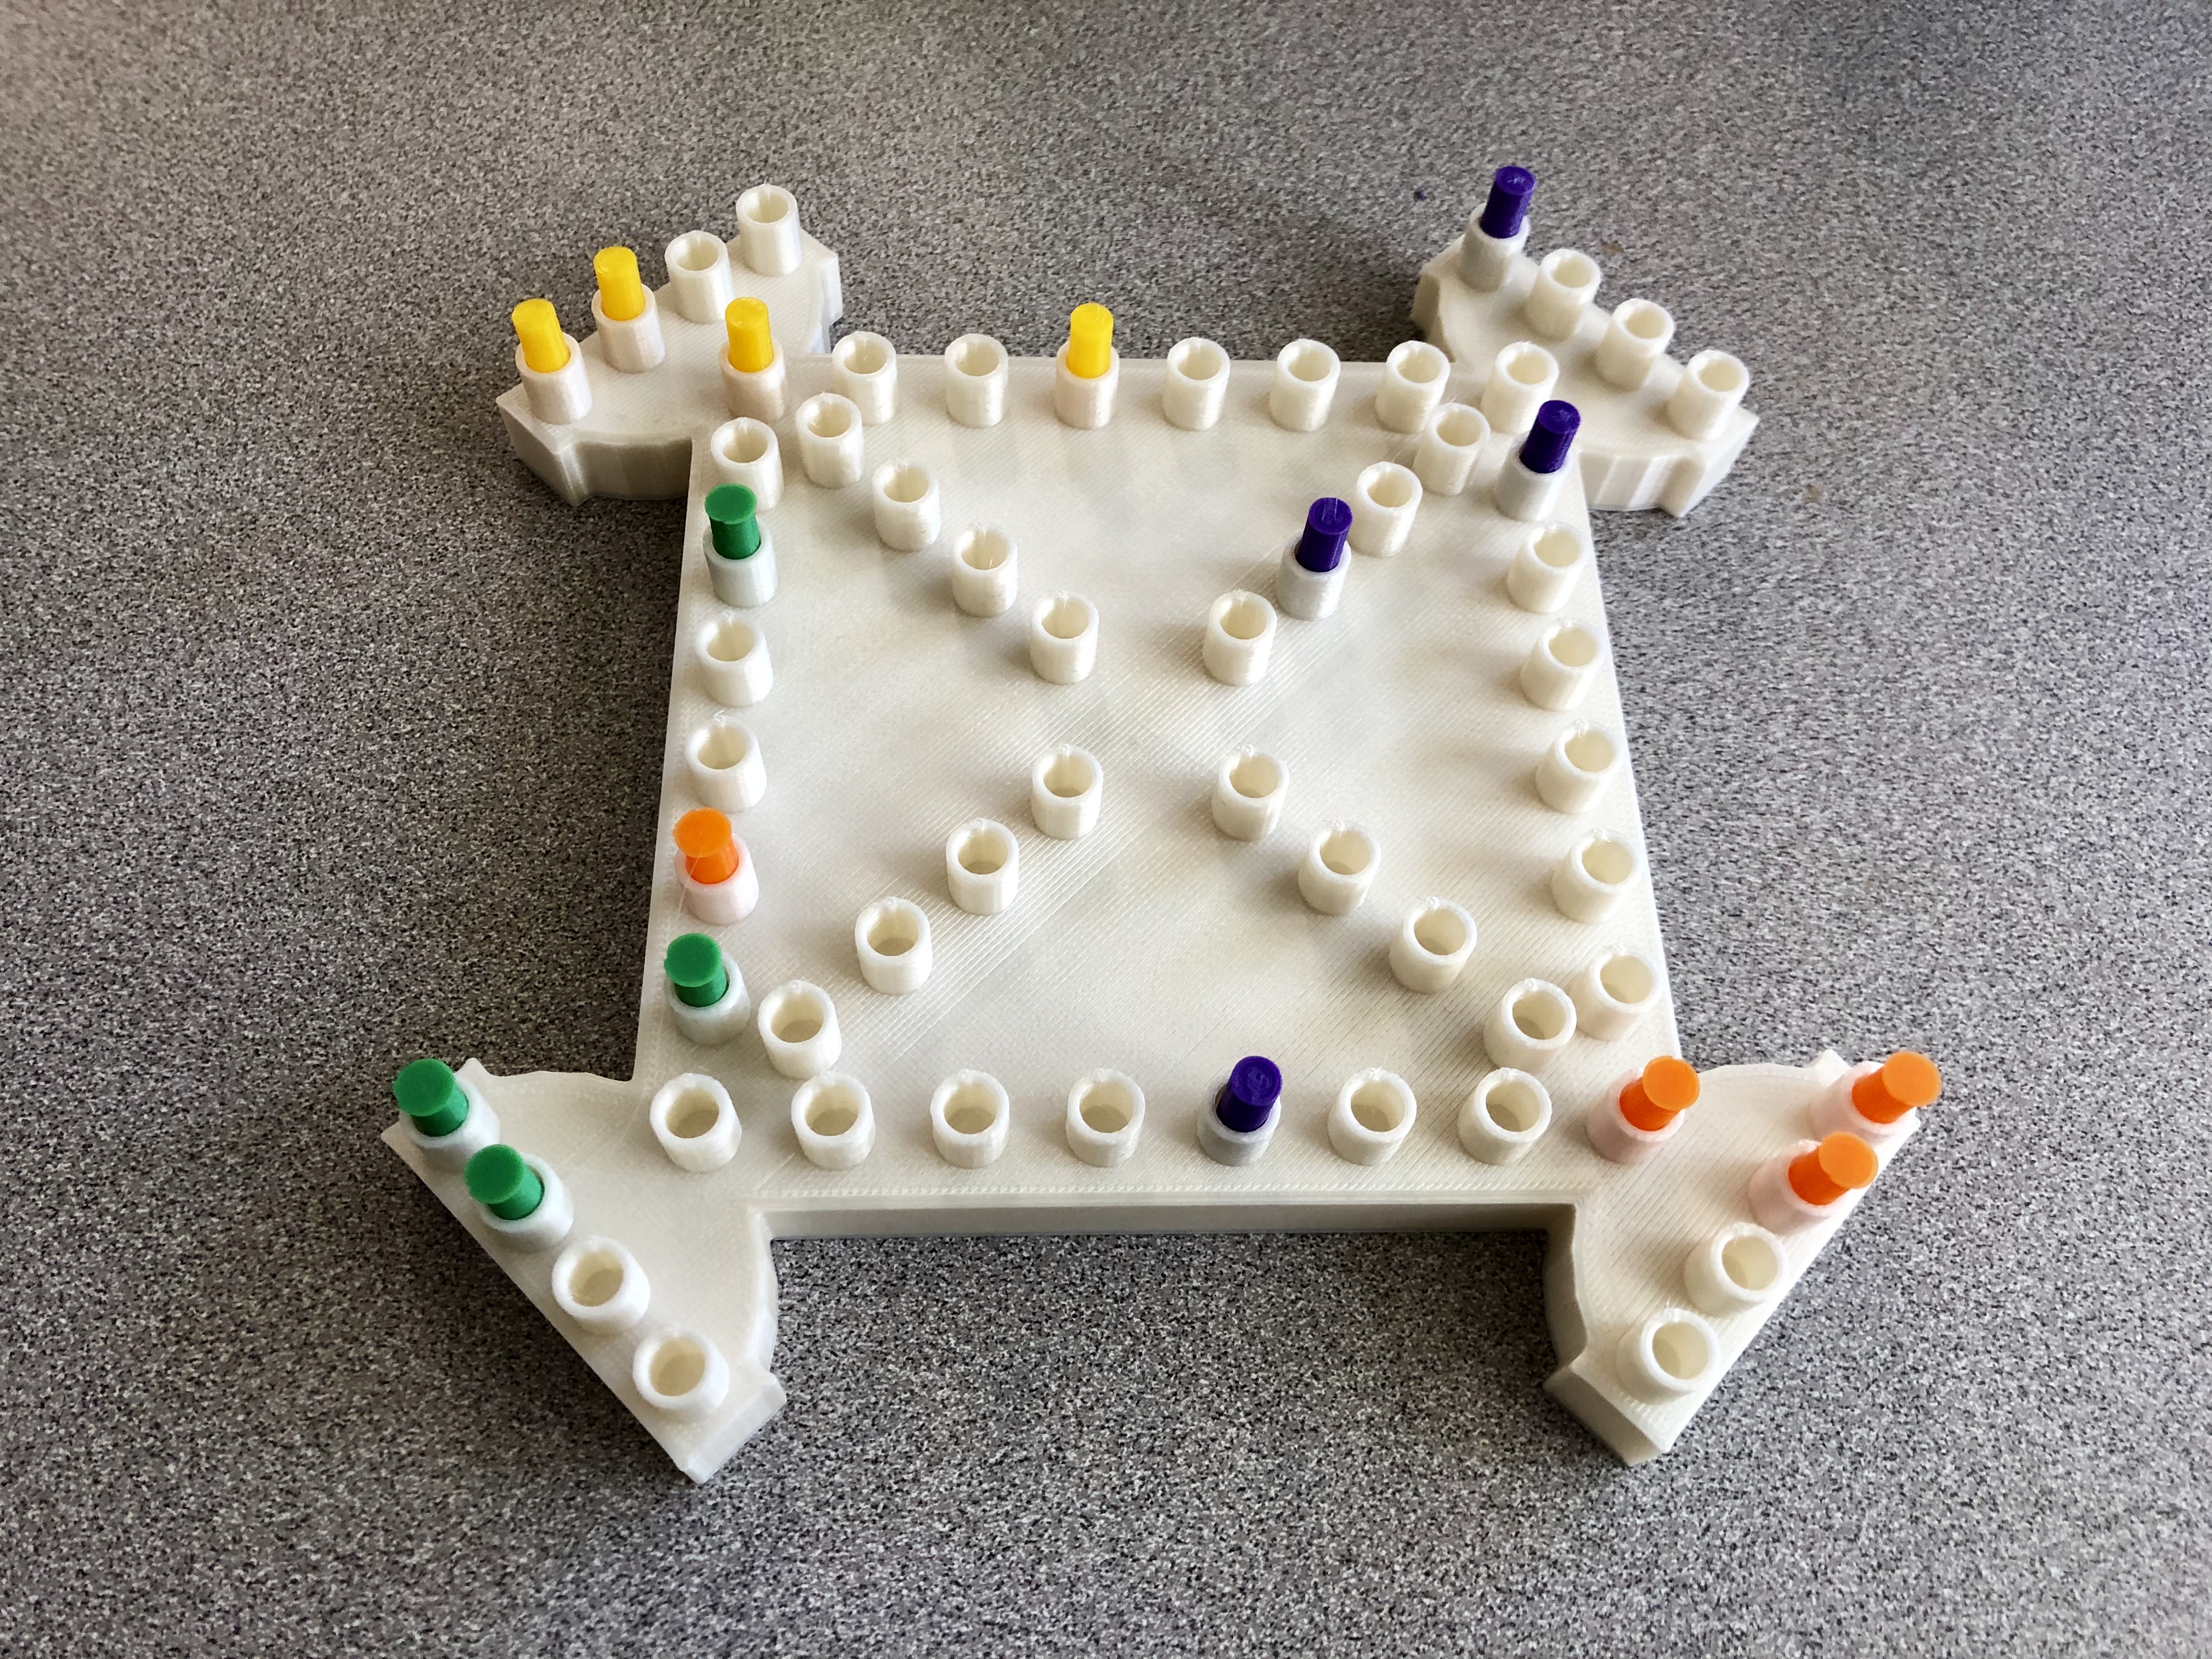
Austin Lam and I created the board game Trouble pictured above.
Link to Trouble Board Game with Pieces
The game board is designed to where the players get to choose the size of the game board, size of the spots, the number of pieces, and the number of spots per corner. Originally, we wanted to use adjust the game board based off the number of players. For example, if there were 3 players, then the board would be shaped like a triangle. If there were 4 players, then it would be shaped like a square. However, the mathematical principles behind each figure were not the same for each shape. In the end, we decided to allow the players to modify a 4 player board. I think we still did a great job designing the board, and it turned out as a success. It took a lot of trial and error because there were a few complications with the board printing successfully. The main problem was getting the height of the spots to print. It was solved through making the game board large. It was personally hard to me because I don’t have a lot of experience coding. So, I was really glad to have Austin as a partner since he’s a computer science major.
To read more about the project, click here.
Reflections and Future Projects
This is one of my favorite classes I’ve ever taken at JMU. It challenged me to explore and create different 3D objects that I never imagined myself doing. My favorite 3D printed model I made this semester was the Bridgeforth Stadium with Austin. It provided a challenge because we used a drag and drop method to make everything. And, we were able to make it look almost like the real stadium. I thought it was really interesting to learn different ways to make 3D printed designs. My favorite was using Tinkercad because it was the easiest for me to learn as a beginner. I think using OpenSCAD would have been nicer to use if the class was a regular 3 credit class. I would have felt more comfortable using OpenSCAD then because I would have more time to explore with the program.
At times, I did find the course challenge but only because of how fast paced things moved along. Even though there was a lot of work for the course to meet the deadlines, I really enjoyed spending time making models for class. Since it was unlike anything I’ve ever done before, I enjoyed spending my time working on projects for the class.
For the future, I could see myself wanting to 3D print certain functions on an x,y,z plane for my future high school students. I think my future calculus students would then have a better understanding on what certain graphs look like if they are able to see them rather than trying to interpret the image from a sketch or trying to imagine the function in their heads. Additionally, I would like to add to Bridgeforth Stadium to get the wrap around student section of the bleachers to have them connect. We were not able to do that for the original model because of time. But, I would eventually like to go back and add that feature to make it more realistic.