Hello
10 points, due by noon on Thursday 1/10
Hi!! My name is Skylar Simone and I’m from Monmouth County, New Jersey! I grew up 10 minutes away from the beach and anyone who knows me knows I practically live in the ocean. I played soccer all of my life until college so I consider myself pretty athletic and I also did a lot of acting and singing! I am currently a sophomore majoring in business and I plan to concentrate in marketing. My family and I are really into traveling so I’ve been to many places outside the country such as Italy, Portugal, Canada, and Saint Martin! After college, I plan to create my own business and base it in NYC because thats my favorite place in the world! Since my family is from NY and we only live an hour away from the city we would go at least one weekend a month and I also worked there the past two summers! At JMU, I am involved in Greek Life and plan to join DECA to help me further my skills in marketing. Business has always been a passion of mine. My parents would talk about their days at dinner and converse about stocks and liabilities and I would always be so interested and wanted to know and learn more. Finding out that JMU offered this class made me so happy because these hands on classes are surprisingly very hard to come by! I am so so soooo excited for this class because I’ve always wanted to see what 3D printing was all about and how it works.
https://www.thingiverse.com/skylarsimone/about
Thingiverse Model
10 points, due by noon on Thursday 1/10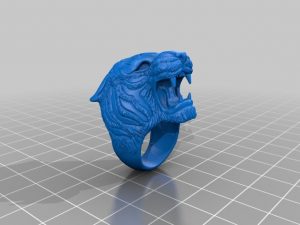
https://www.thingiverse.com/thing:1393575
Ring-Tiger, by FP-Creator
I choose this ring because, well it looks so awesome, but also because my zodiac sign is a leo. The lion has always been my favorite animal and to have a ring that I made myself would also be such a cool experience!
Thingiverse Print
10 points, due by noon on Tuesday 1/15
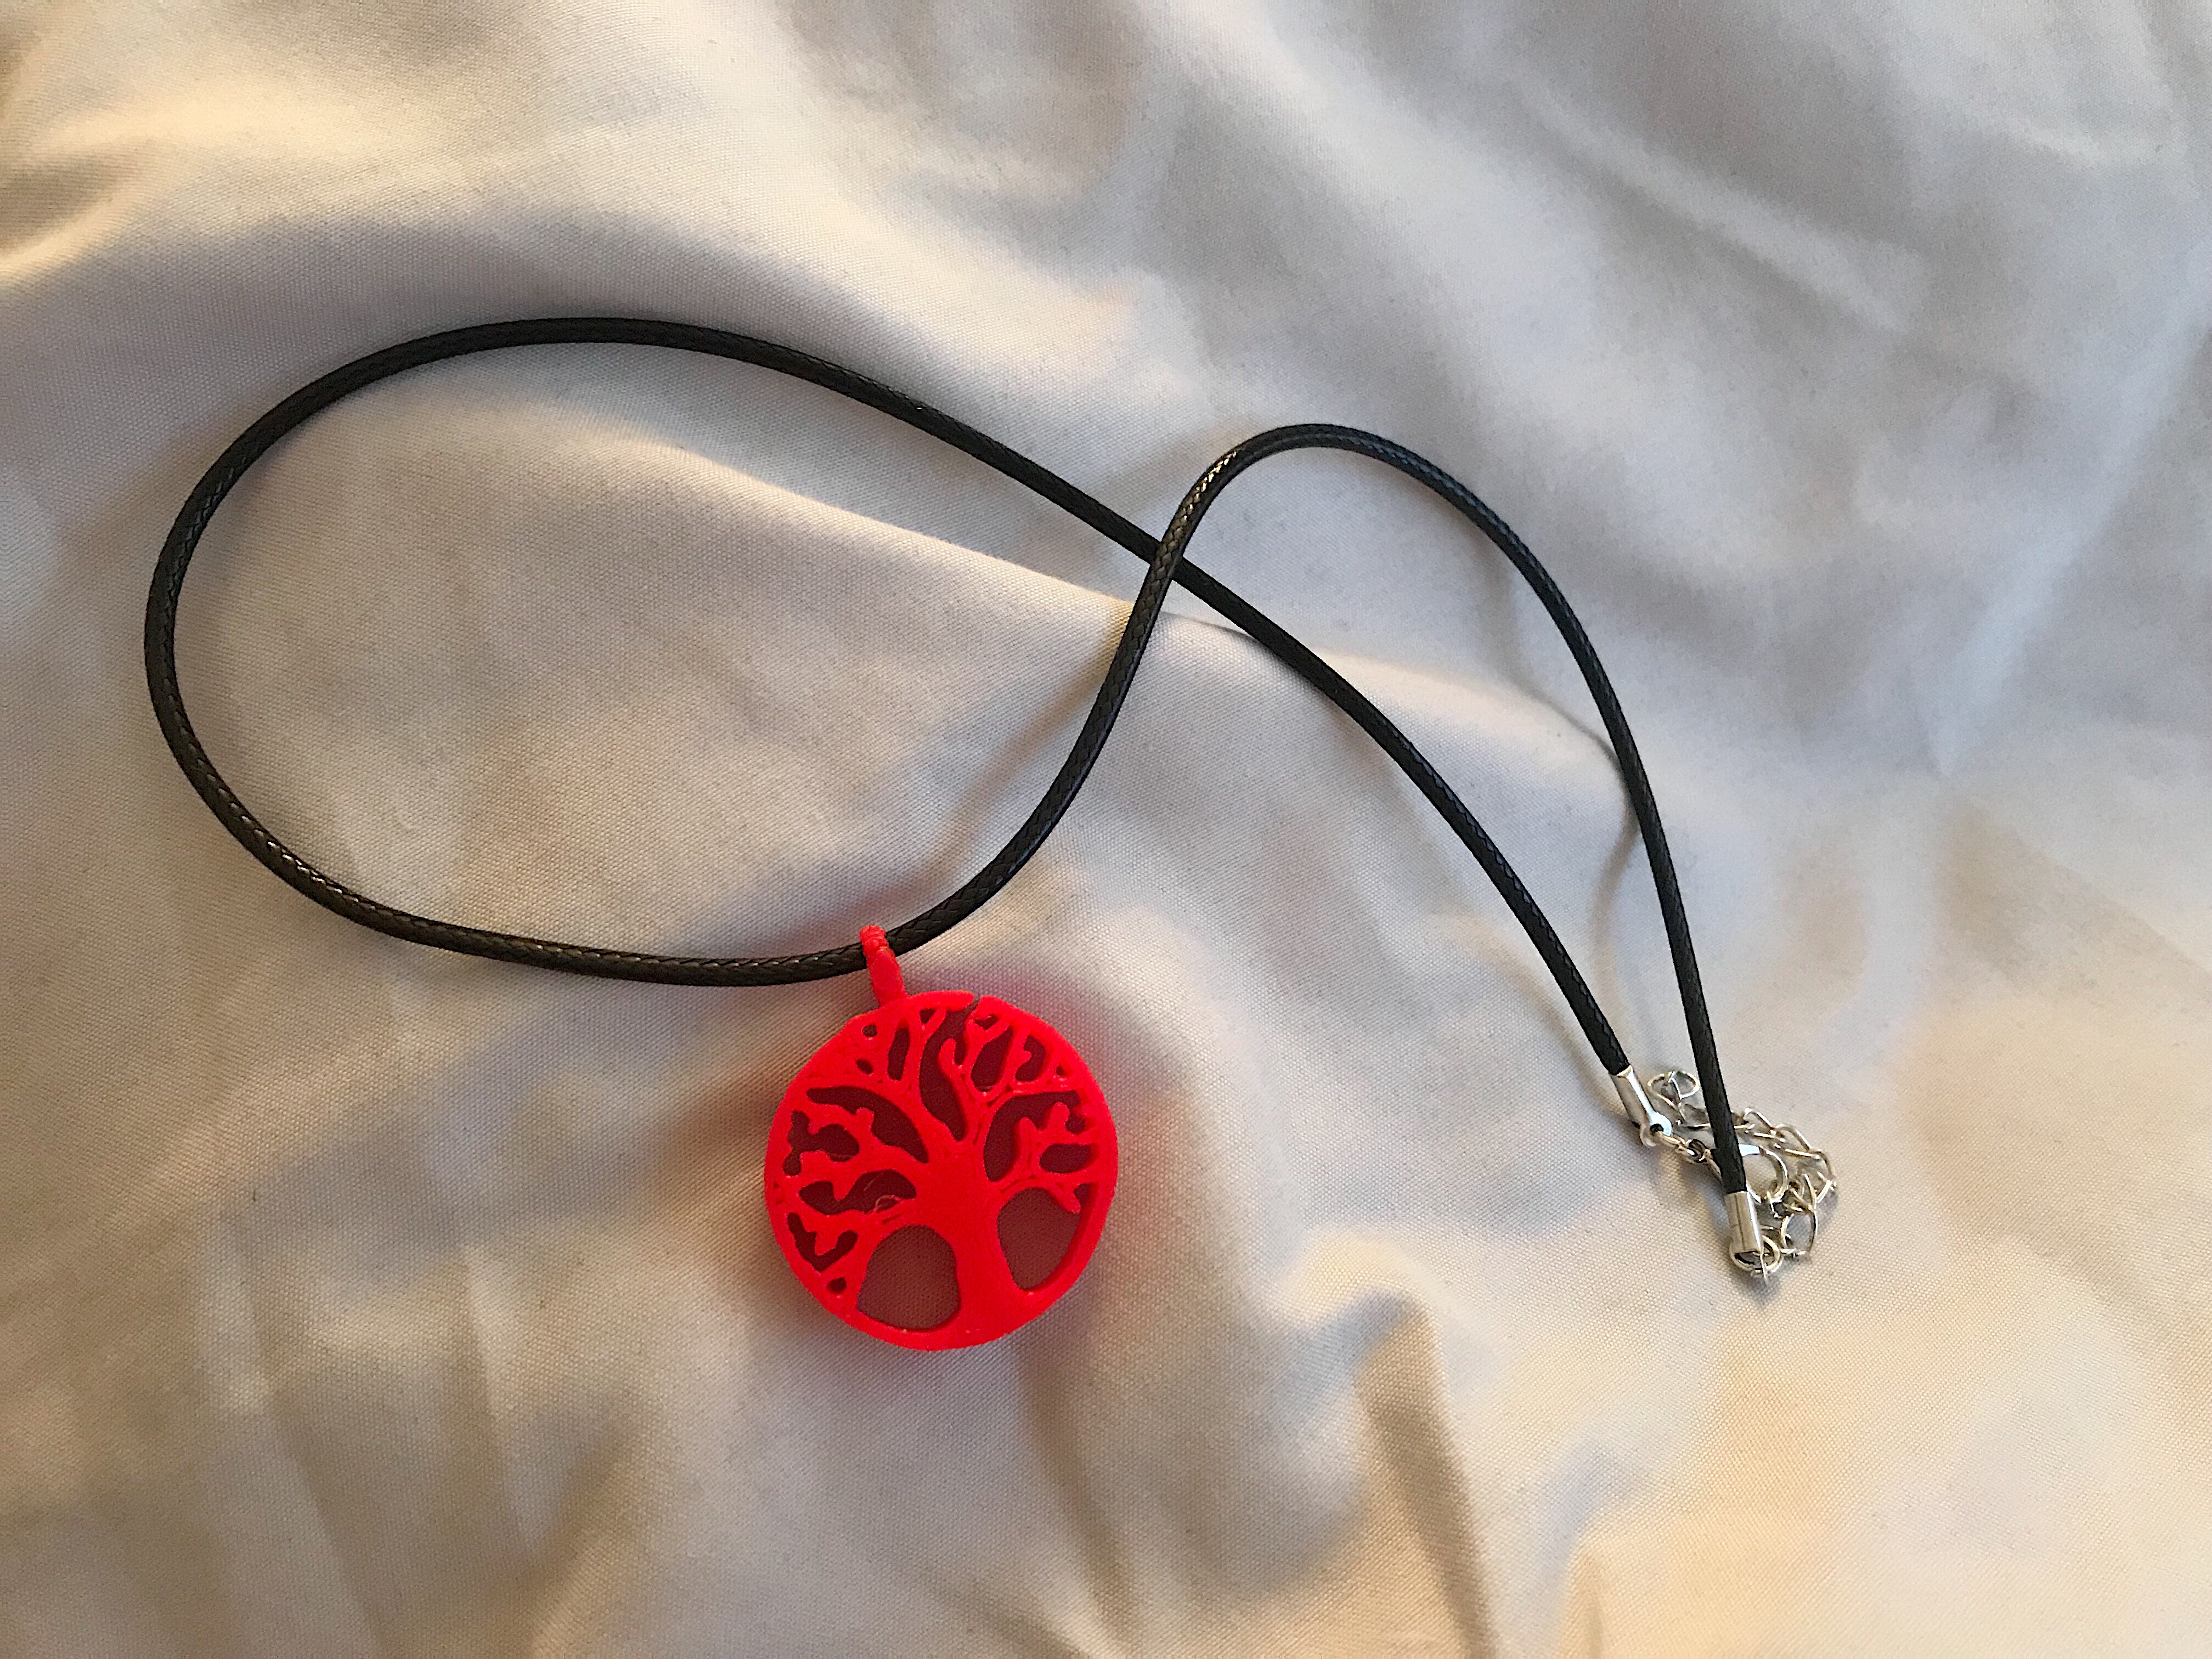
I think my print was truly a success, even though it took about four tries and two different printers to finally create the pendent. I really wanted to be able to make a necklace in this class and I’m super proud of the finished product. Its amazing to see how much detail actually went into creating the tree through the a 3D printer rather then just seeing a necklace in a store and not think about how it was made.
https://www.thingiverse.com/make:594850
20 Forms in Tinkercad
10 points, due by noon on Tuesday 1/15
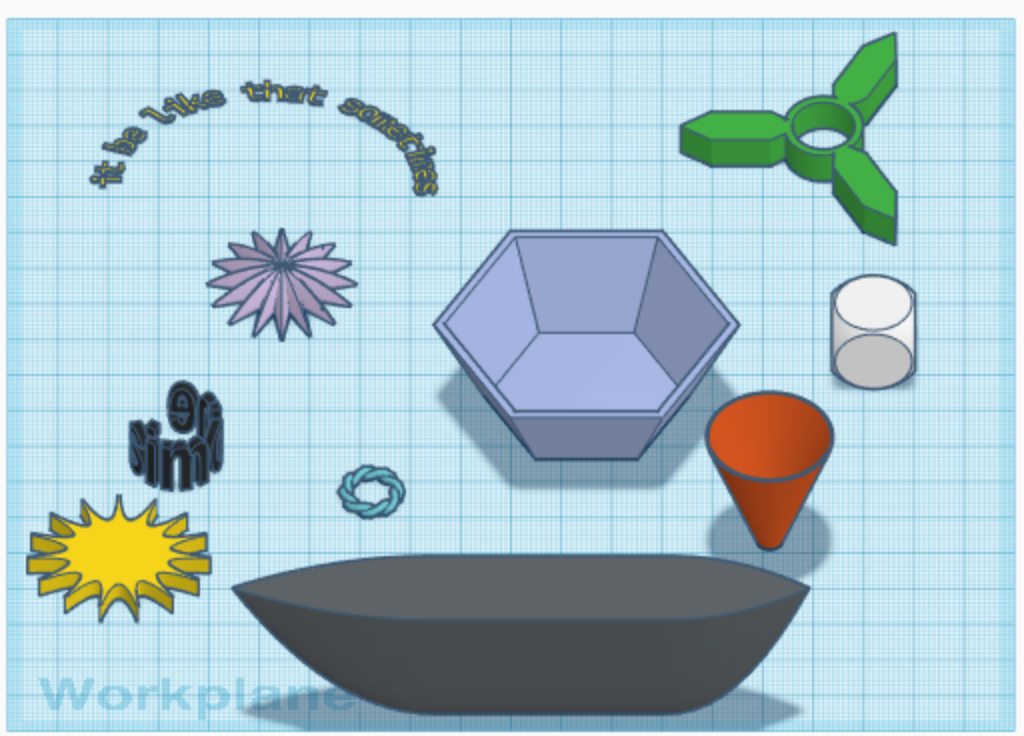
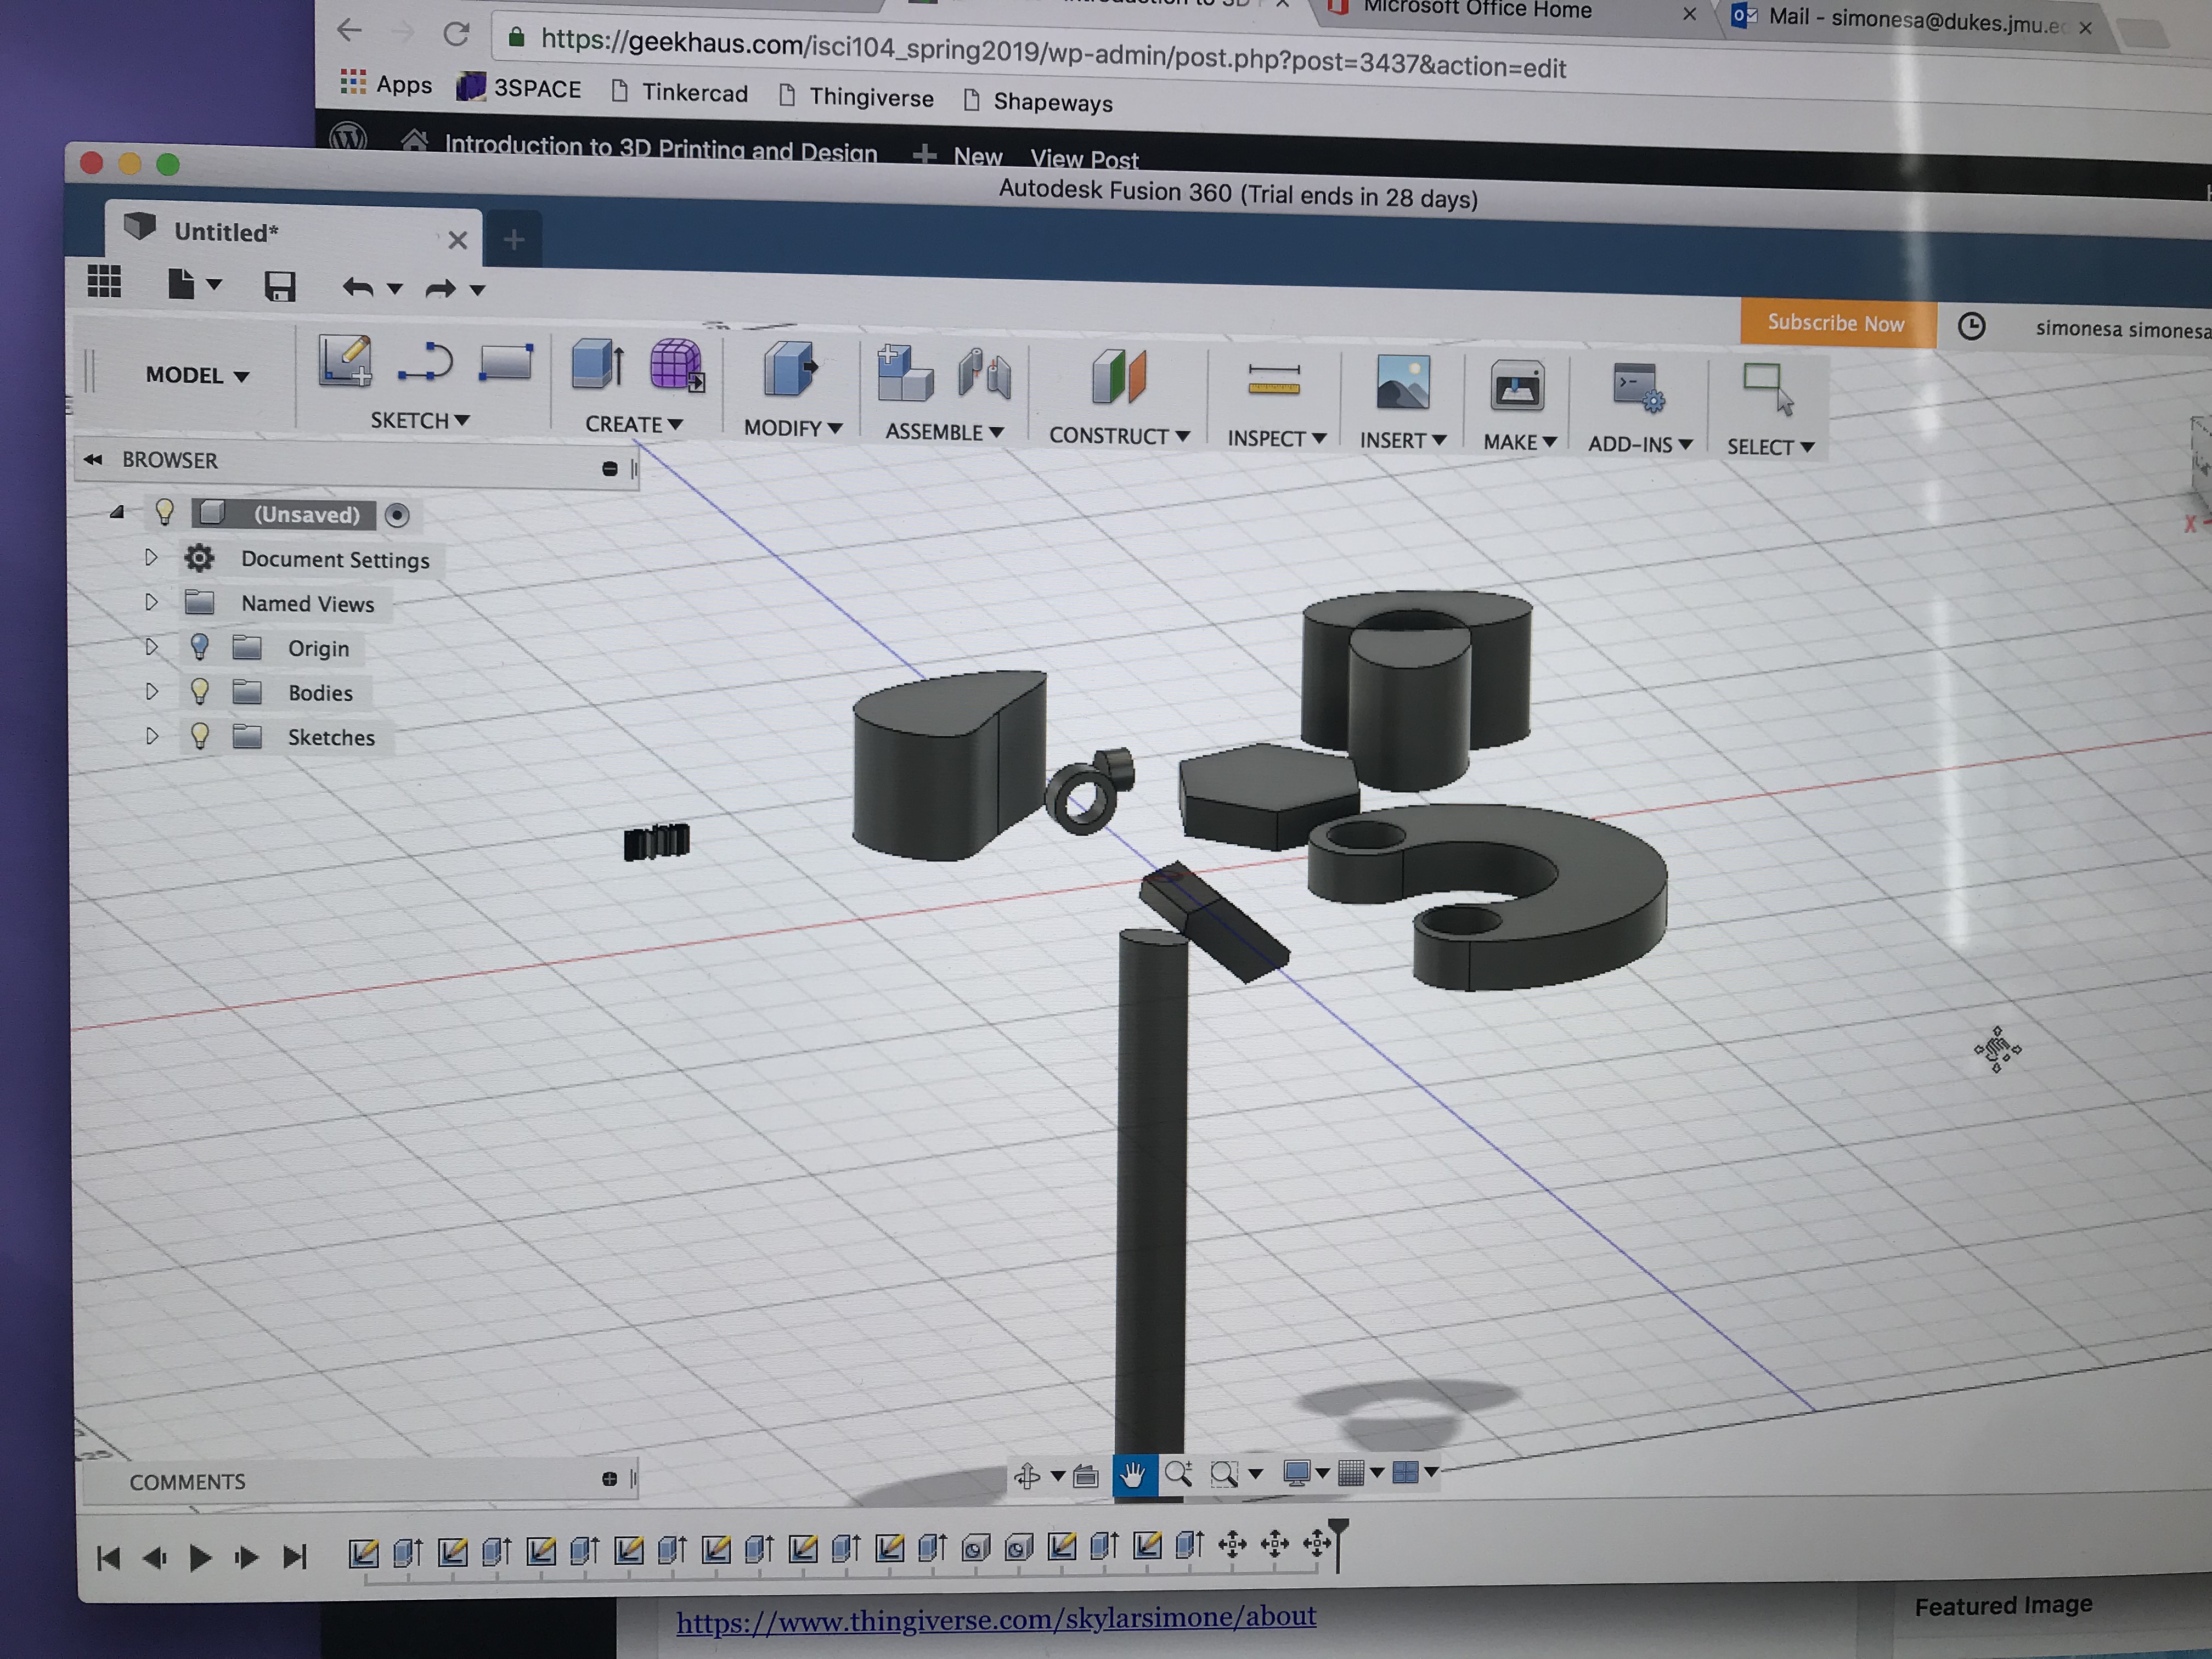
This project was so entertaining to do. It was fun to be able to play with different object’s height and width, whilst being able to change the color and even the wording. My favorite one on the first screenshot is the words “it be like that sometimes”. Its a pretty wide known quote of my generation and its pretty much the equivalent to “it is what it is”. I also am really excited about the dice because i made it white on purpose who i would be able to write words on the side and maybe create my own game. I made a ring of my last name because i already have a necklace with my name on it so i thought it would be cute! I also made cute easy design objects for decorations like the sun and flower.
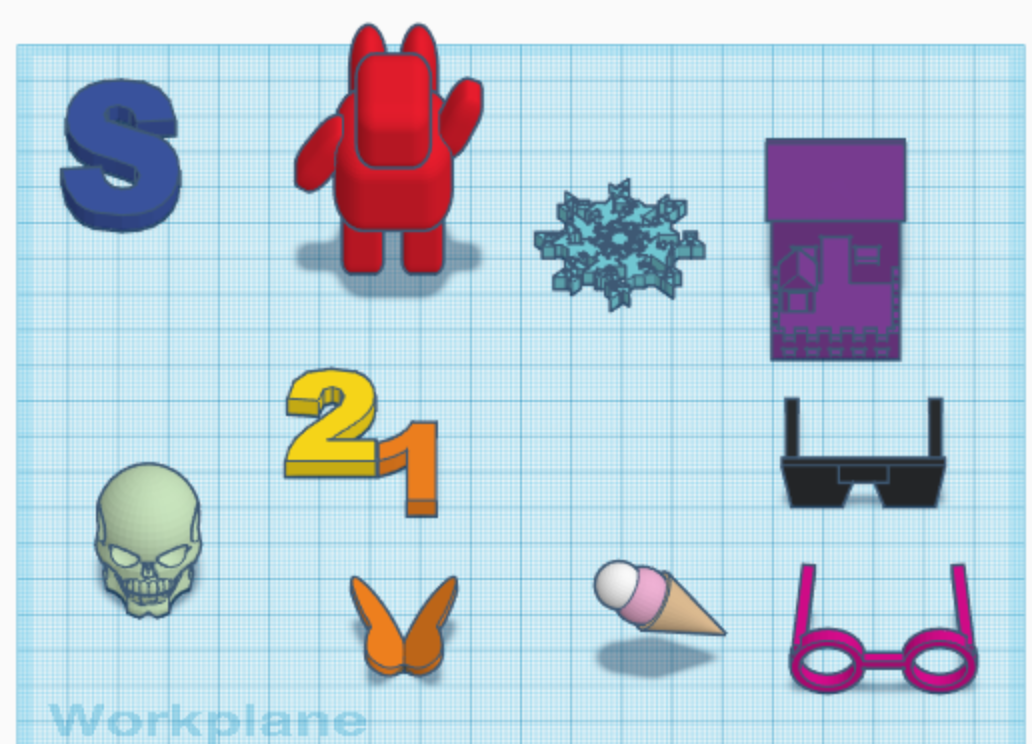
In my second screenshot, I combined two number to make my favorite number, 21. I also made a cute red robot that I know my friend would love to have. I printed the butterfly because my grandma adores the. I made two sunglasses because i thought they were really cool and i couldn’t pick between them so I created both! I also made a little ice cream cone because it reminded me of summer and this cold weather is awful but in spirit of the current weather i also made a snowflake!
Tinkercad Print
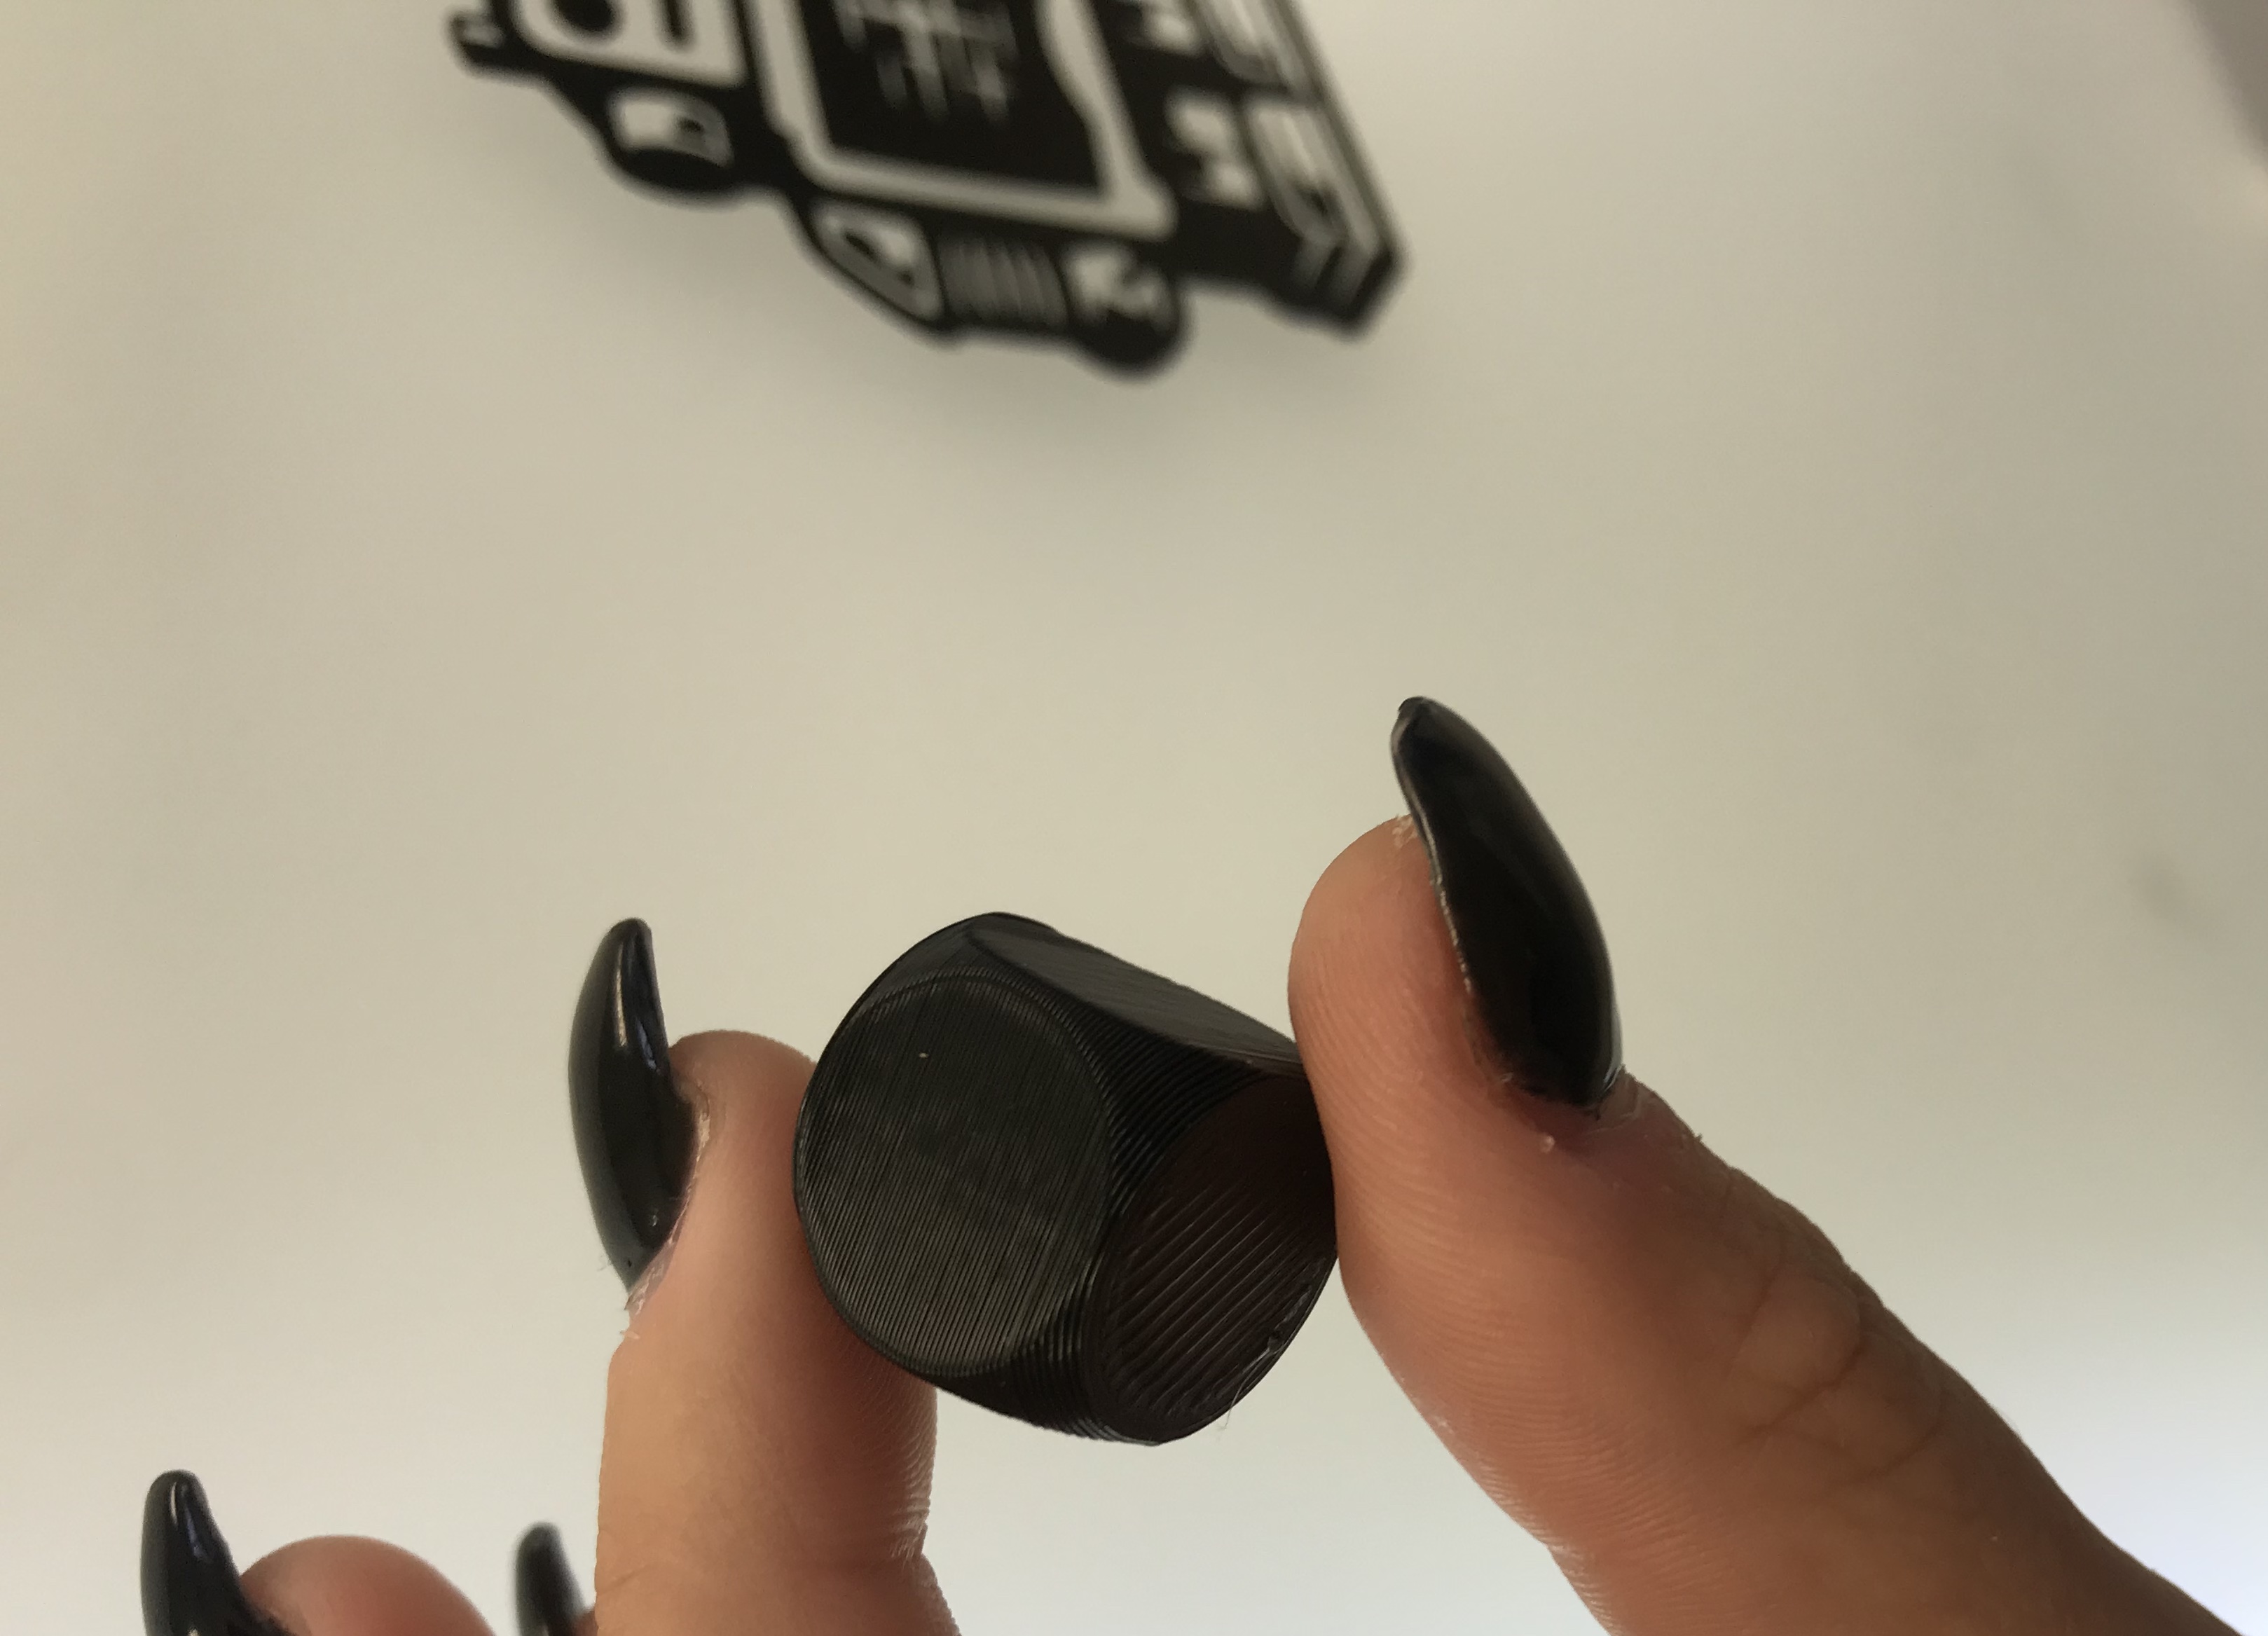
My dice was a perfect success! The only thing I was disappointed about was that I didn’t realize it was printing in the color black. My plan was to be able to write things on the side of the dice in black sharpie and create a game. Even though it didn’t go quite according to plan, I had the idea to instead use white sharpie, which would still work just as well! I love being able to print these little objects and get creative with how to put them to good use.
Summary of Group Tinkercad Project
10 points, due by noon on Tuesday 1/29
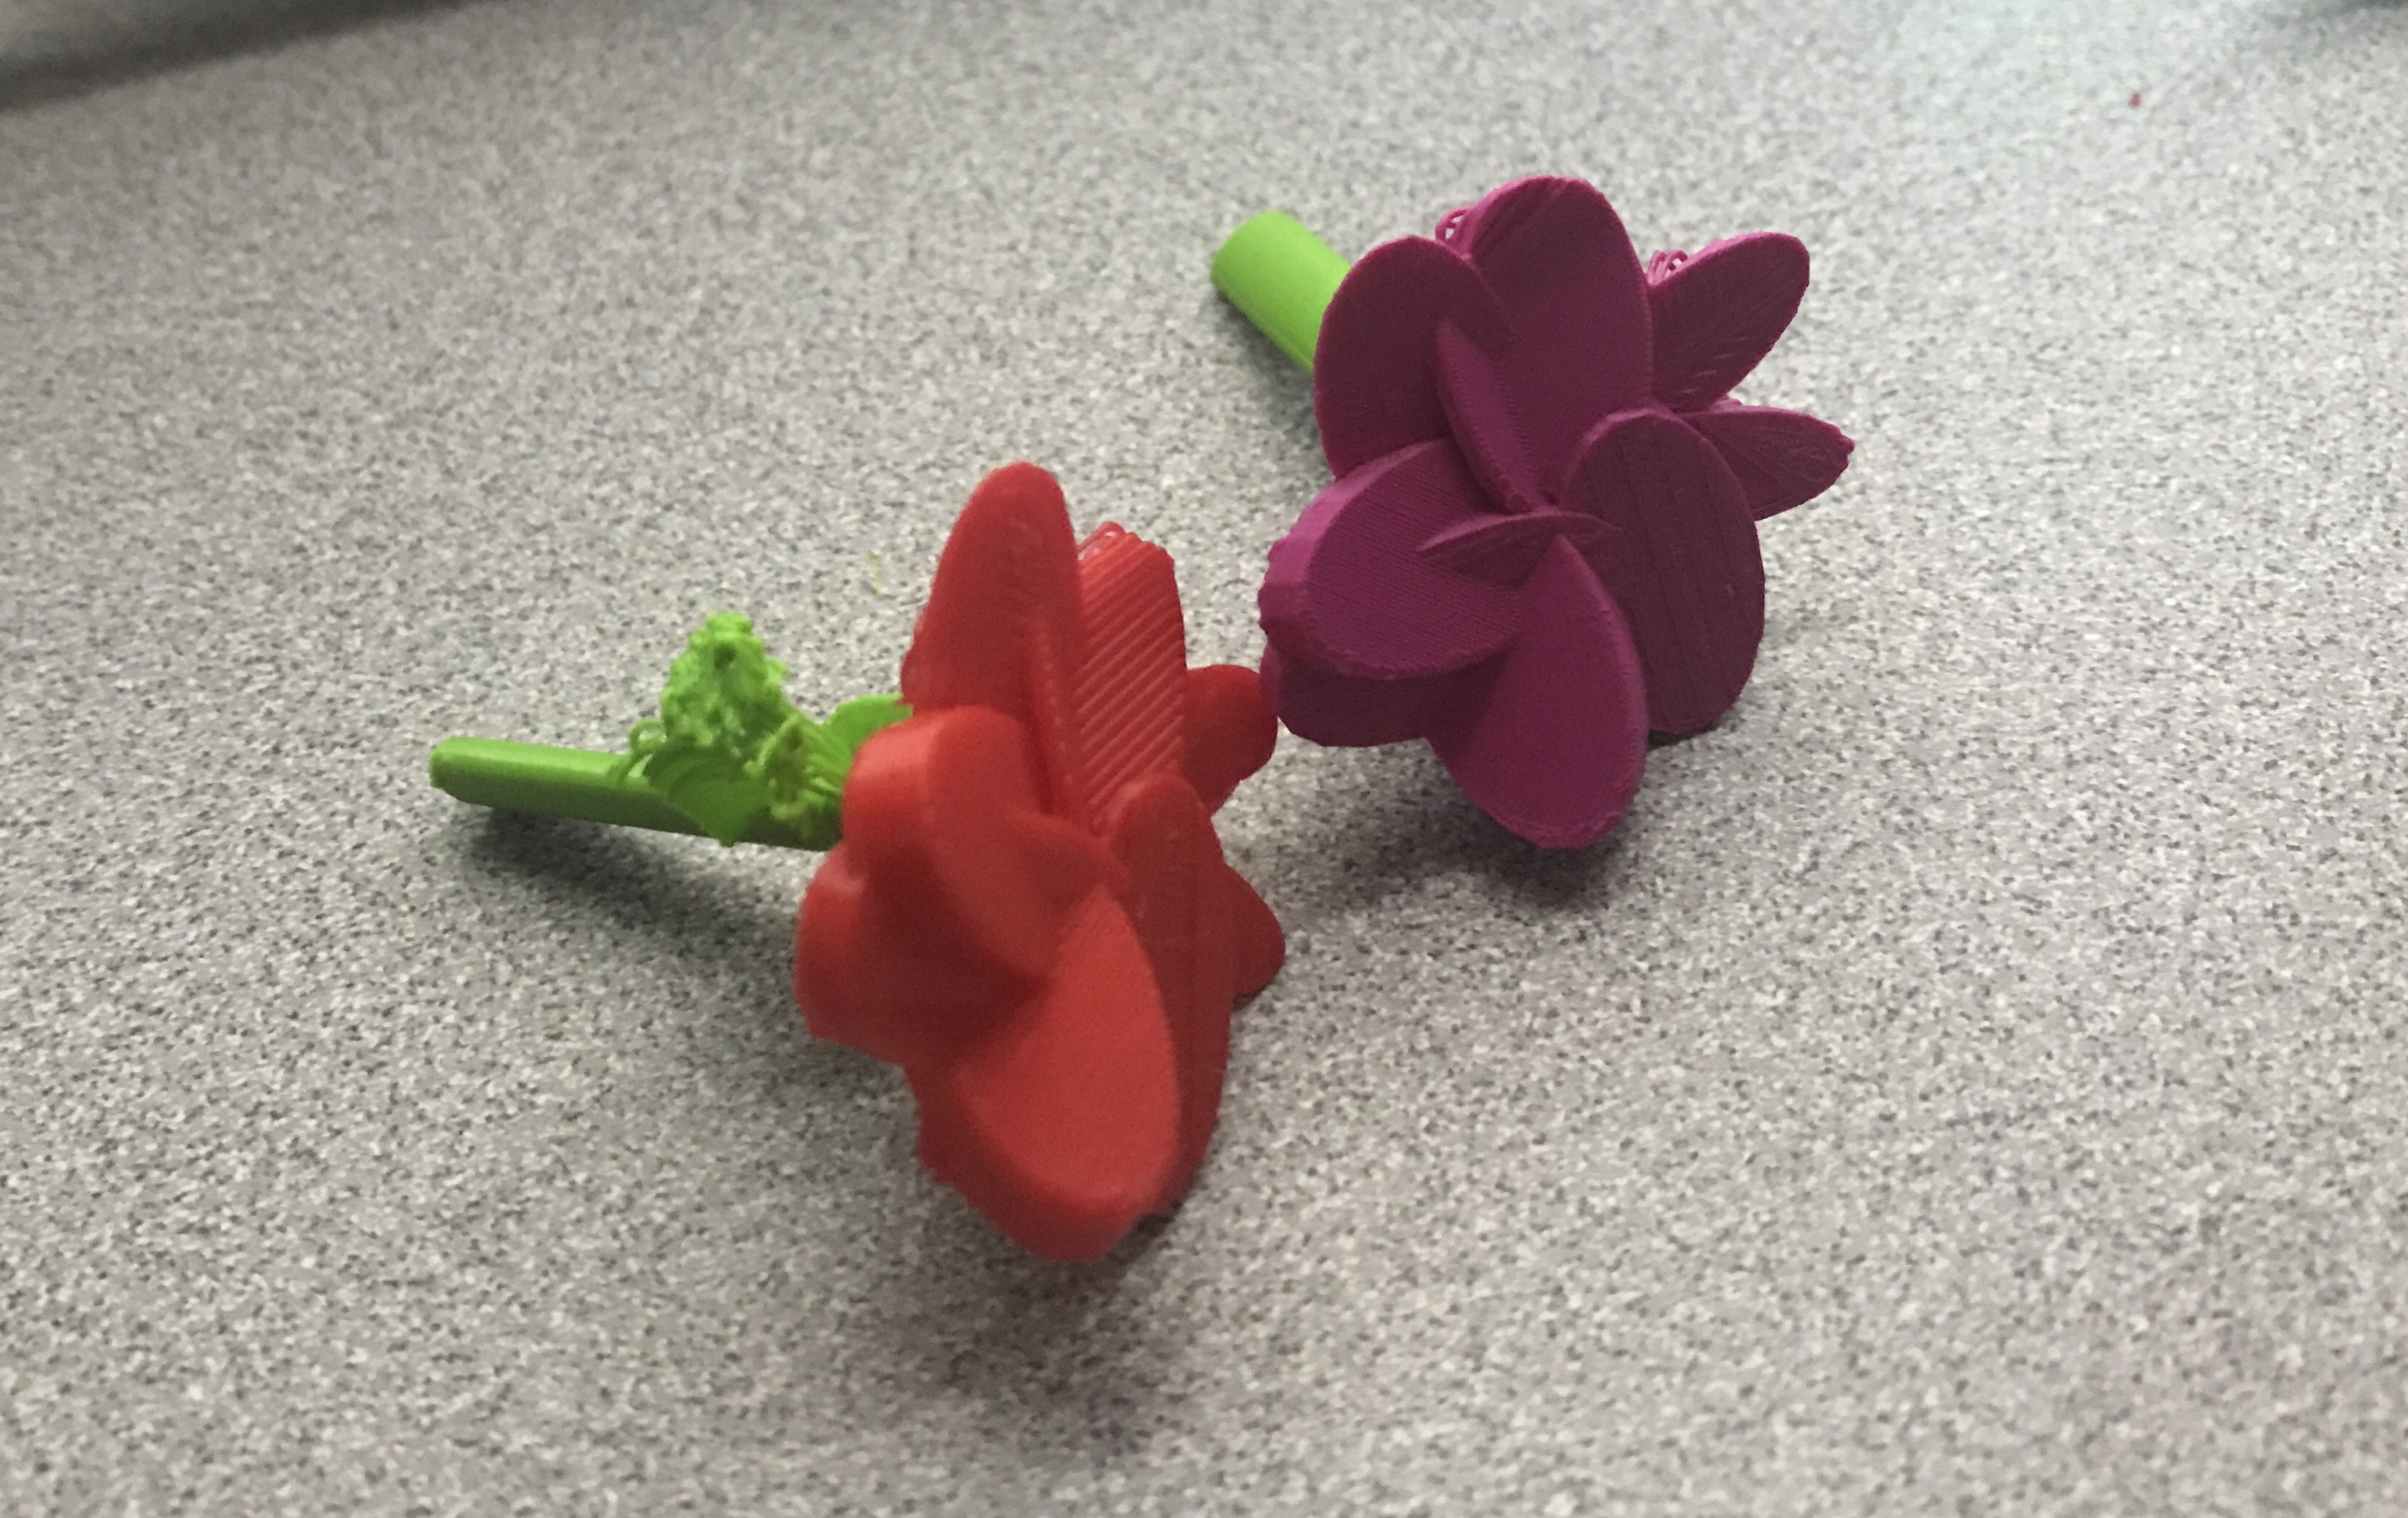
Title: Bachelor Rose Partner: Shannon Stagliano
group post link:
thingiverse link: https://www.thingiverse.com/thing:3378909
The Bachelor Rose 3D print was created to be able to hang off of wine glasses to differentiate between them while having a “girls night” during the airing of the show! I thought this was such an innovative idea and could actually be something fans of the show would really want! The petals on the flowers came out fantastic but the stems sadly didn’t have the same luck. The handle was too brittle to withstand the 3D machine. Overall, I’m very proud of the work my partner and I did and the creativity that went along with it!
20 Forms in Fusion 360
10 points, due by noon on Thurdsay 1/31
Fusion 360 was super tricky to try to get the hang of at first. I tried to get it on my laptop but it wouldn’t download and then on the library’s computer it glitched and left the screen frozen until I had no other choice but to restart the computer. To make my designs I primarily used sketch so I could be more creative and make original designs. I was also a big fan of sweep and pipe. My designs vary from being basic to creating a whole new shape altogether. I used the push/pull option numerous times to play around with the sizes and length of my designs. I also got quite good at being able to move my objects and rotate the screen as well.

Fusion 360 Print
10 points, due by noon on Tuesday 2/5
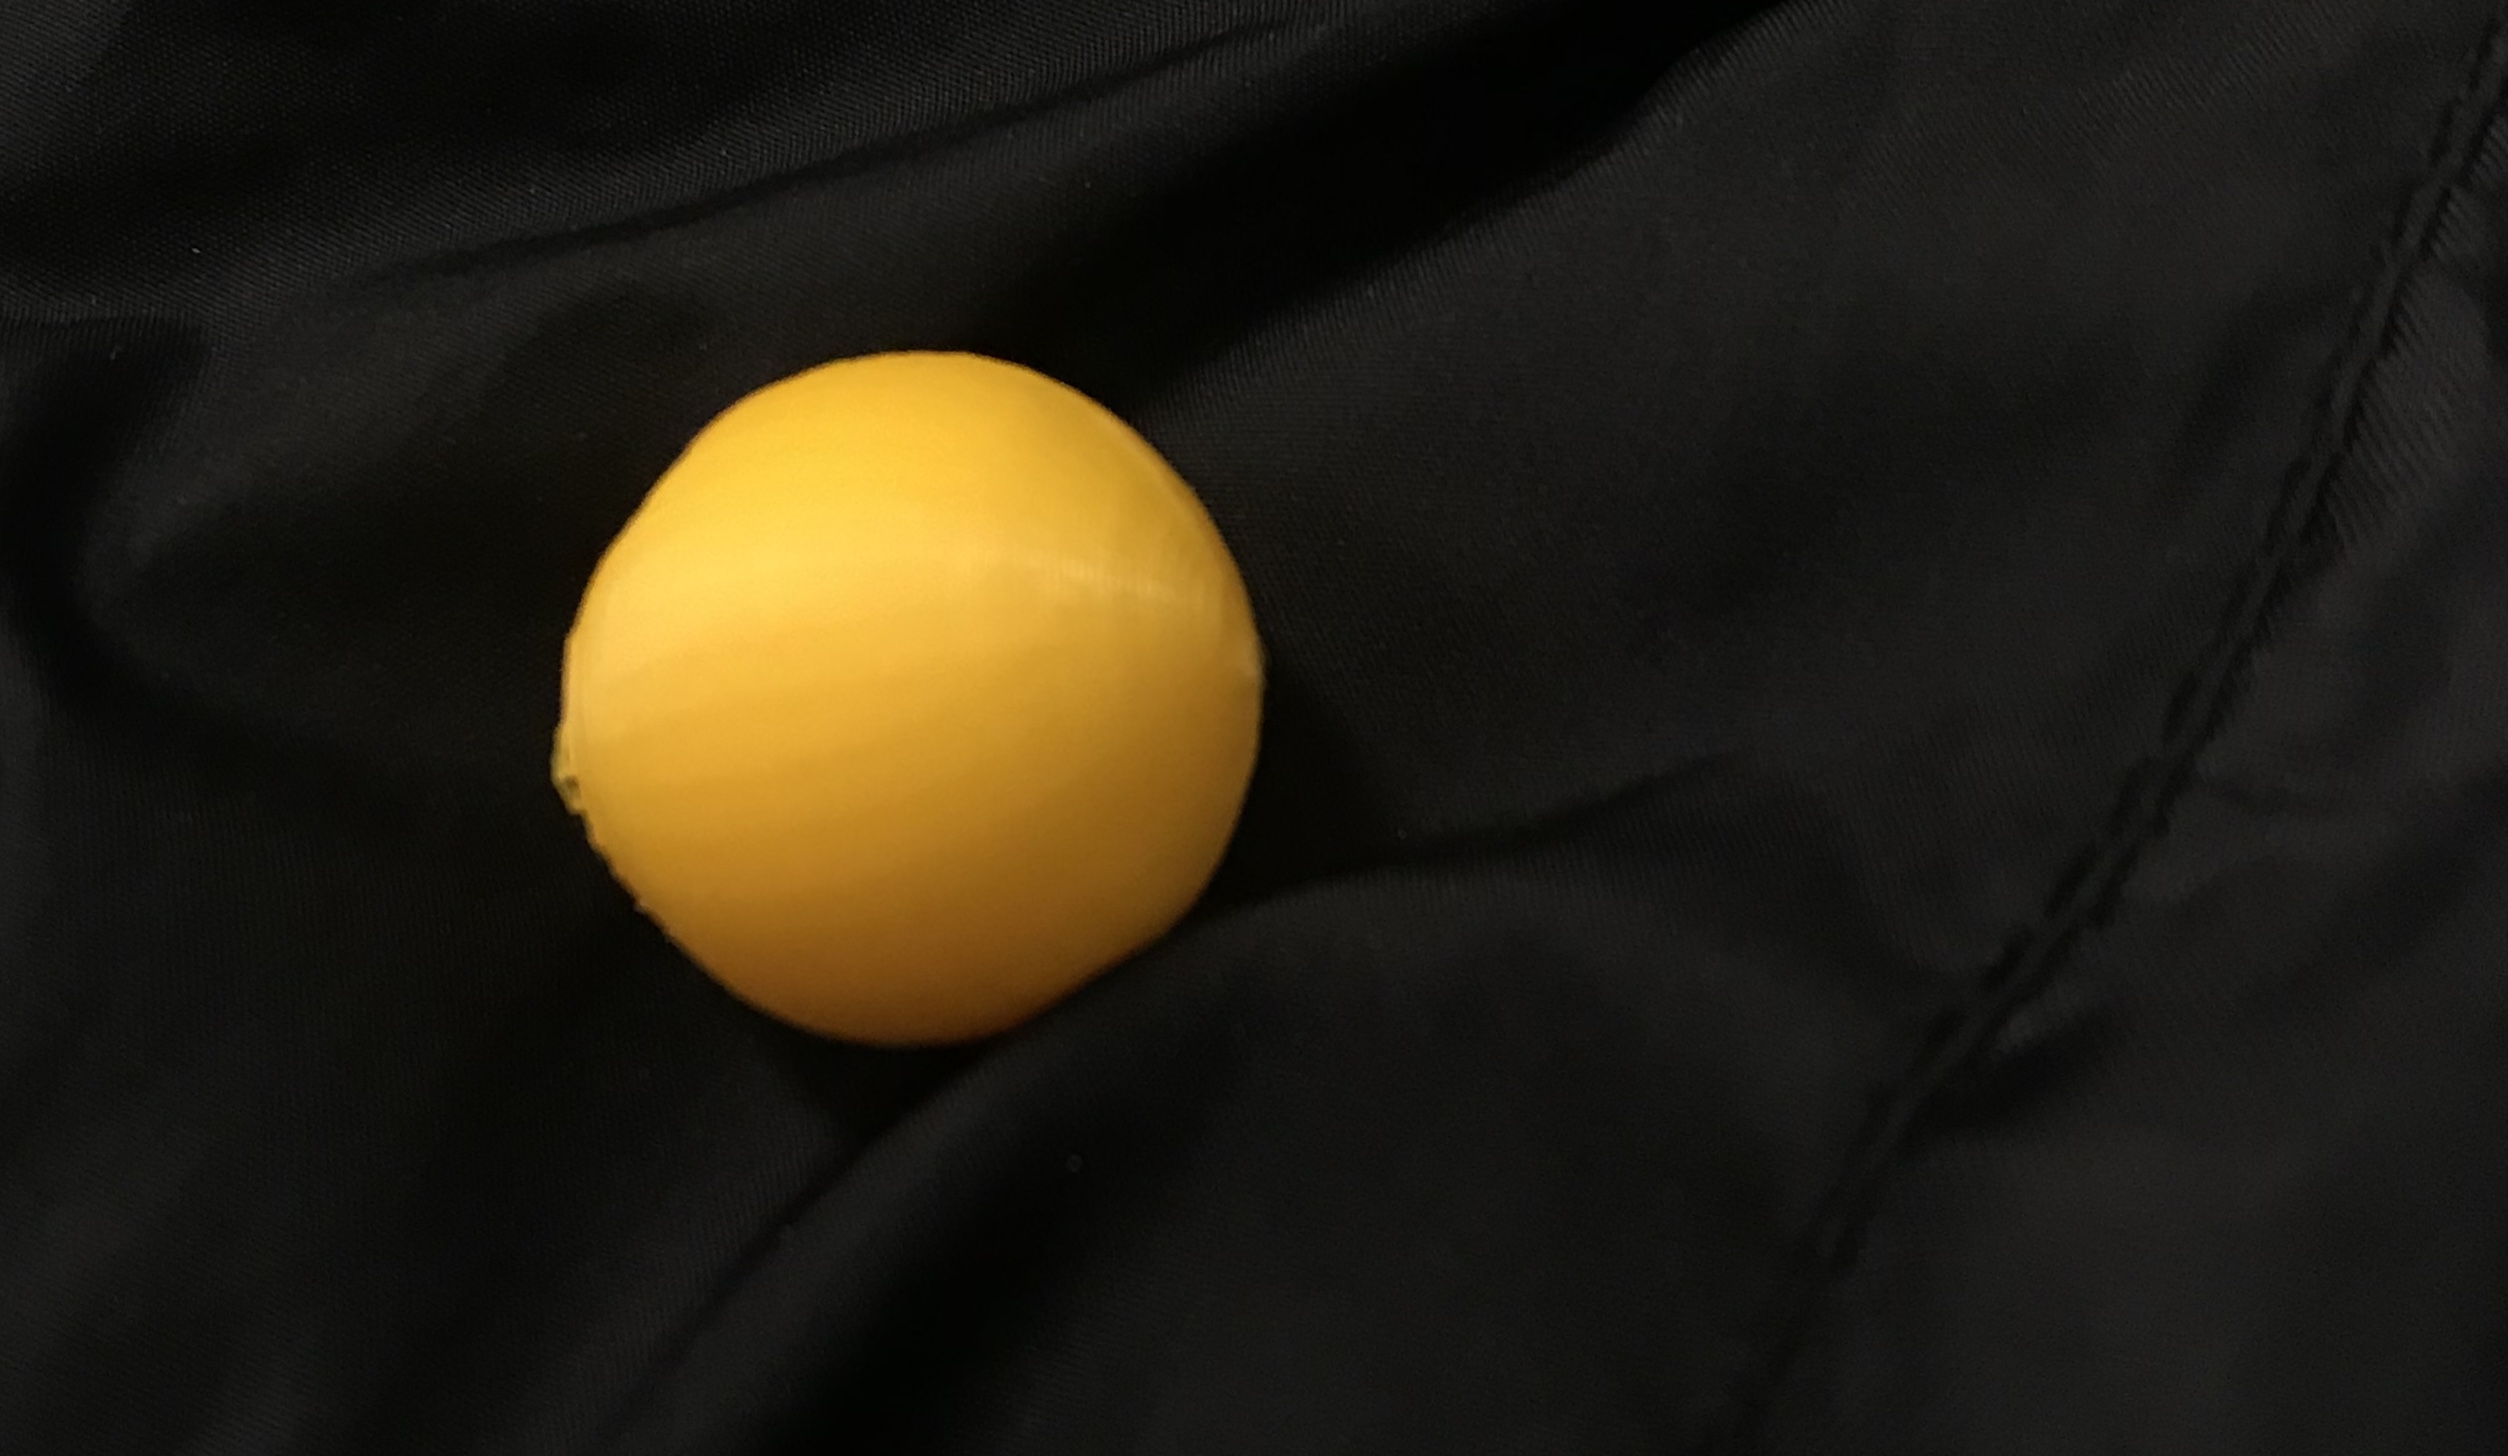
My model was indeed a success. The sphere was molded perfectly. It was also in great condition regarding durability. My friend had a set of mini bowling pins but lost the bowling ball so we used my 3D crafted sphere instead. It rolled smoothly while also having the strength to be able to knock the pins down. Overall, I’m very satisfied with the final product and its capabilities. (picture will be uploaded tomorrow morning)
Fusion 360 Vase Design
10 points, due by noon on Thursday 2/7
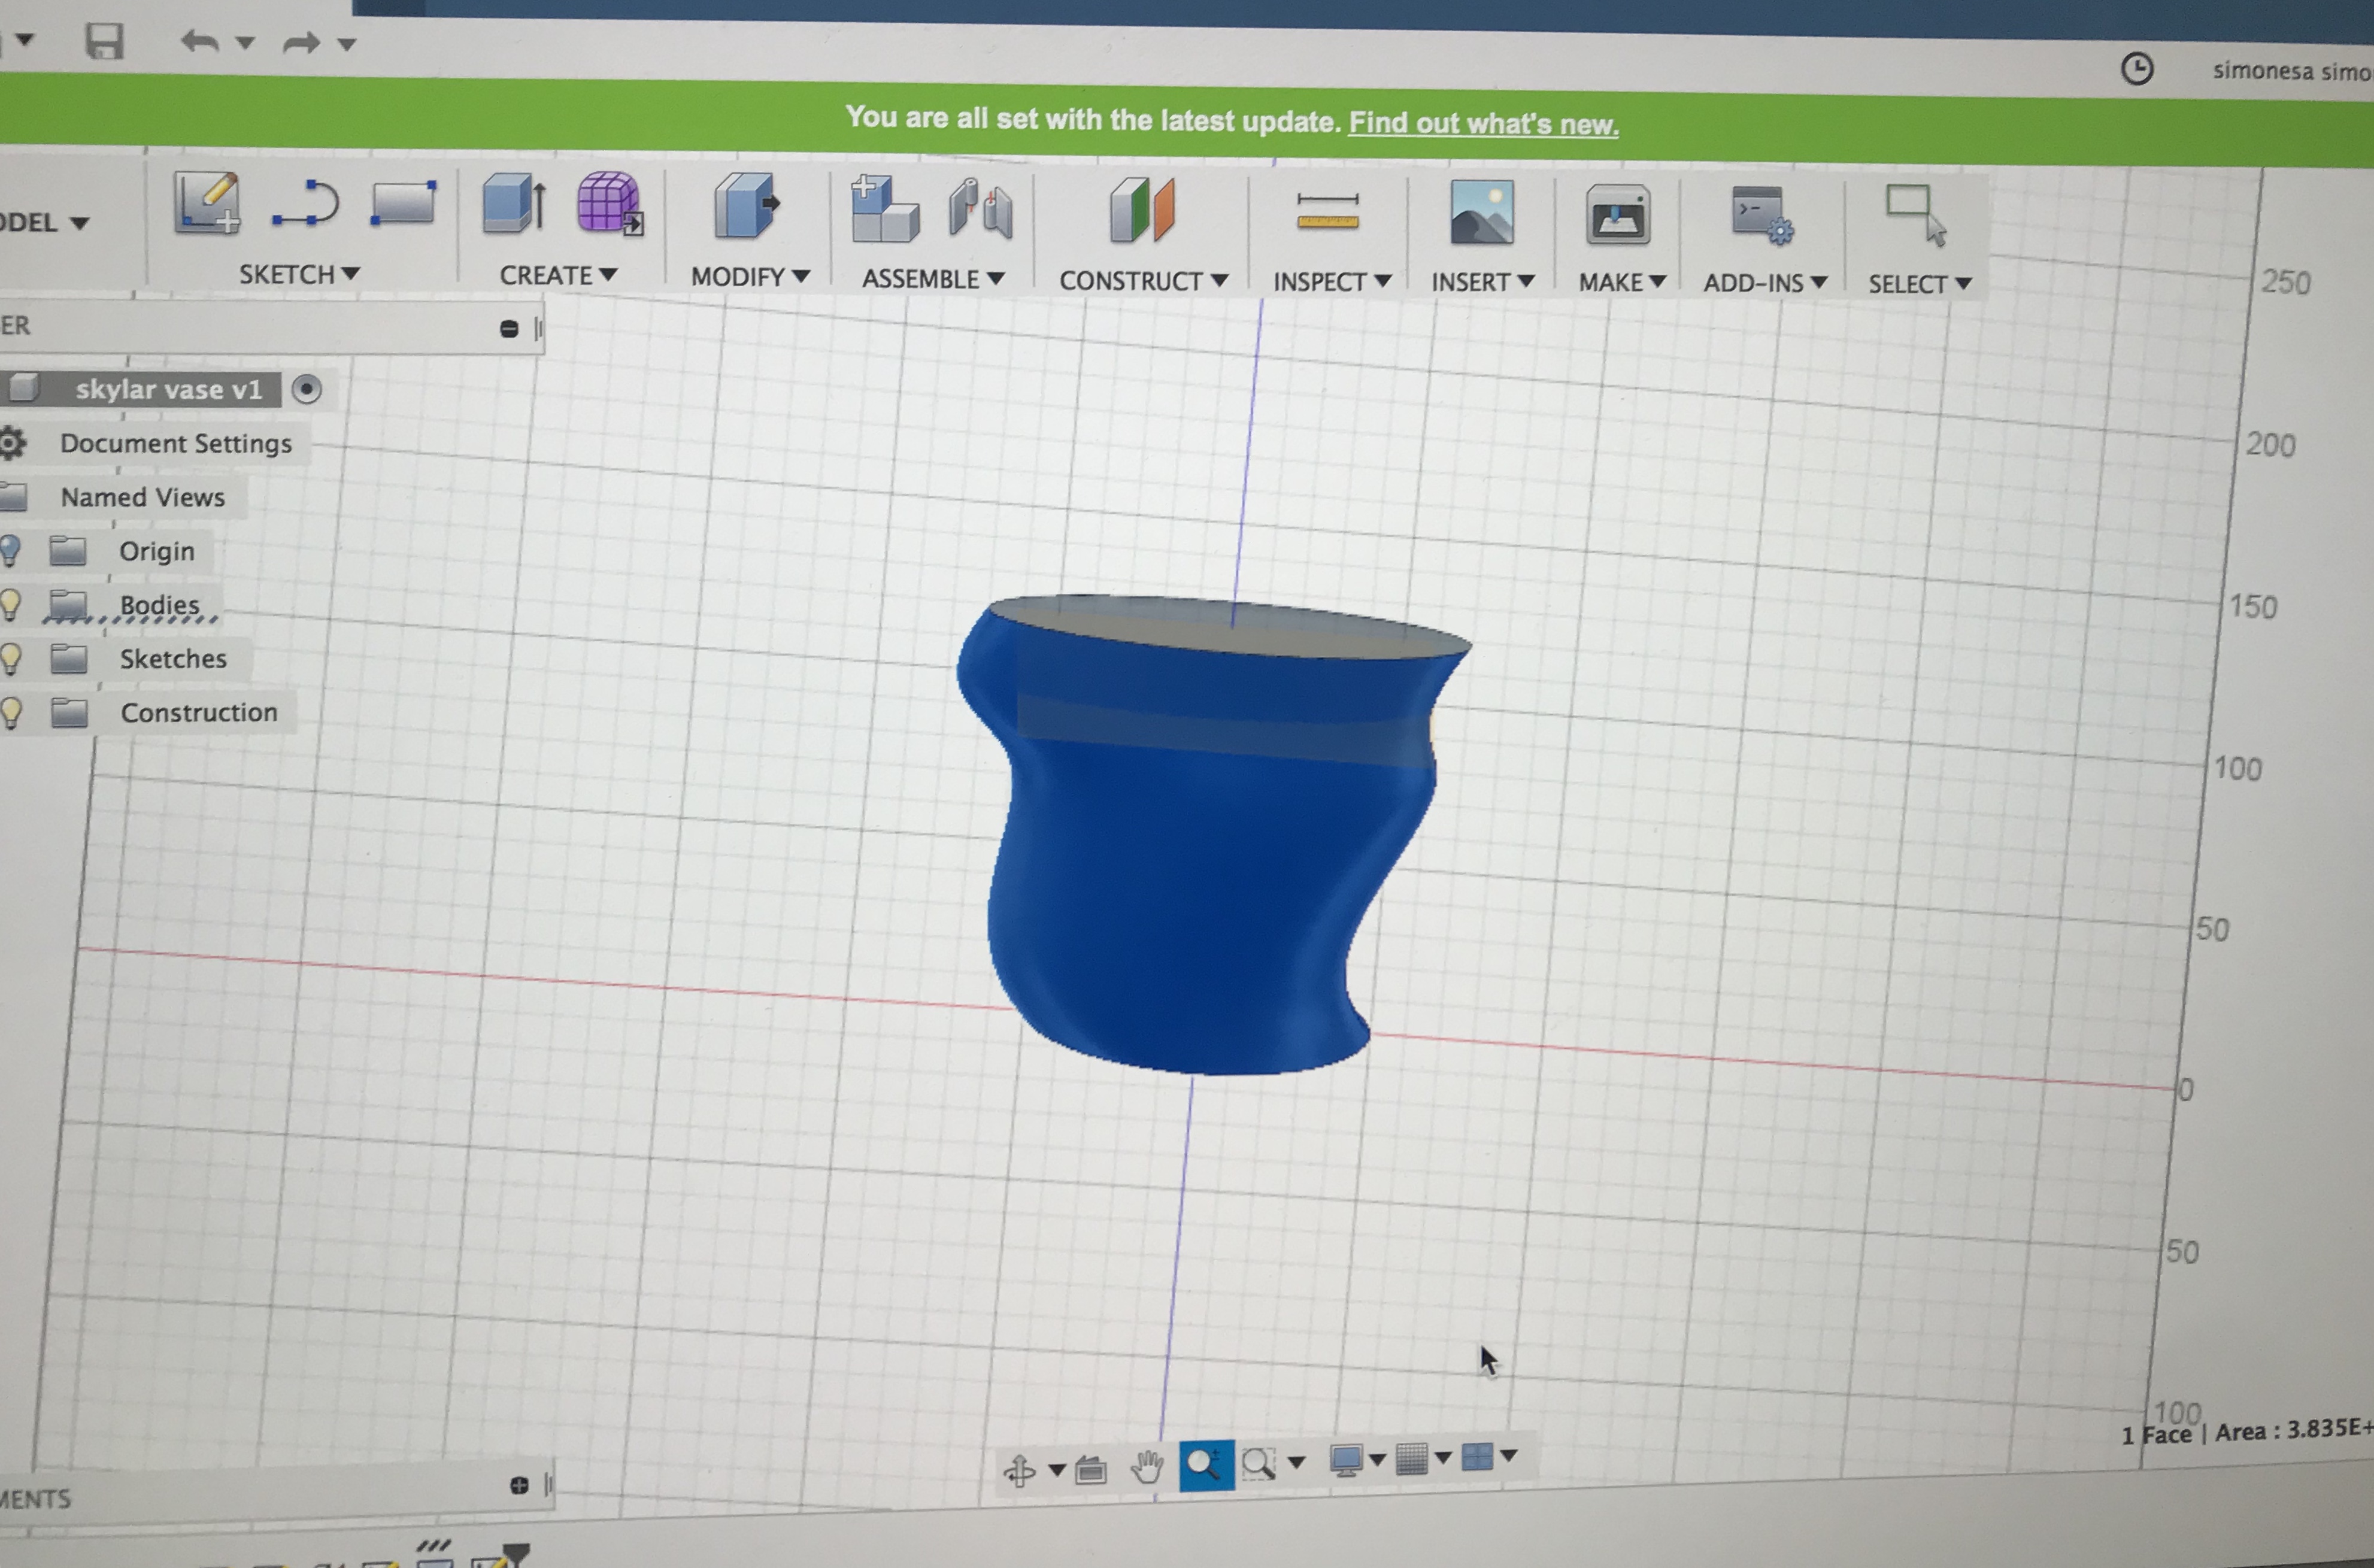
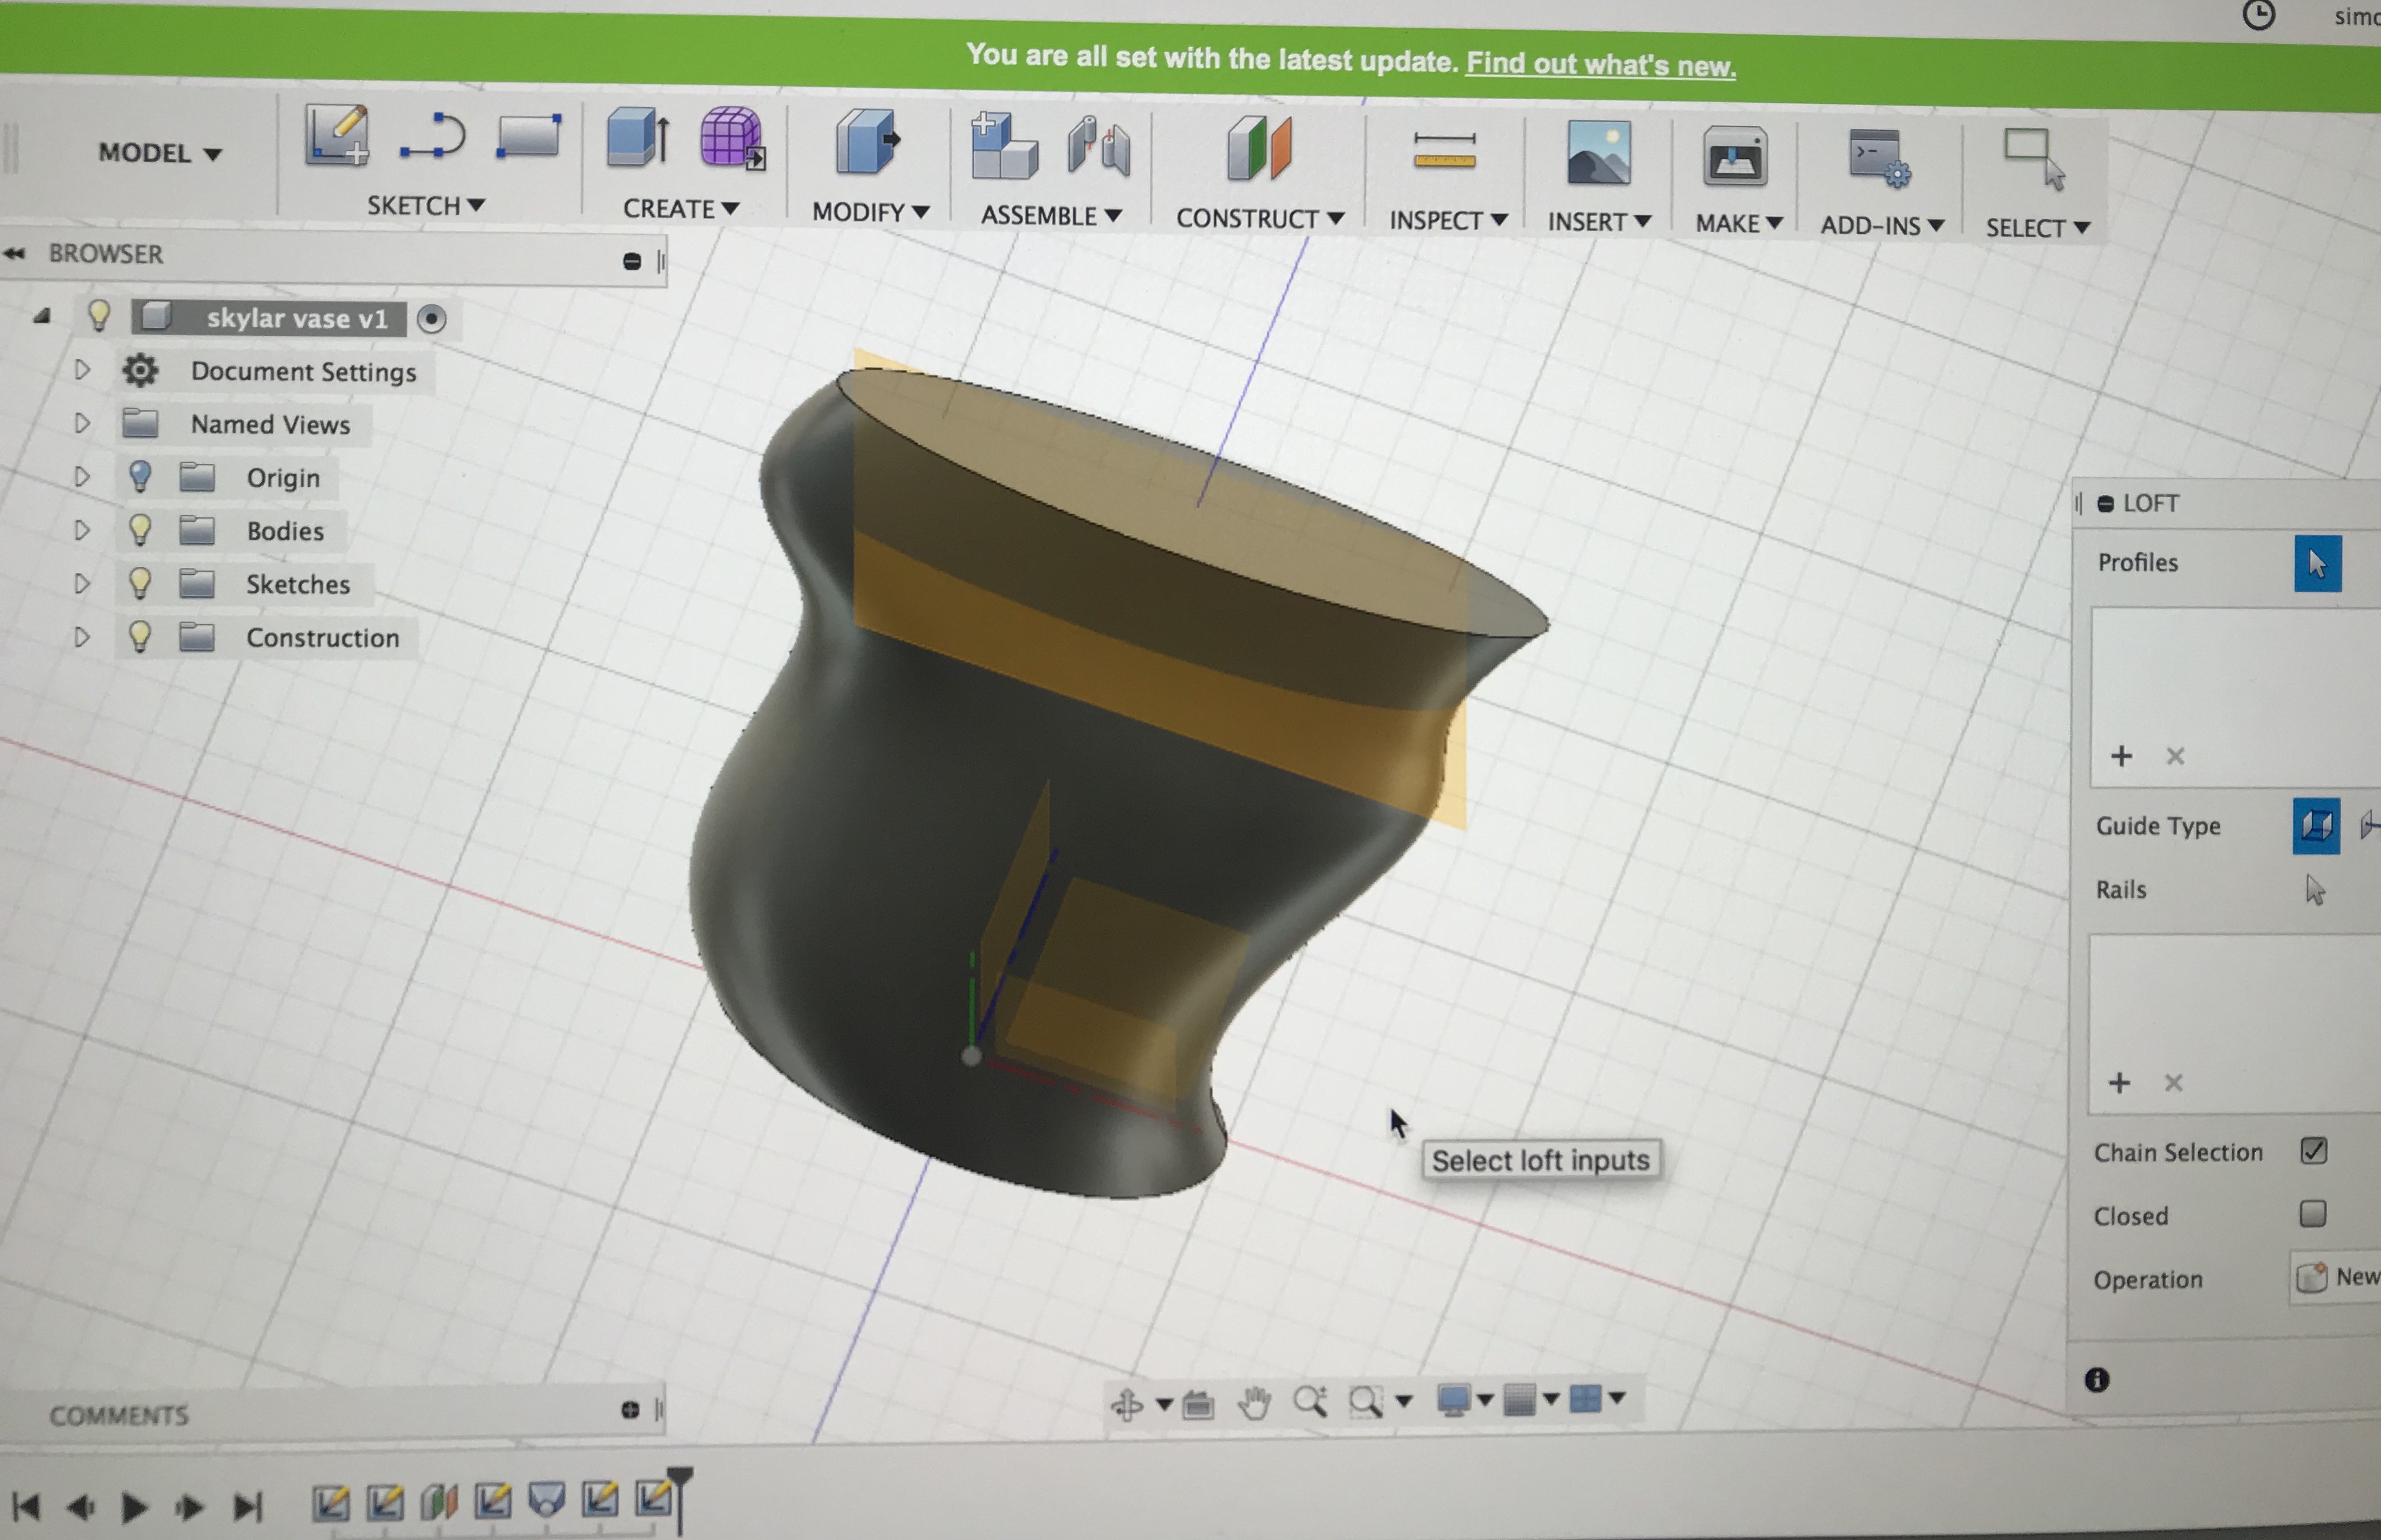
While watching the beginning of the fusion 360 vase design video, I was very frustrated. As time went by and I started to get the hang of the tools and techniques, it became fun and intriguing to try out the new abilities fusion 360 had to offer like the spline sketch, lofting capability, and morphing two different shapes on a plane together! Constructing on an offset plane definitely was the technique I had the most struggle with during the creation process. I had trouble figuring out where to properly use this tool on the plane and how to correctly offset the needed distance for the shapes that was recommended in the video. That being said, I put my own creative spin on my vase and followed directions from my own imagination and past experiences with fusion 360, regarding the configuration of the spline sketch. That was personally my favorite part because it let me be as original as I wanted. I took a lot of time to try to master the basics like fully highlighting an object and orbiting around the plane with ease, which is represented in the screenshots. I also advertised my ability to form my final creation into a completed object by lofting the separate shaped incorporating my spline sketch. I am yet again so proud at how my final project came out.
Fusion 360 Vase Prints
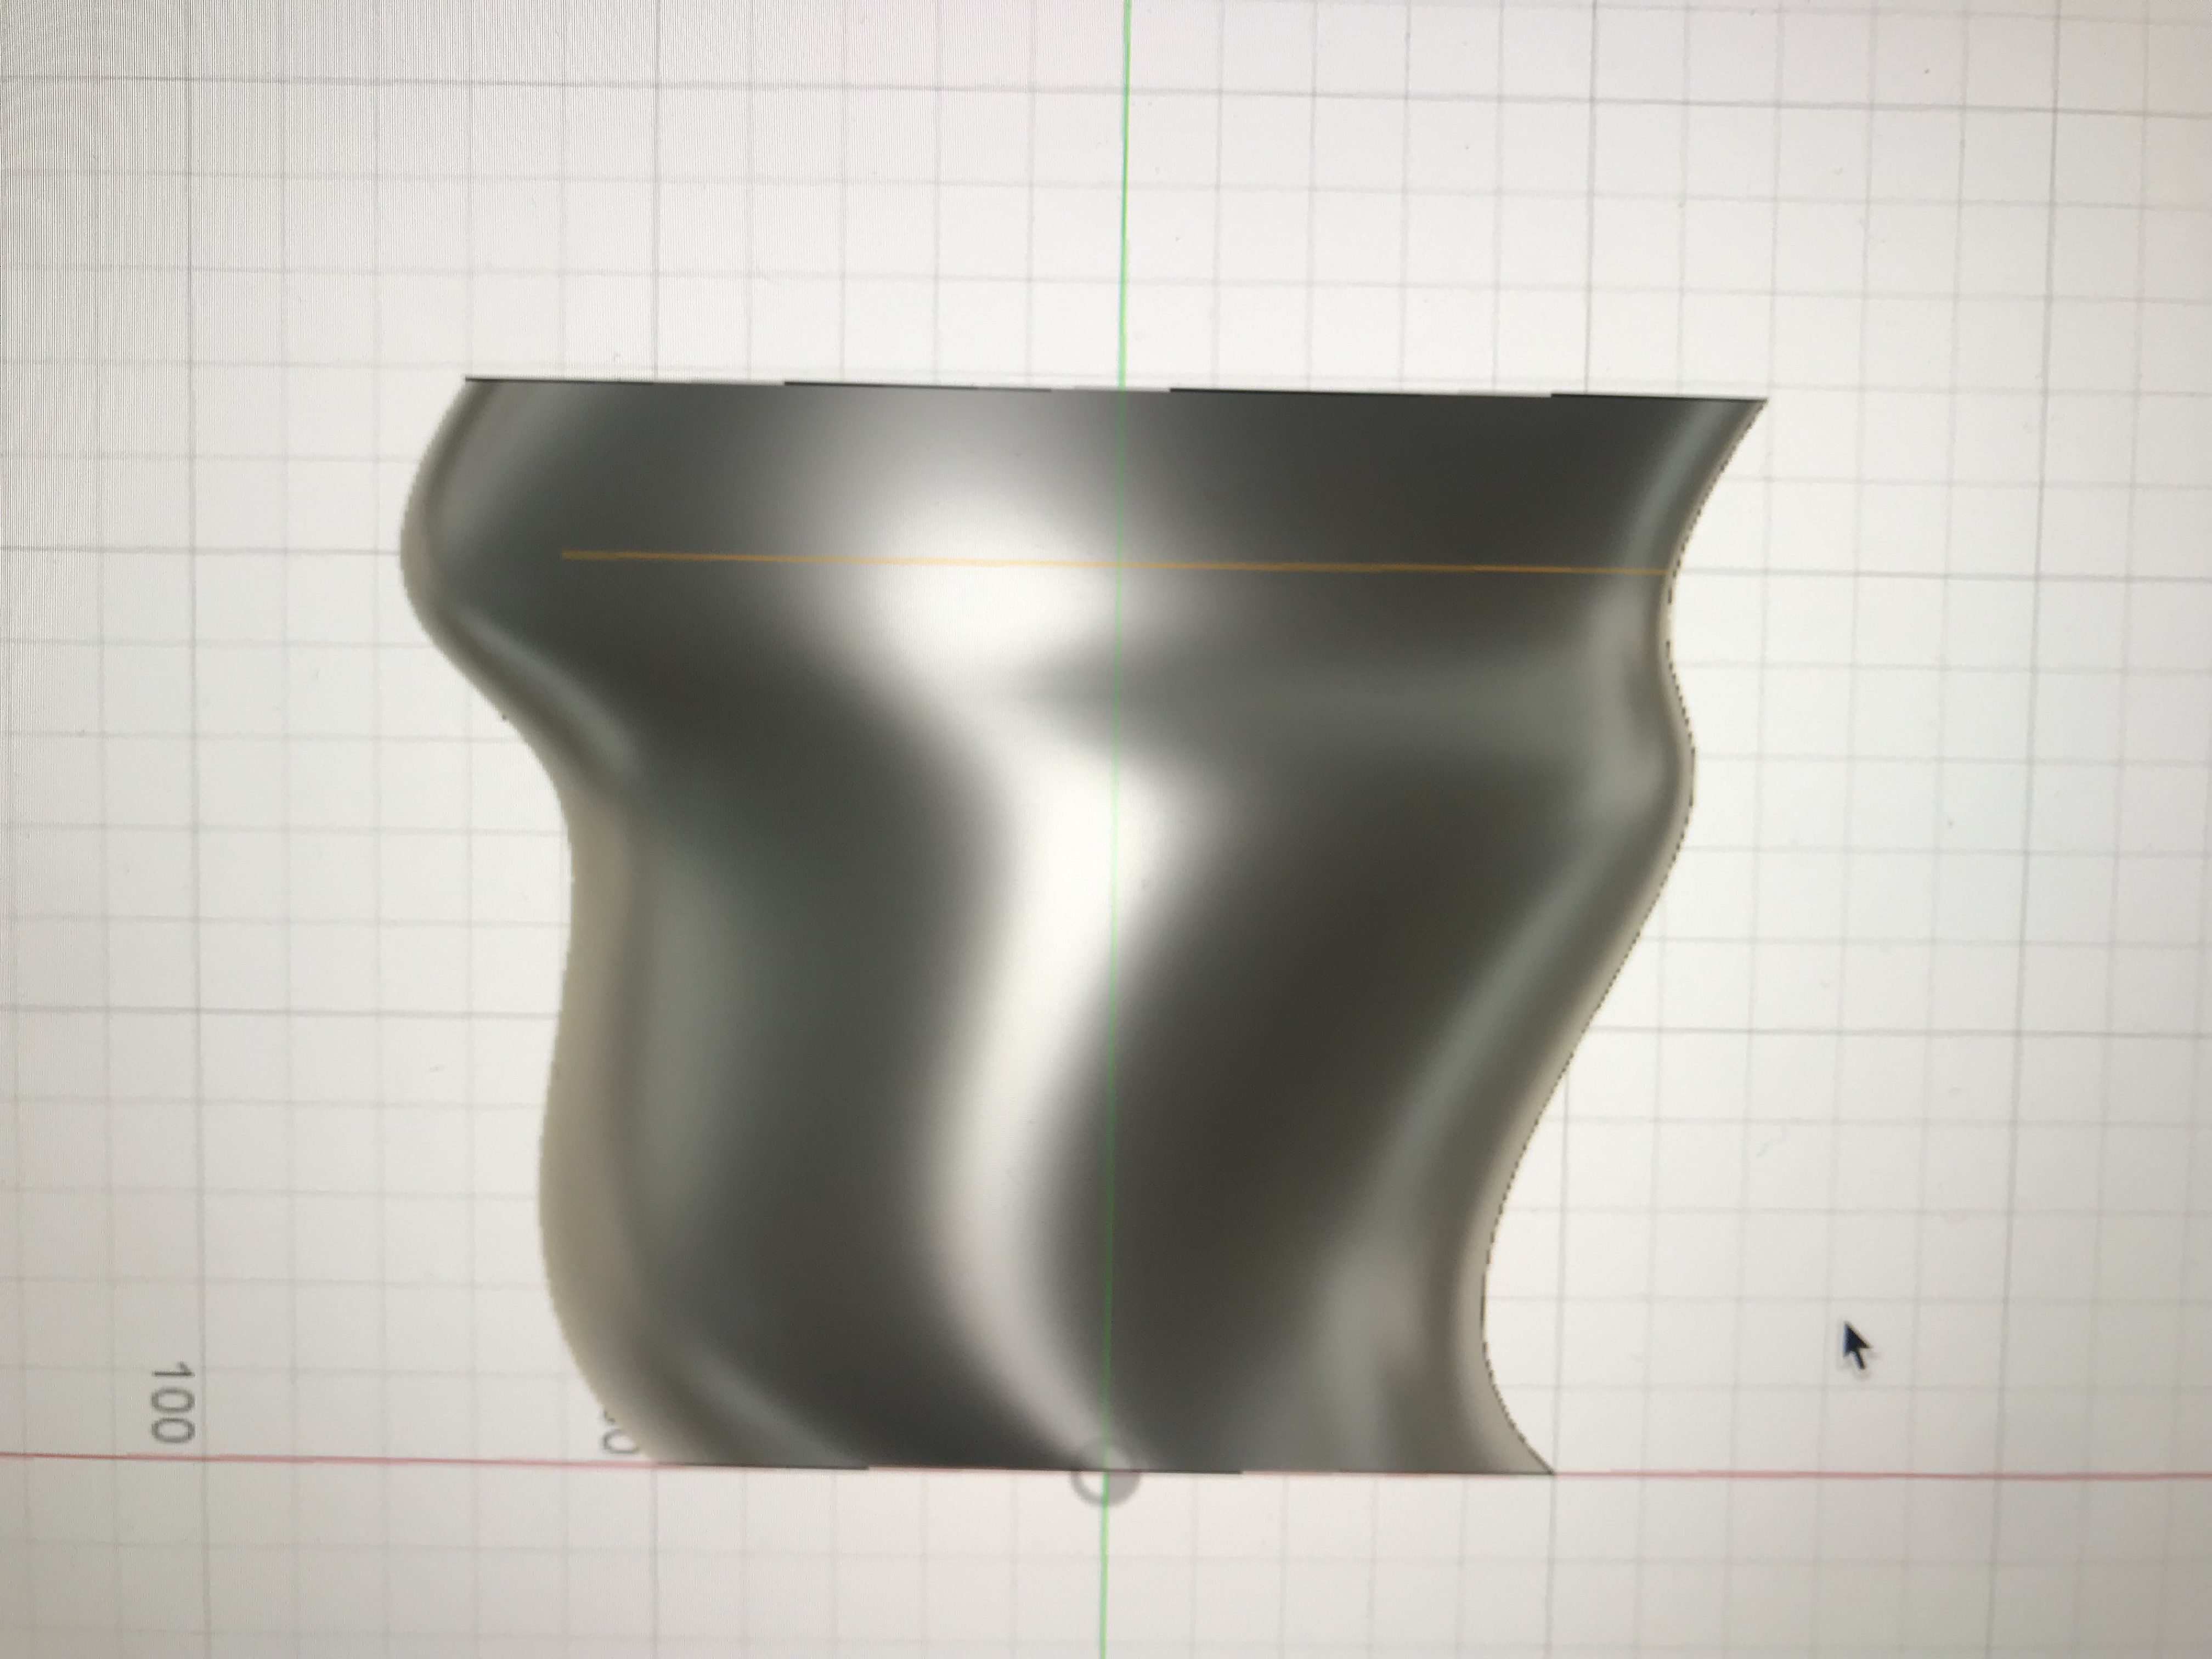
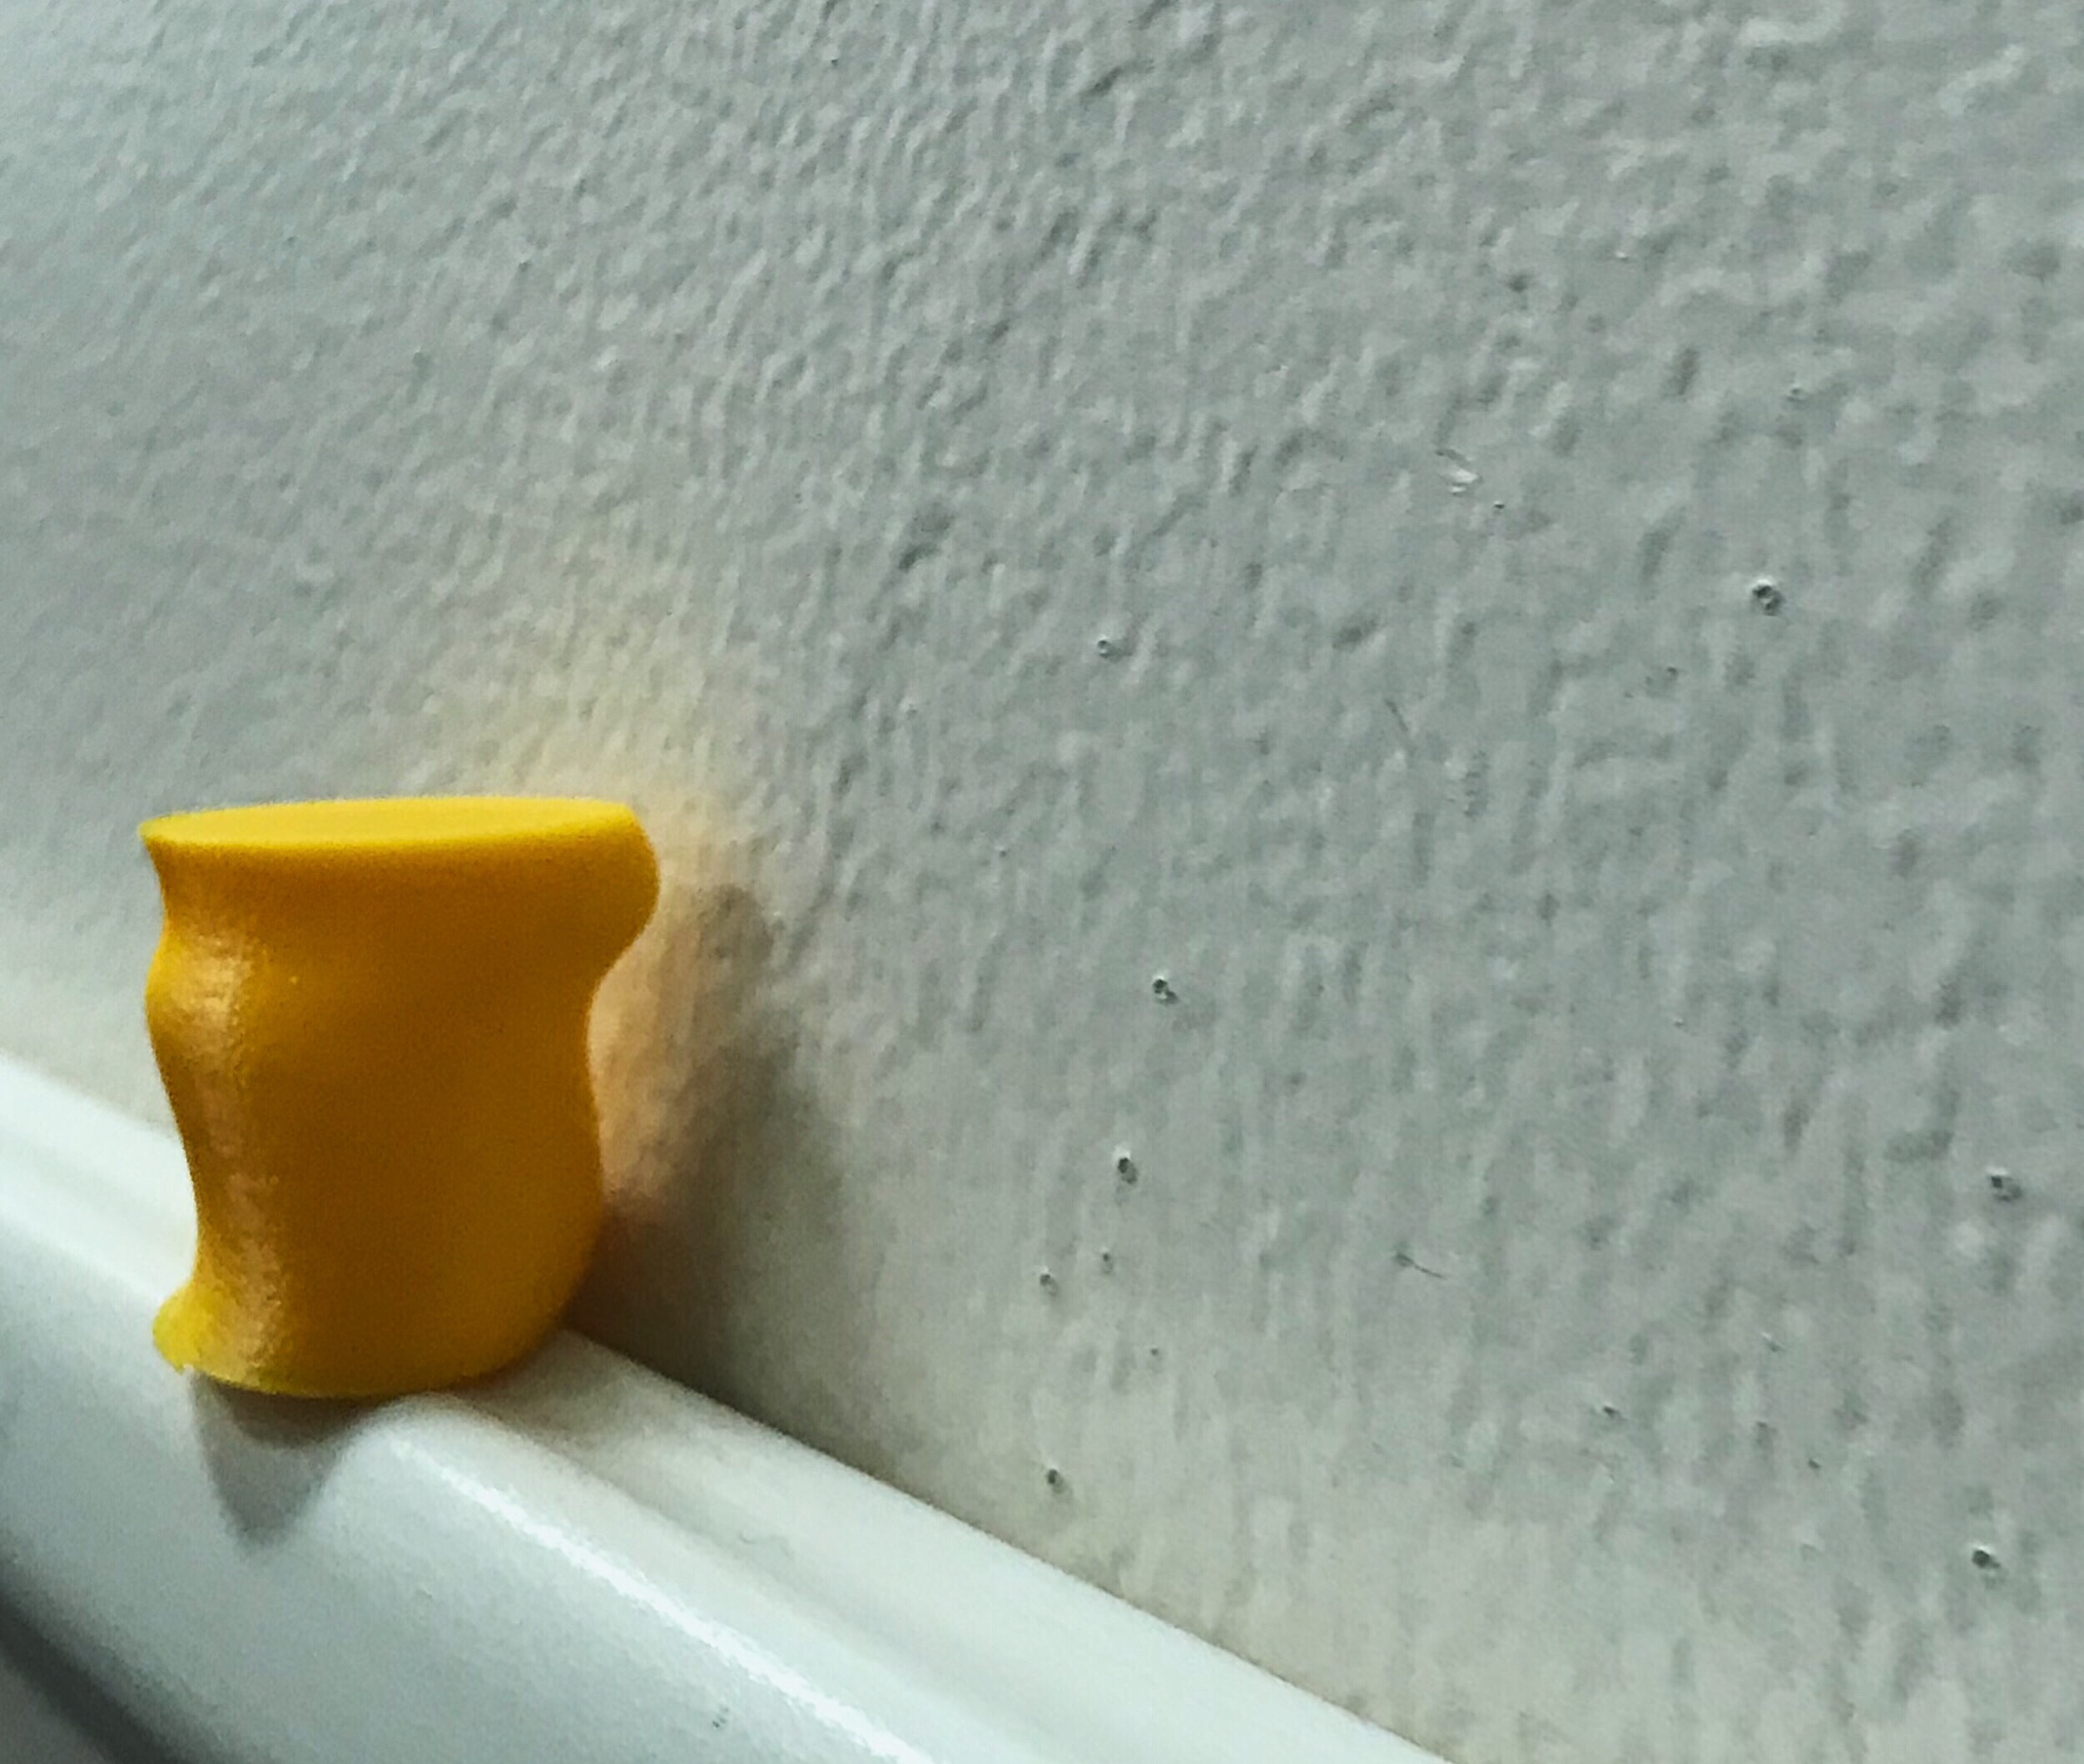
For my first time creating an object this difficult I am pleased at the results and the knowledge I now have for my future creations using fusion 360. It wasn’t a complete success but for the amount of trial and errors I went through, I am proud of the creation I 3D printed! Its amazing the efficiency and carefulness that goes into the physical aspect of the object as I watched it be printed. I think it differs from Tinkcad in the sense that I now have more trust that my creation will go according to plan and pay attention to the little details that make my object my own.
https://www.thingiverse.com/thing:3411397
20 Forms in OpenSCAD
10 points, due by noon on Tuesday 2/12
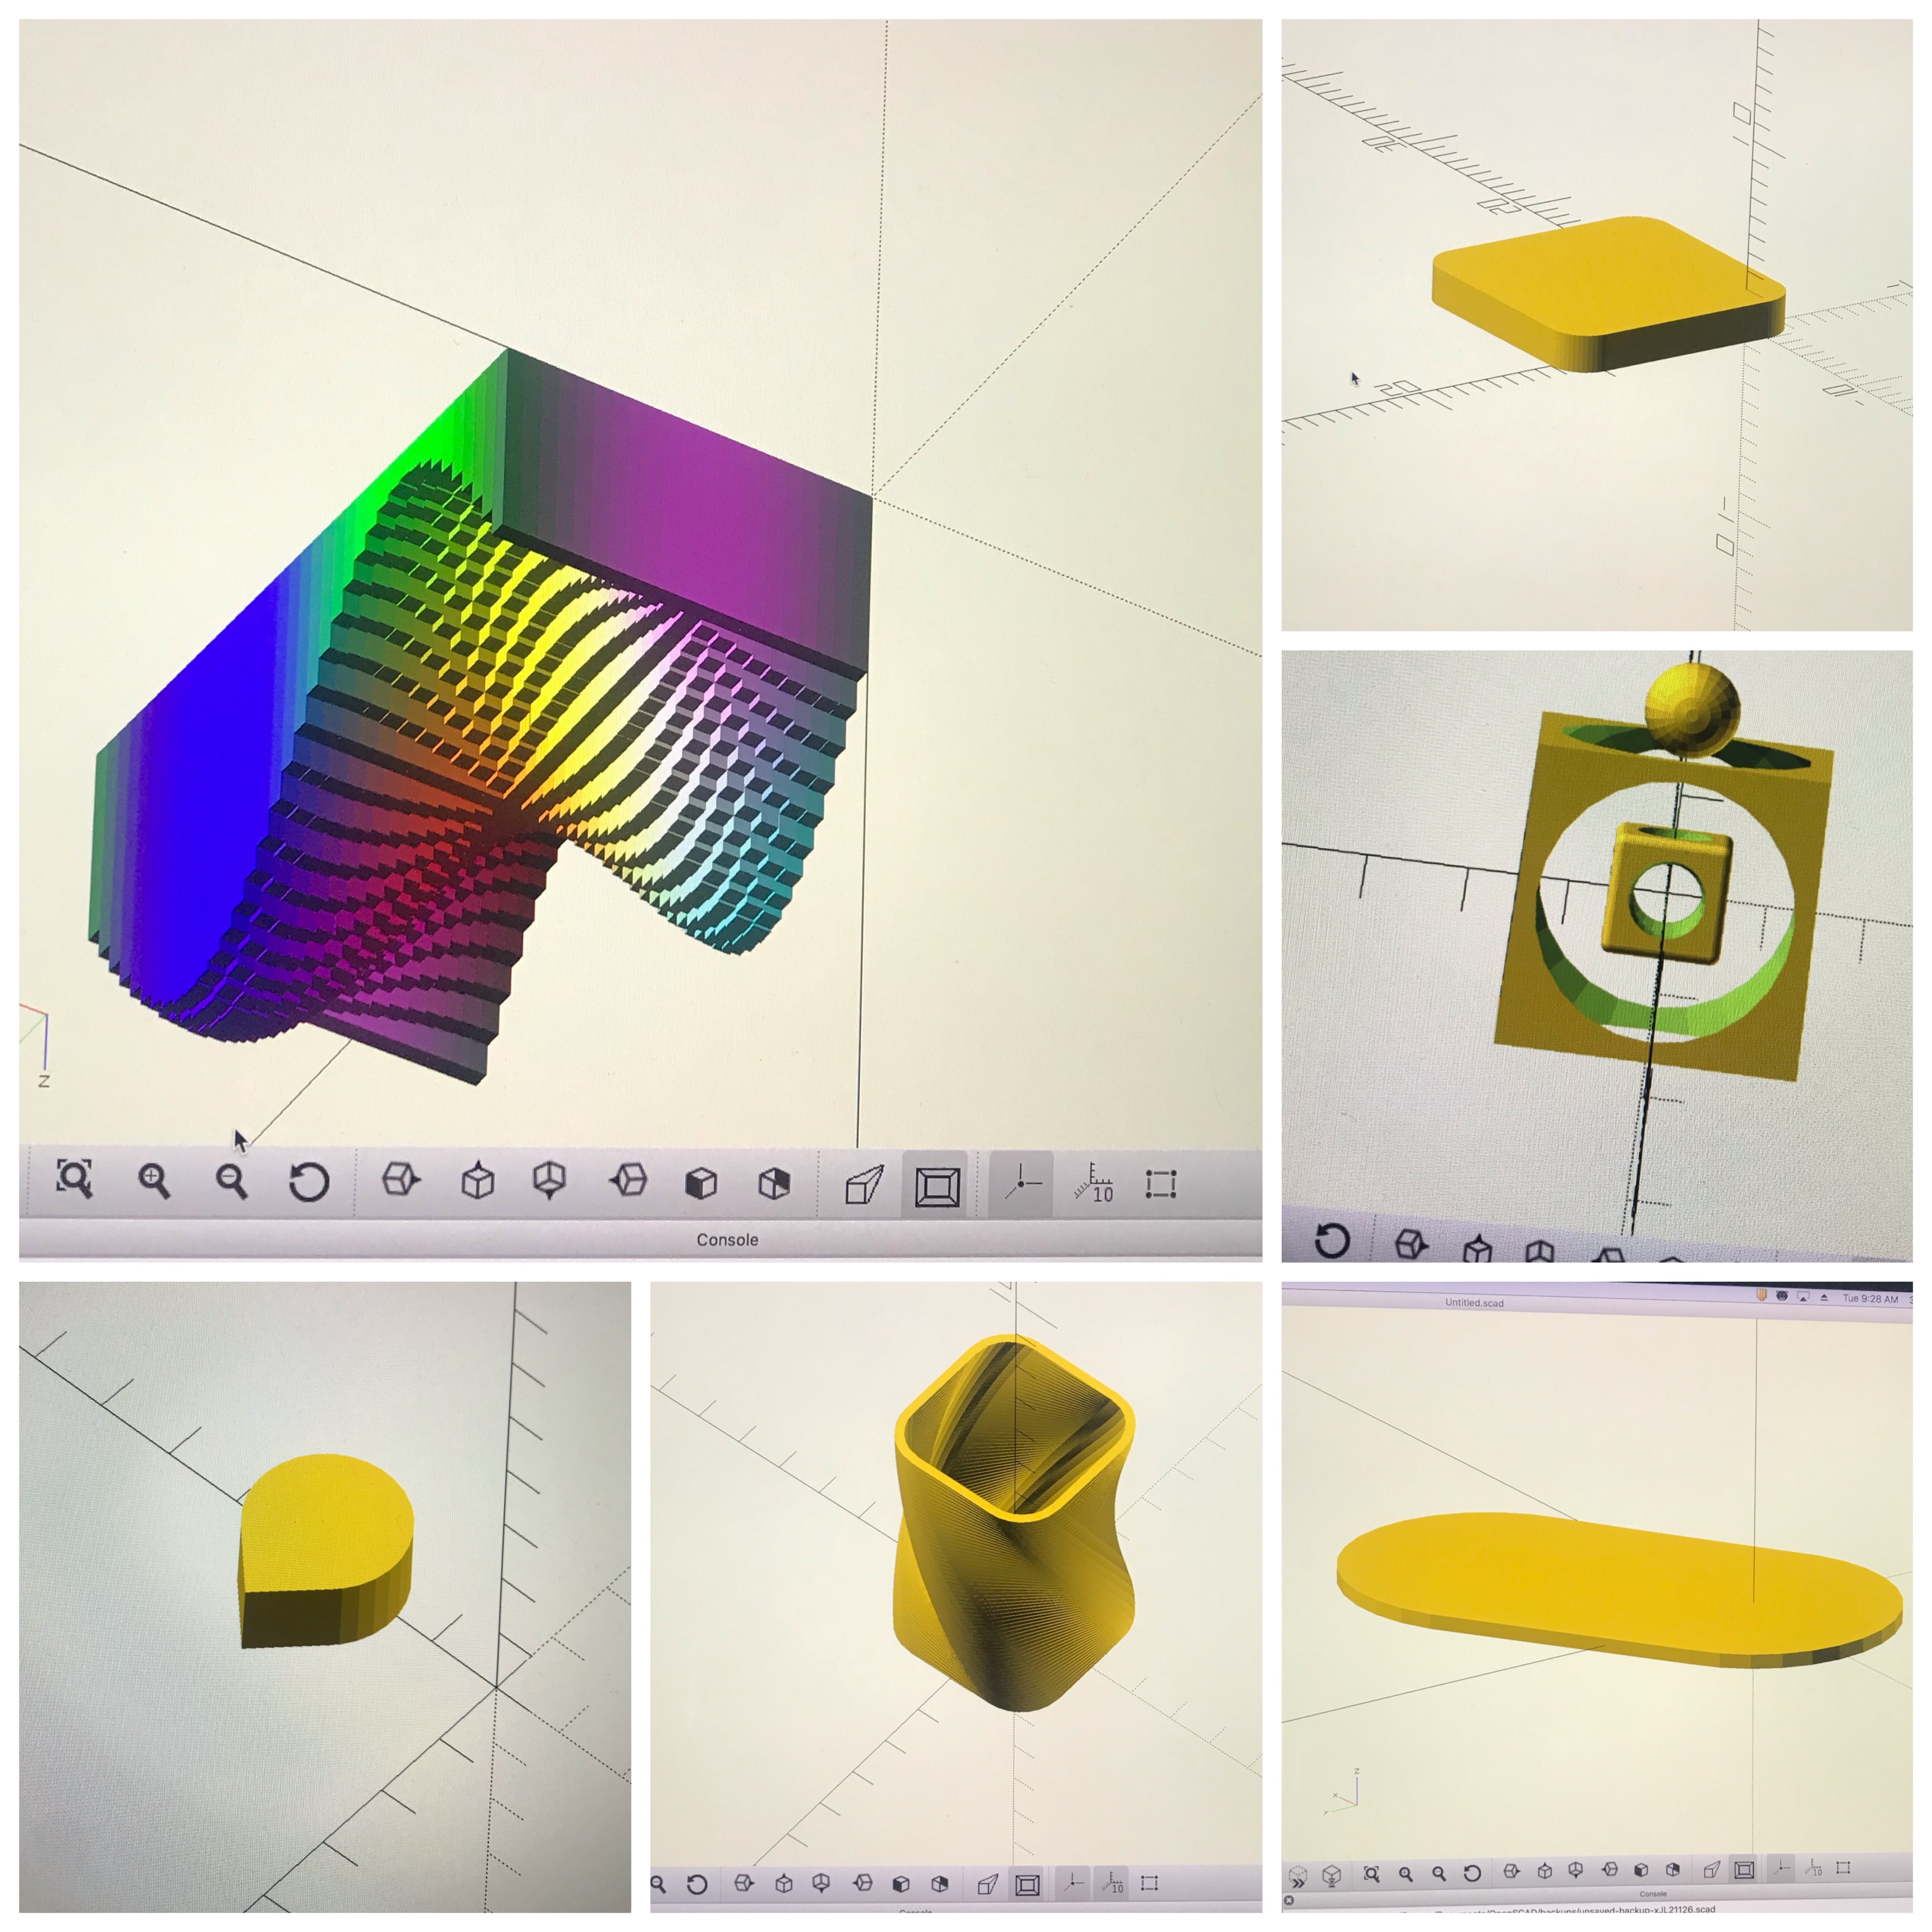

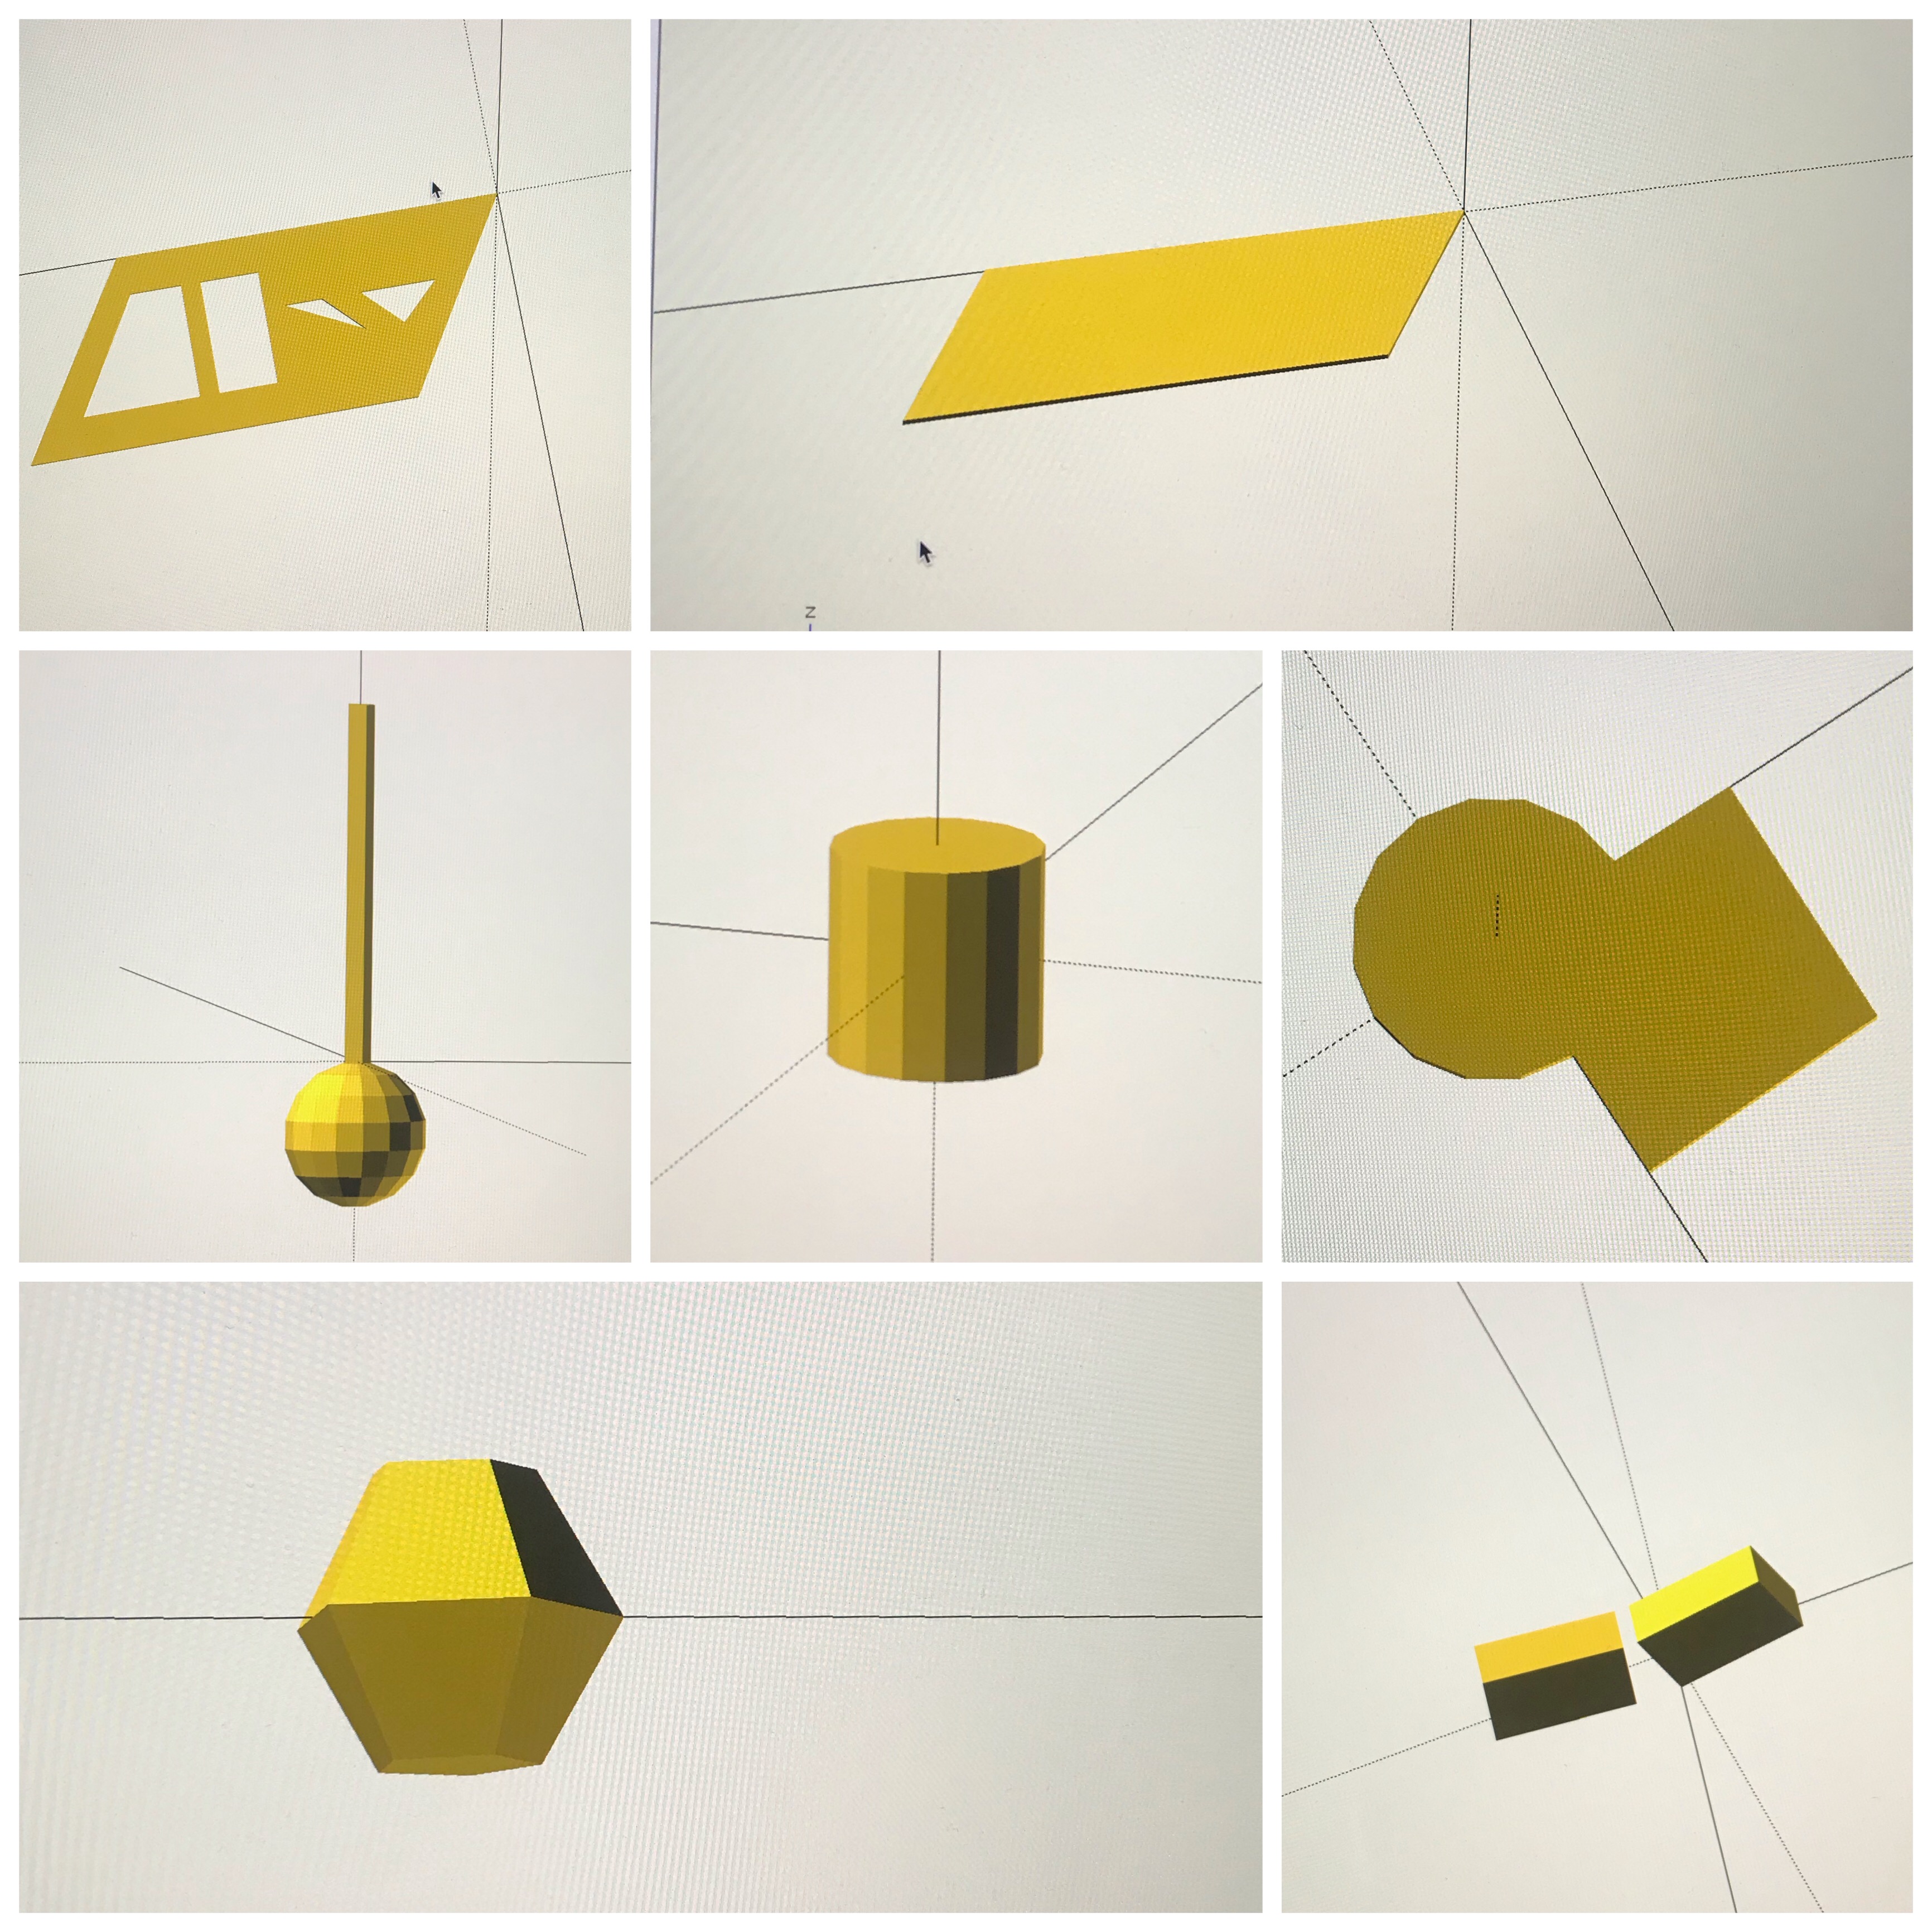
I went on a hunt in the internet to find as many tutorials and different type of codes as possible. In the beginning, I started out with more simple shapes with moderately difficult codes, which is represented on the bottom collage picture. With more practice, I then attempted to try and figure out how to do the more unique and harder 3-D objects. My personal favorite is the multicolor creation on the top collage. I wanted to see play around with the different colors that OpenSCAD has to offer. In the second collage, I focused at lot of my energy on trying to perfect how to form the twists and curves of numerous objects. In the top collage, there’s a picture with three different objects in it. I noticed how they weren’t separated to my liking and decided it would be more organized to code the rest of the objects individually and then take pictures of each to neatly edit into a collage. I played around with the size of the shapes and often had to zoom in and out to allow them to fit on the screen appropriately. I practiced how to mirror objects and smooth their edges using precise measurements, spaces, commas, and parenthesis. I had trouble figuring out the correct order and how many spaces to use to type the codes but after many trial and errors and referencing from the youtube tutorials and OpenSCAD’s cheat sheet, I finally got the hang of it!
OpenSCAD Print
10 points, due by noon on Thursday 2/14
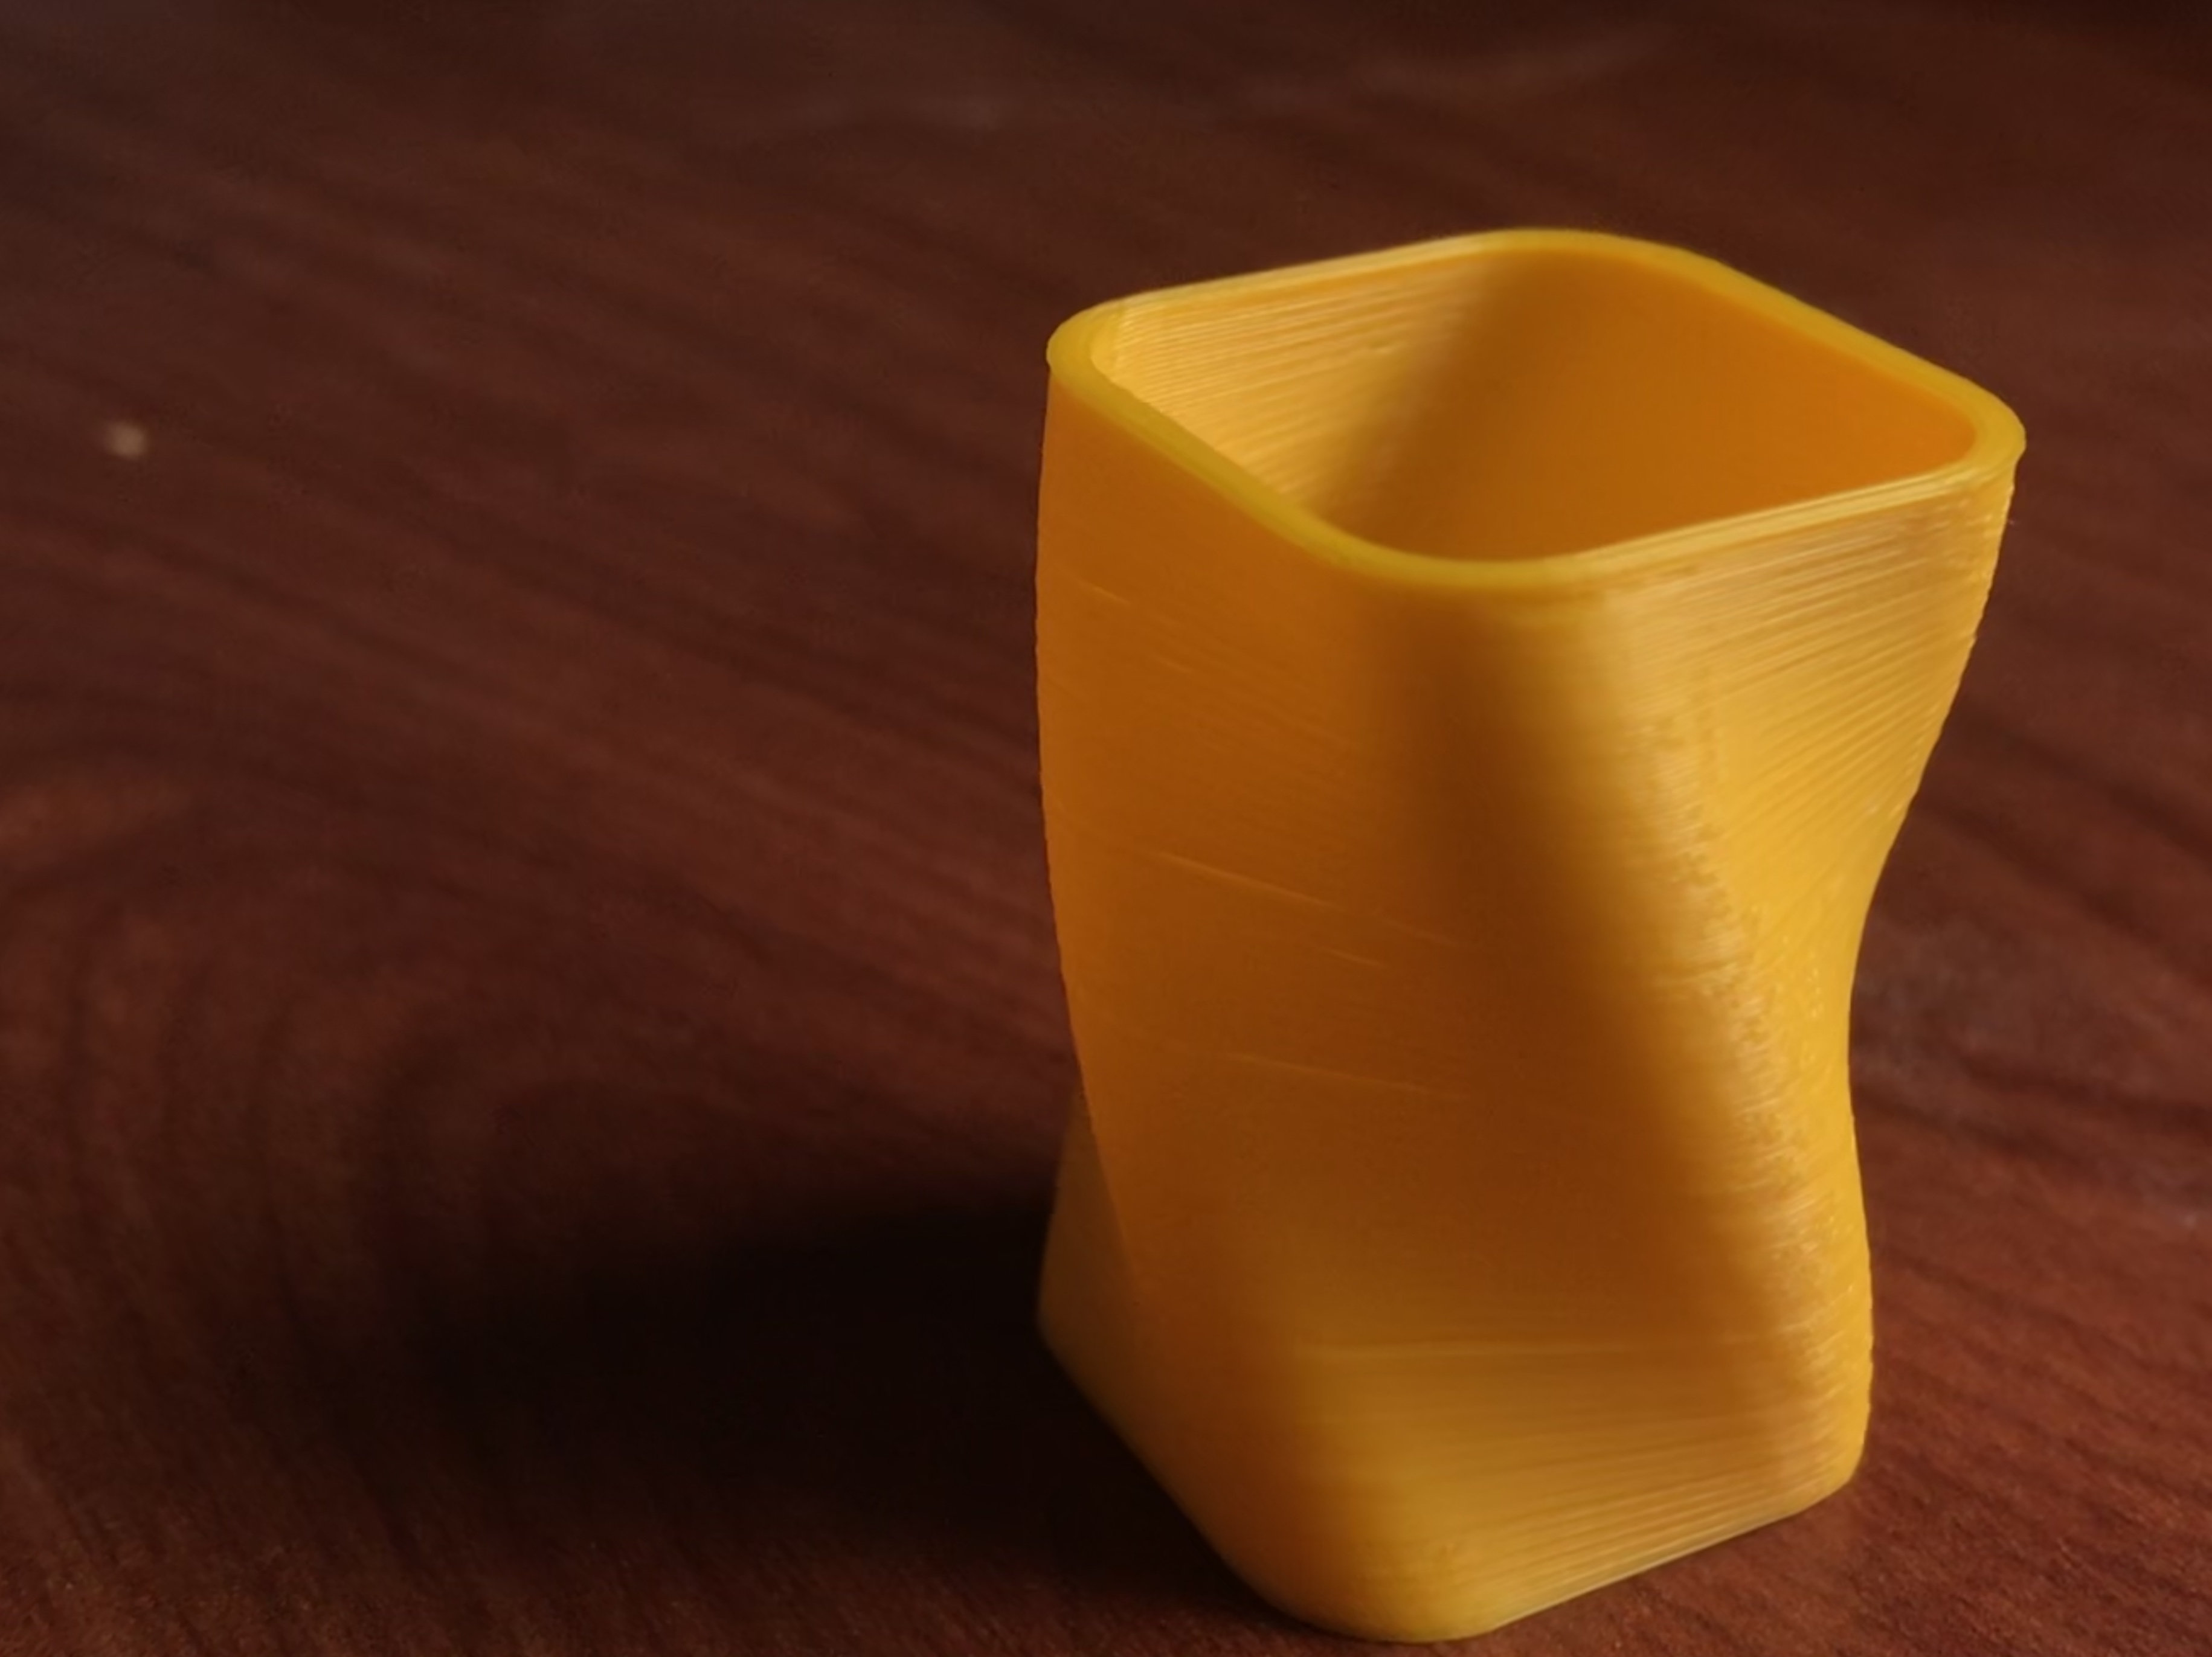
This object was apart of my second picture collage where I was practicing really hard on trying to master the art of the twists and curves for OpenSCAD. It was tricky at first to make the curves exactly to my liking, but with a lot of patience and different types of codes I was able to create an object I was proud of. It was surprisingly one of the easiest things I’ve ever had to print and it went exactly according to plan. The twists are absolutely perfect and amazing. There isn’t one thing out of place, which also make me want to give OpenSCAD a biiiig thank you for that. Overall, I’m pleasantly surprised how my creation turned out and will definitely being working more with twists and curves in the future.
Summary of Group OpenSCAD Project
10 points, due by noon on Tuesday 2/26
Customizable Coaster- Shannon Stagliano
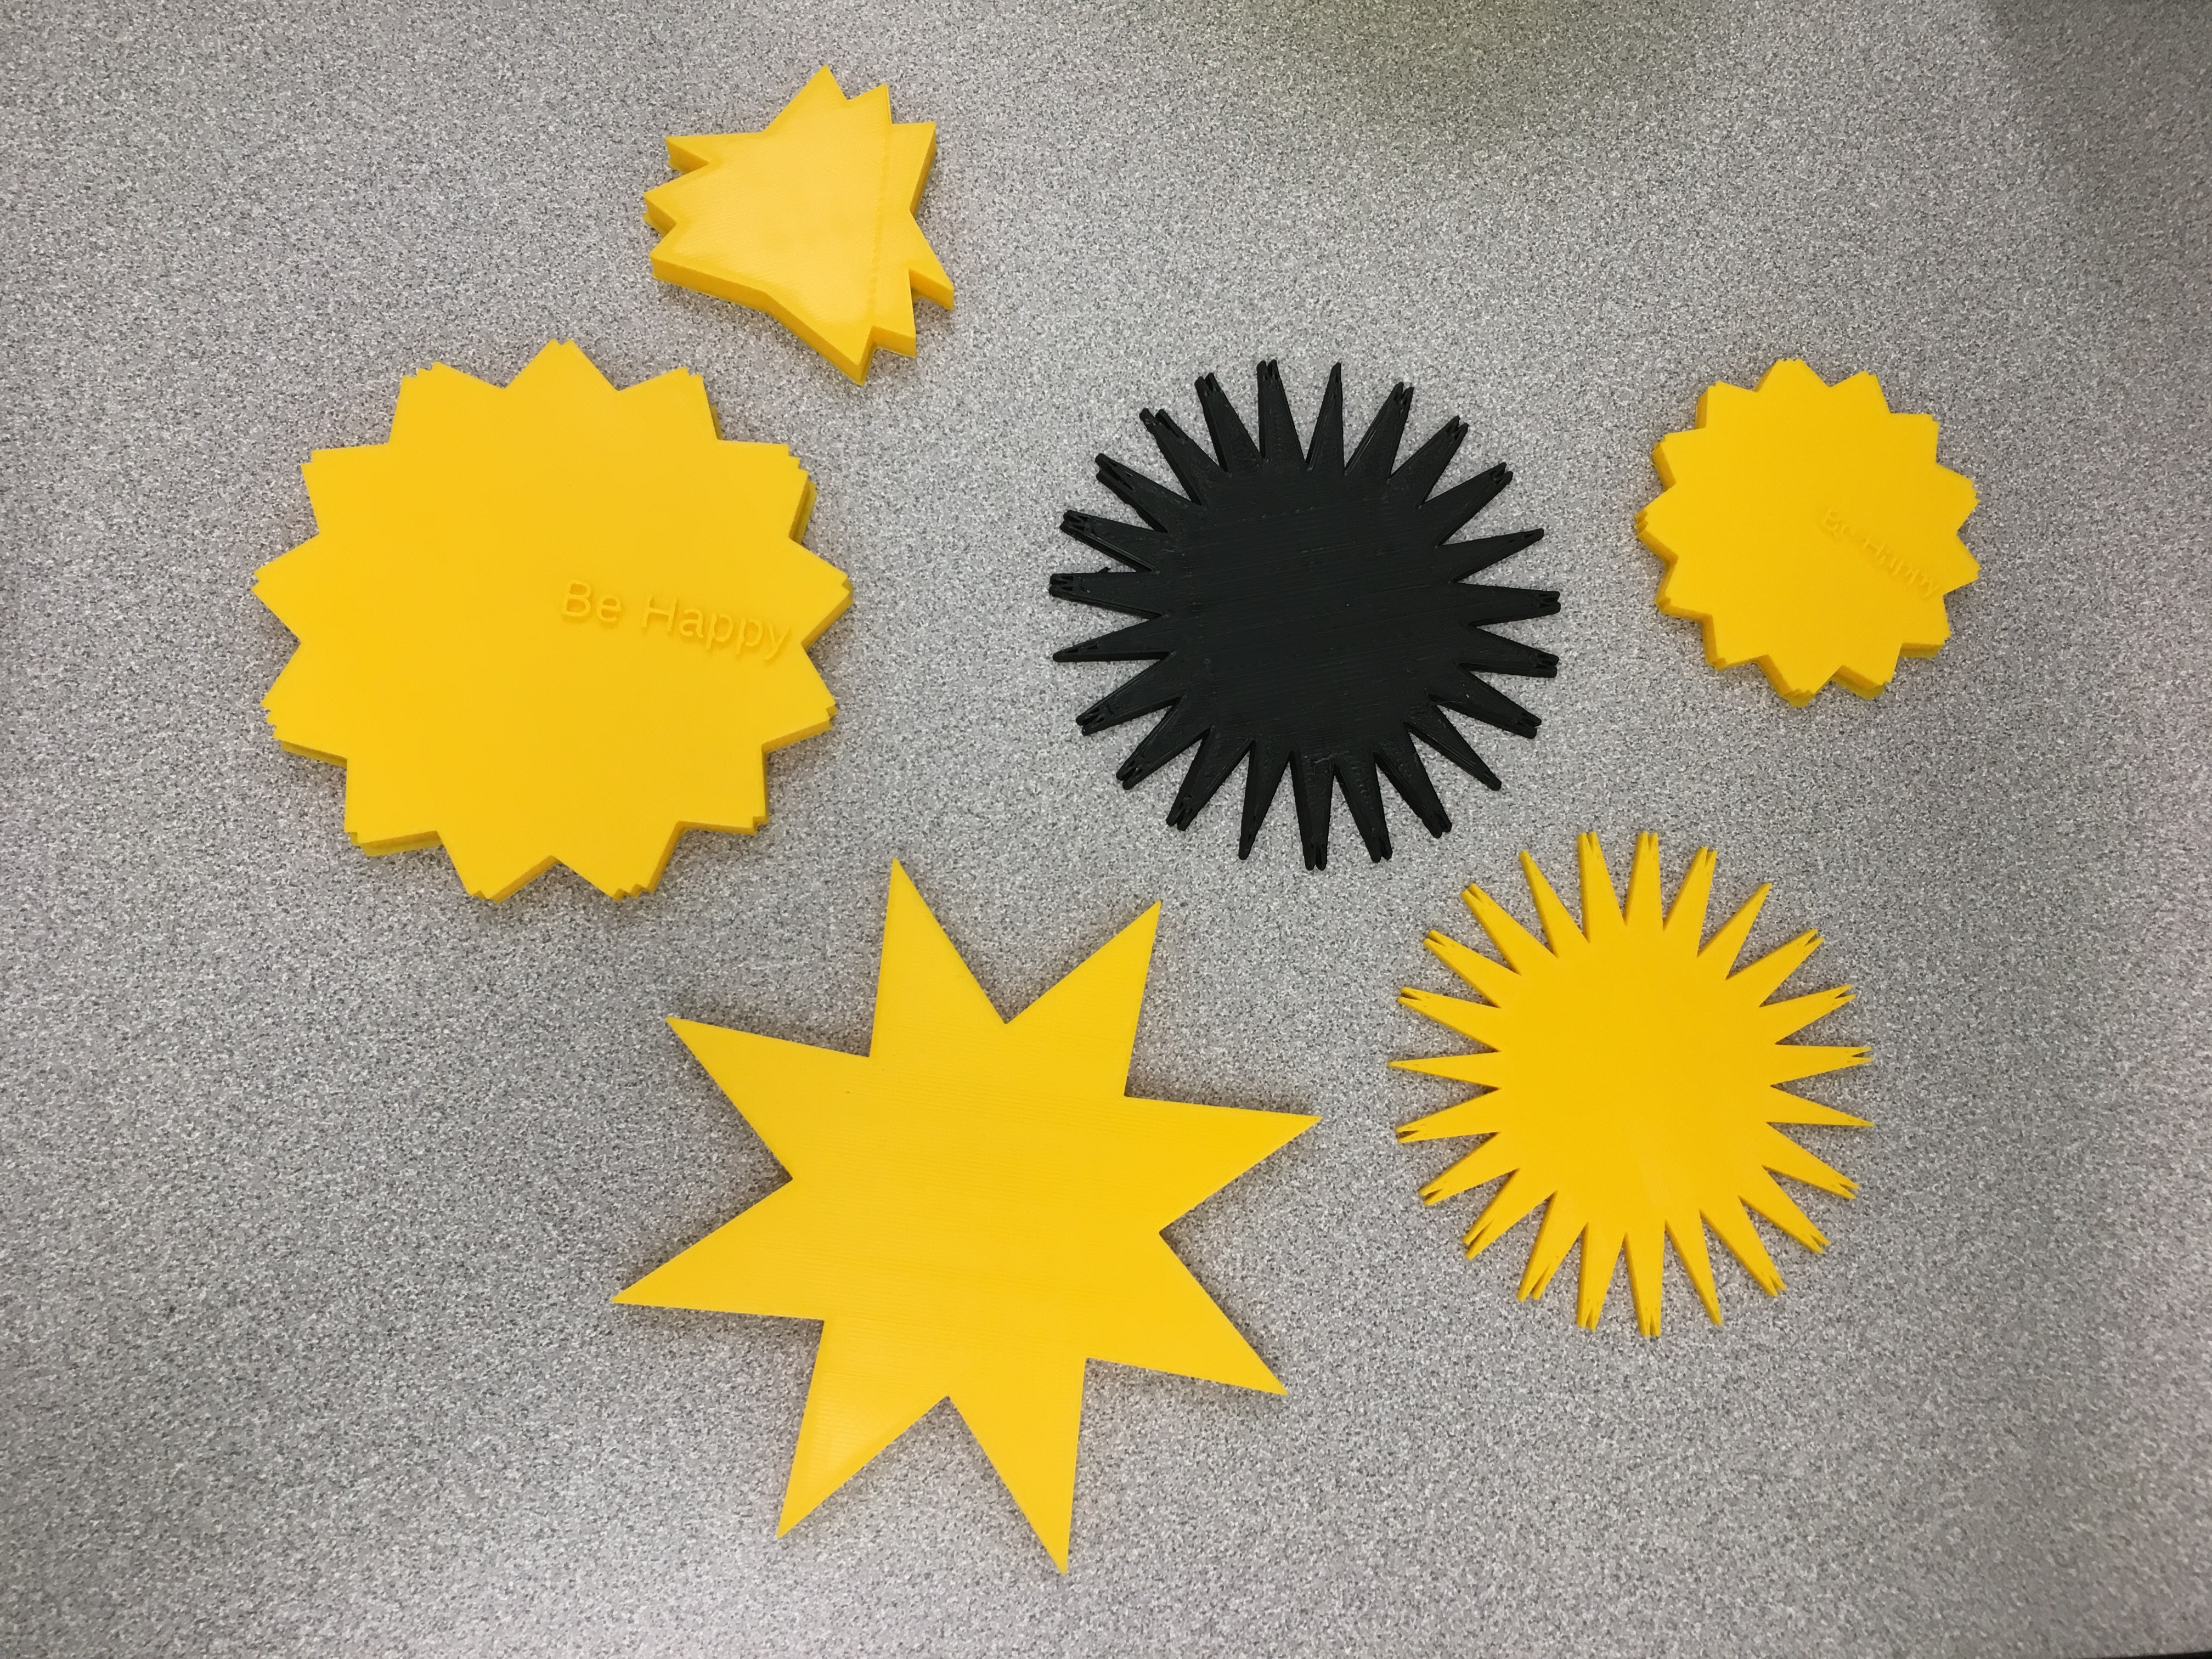
https://www.thingiverse.com/thing:3443749
This was by far my most favorite thing we created. I found them so aesthetically pleasing, especially with the yellow and black colors together as a set. I told my mom about them and she said she wants them so she can use them at home! I thought making 3D coasters was such an innovative idea. I think people will love to have that control and ability to be creative and decorate their home with coasters they actually customized themselves. Personally, I would find them to be a great topic for conversation when people have company over. The code for this product did take me and my partner a good amount of time to fully figure out. Creating codes on OpenSCAD can be very tedious when you’re first starting out because one wrong space or misused character or even forgetting to put a capital letter can completely derail your product. Making the code customizable with the words was definitely the most tricky part of the process. There was one class where I had to keep moving around different lines of our code to be able to properly fit the words on the coaster so OpenSCAD would give me access to print it. Other than that, I believe our coasters were a great success and I hope people use them on Thingiverse!!!
Reflections and Future Projects
10 points, due by noon on Tuesday 2/26
From the start of this class, I wanted to continuously create objects that I could actually use outside of class. Ever since I was a kid, I loved making different “inventions” out of literally anything I found whether it be conditioner to make slime or sticks and leaves to make slingshots or little forts. I also have a weird adoration for tiny objects, which is why most of my projects are pretty small. My grandma always told me “it’s the little things in life that mean the most” so when I showed her all my objects I created in this class the other day, she thought they were the best things on the planet! I have used every single creation I made outside of class, beside for the vase. That vase was my creation that made me the least proud because of the final product. That being said, that assignment as a whole made me proud of myself because I truly worked so hard on it. Fusion 360 was definitely the software that made me the most confused. I sat in the lab for hours trying to properly make the vase and watched numerous youtube videos to learn but for some reason my brain could not grasp it. As for my other products: I used my black dice with my friends in a game I created, the sphere to play miniature bowling at my friends house, I wear the pendent and actually get a lot of compliments on it, and I also used the bachelor roses (I printed 4 more so we could all have them) with my friends and they absolutely loved them. Overall, this class has really been my favorite class I’ve ever taken. It was finally a class where I could be hands on instead of taking notes and studying boring definitions that I wont even remember when the test is over.
I already know my next 3D printing project I’m going to do! I’m going to surprise my grandmother with a little butterfly because in my family she is known as Madame Butterfly for her free and down to earth spirit (I will link which one on thingiverse I’m going to print down below)! I also have been planning to print a couple of little action figures for my 6 year old cousin to play with since he’s at that stage where he is completely obsessed with them. I love that I’m now able to actually print and design all these different types of products. My childhood self would be over the moon if she new I would eventually have the ability to 3D print my creations instead of gluing random objects together!