Hello
My name is Rebecca Sullivan, I am a senior from Ridgefield, CT. I am a BFA Studio Art major with a double concentration in metals and jewelry making and printmaking. I am also a yoga instructor and teach at a studio in Harrisonburg called The Nest. After graduating in May I will be working at a metals studio teaching jewelry making/enameling courses, as well as instructing yoga and doing commissioned artwork.
I am so excited to be able to become familiar with the CAD programs because it is something that is frequently utilized in jewelry designing. The 3D models and prints allow me to design more ambitious pieces by strengthening my planning process. I am hoping to eventually use some of the prints for wax mold casting and transform the designs I create on the 3d printing softwares into finished pieces.
https://www.thingiverse.com/Bsullss/about
Thingiverse Model

https://www.thingiverse.com/thing:1375771
“Flower of life Pendant” by Kamara
Although I as hesitant to choose this model given that it is a relatively 2 dimensional form, I chose it because the seed of life is a sacred geometric shape that I absolutely love, I actually have a tattoo of it on my back. It is known as the origin of all things, the “blueprint” of the universe. I went through a phase where I was obsessed with learning about sacred geometry and how these intricate shapes and patterns begin to scratch the surface of explaining our existence and connection to everything in our world. I plan to use this model to experiment with copper electro-forming to see how 3d prints react to various metal working techniques.
Thingiverse Print
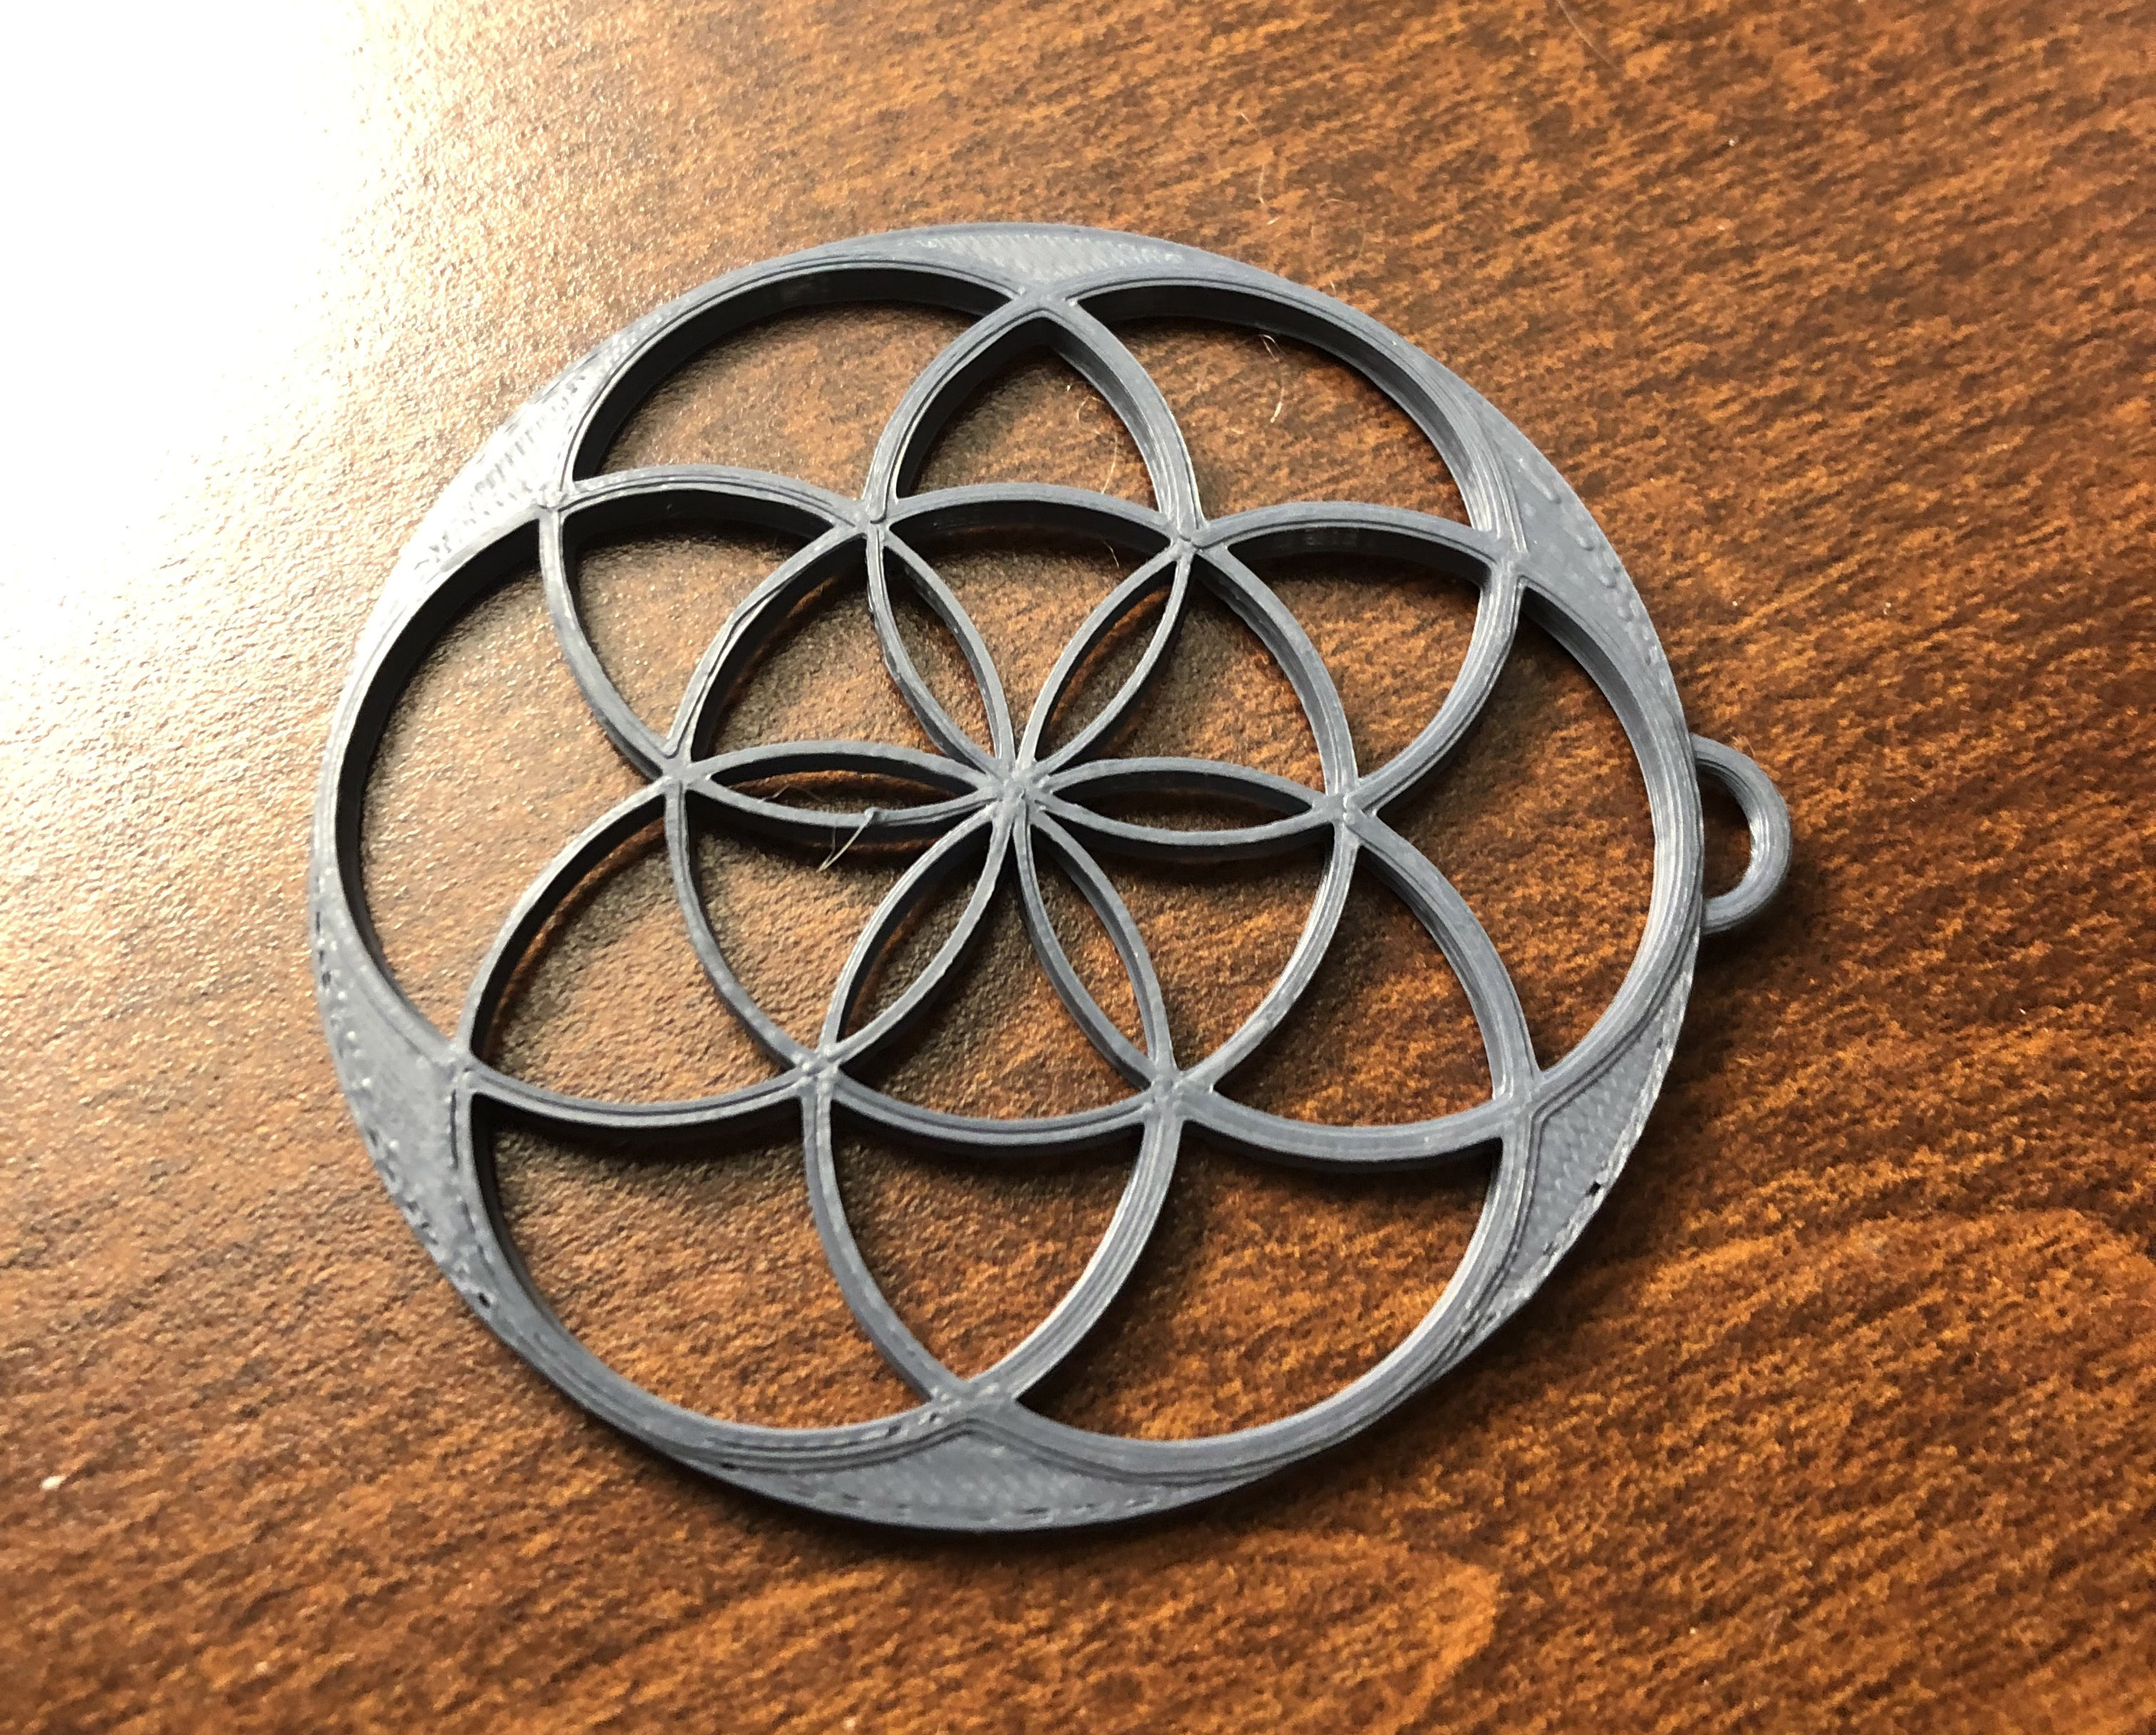
I was pleasantly surprised by the outcome of this model, some parts were a little rough but overall the design and structure of the piece came out very well.
https://www.thingiverse.com/make:593591
20 Forms in Tinkercad
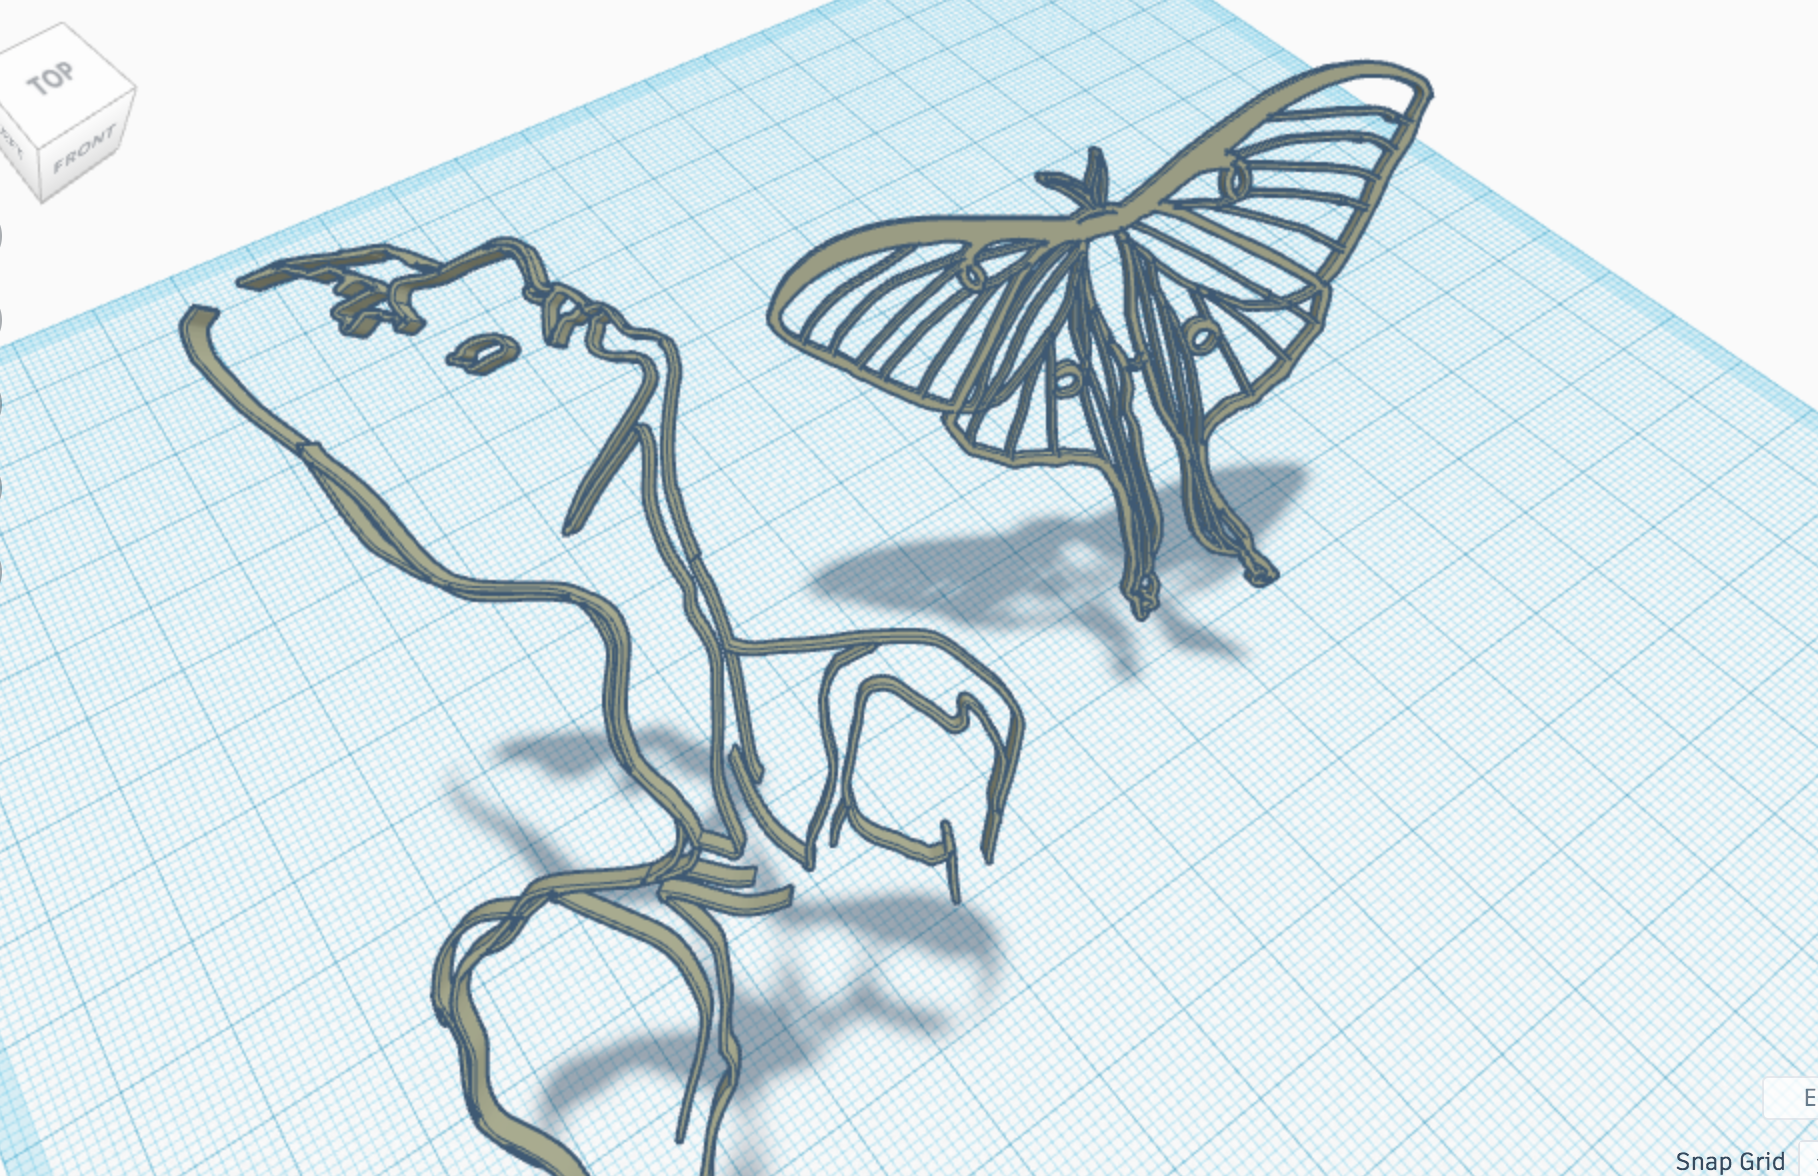
These two models are made of two of my own drawings that I inserted into tinker. I played around with the depth of the lines but found that most drawings I insert end up staying relatively 2 dimensional. However, I do still find this feature very useful.

As a jeweler, I was so excited to try to experiment with the designing aspect of the tinker application. I changed the width of the bands as well as altering the points where I was able to customize the bands. I made 2 types of stone setting models, one for a flush set, faceted stone where I used the diamond shape as a hole. The other style is for bezel setting cabochon stones (one with a “stone” and one without), which I made using 2 cylinders. In addition, I designed a simple jewelry tray just by utilizing the negative space when repeating the same shape in a different size.

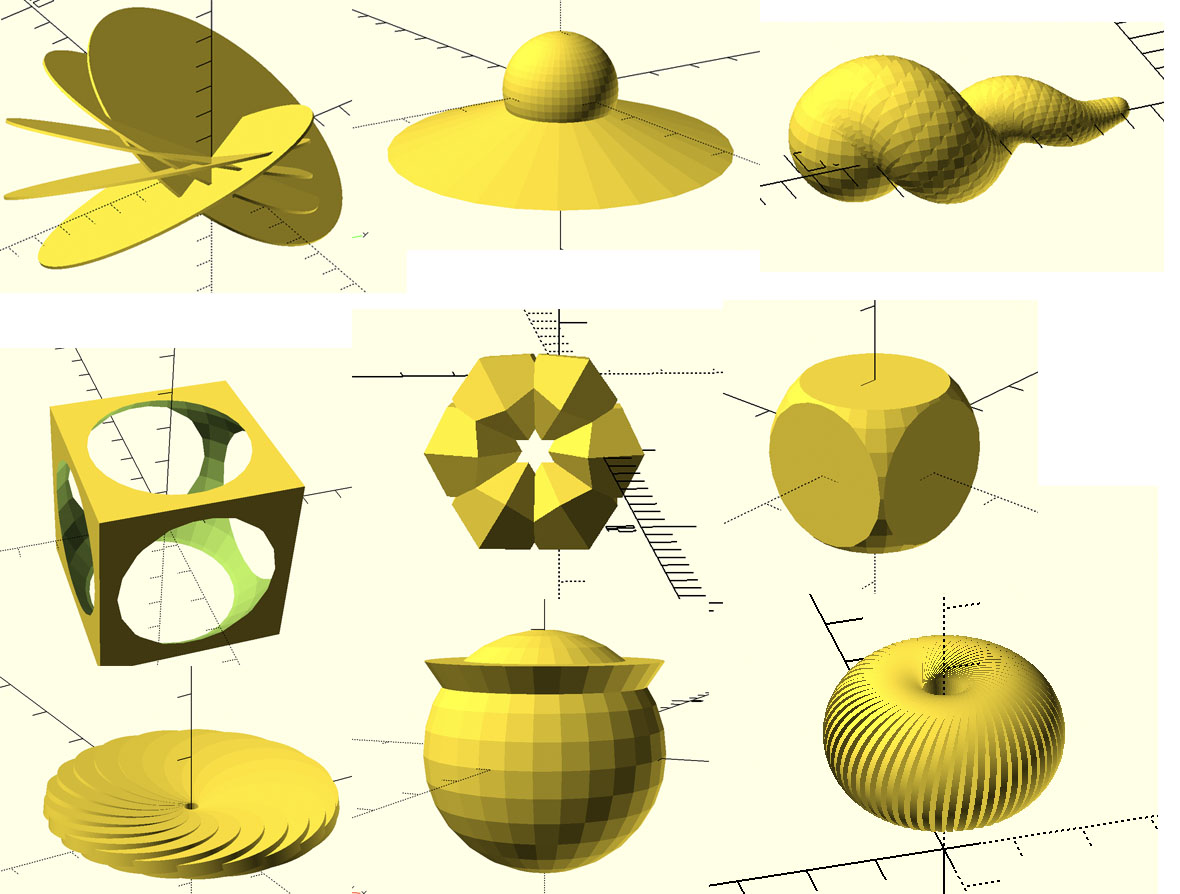
Here I experimented with more abstract forms. I wanted to create some practical pieces that could be used as flower pots (there is a draining hole on 2 of them but you can’t see it at this angle) and the others were experiments testing out different shapes and tools on the program.
Tinkercad Print

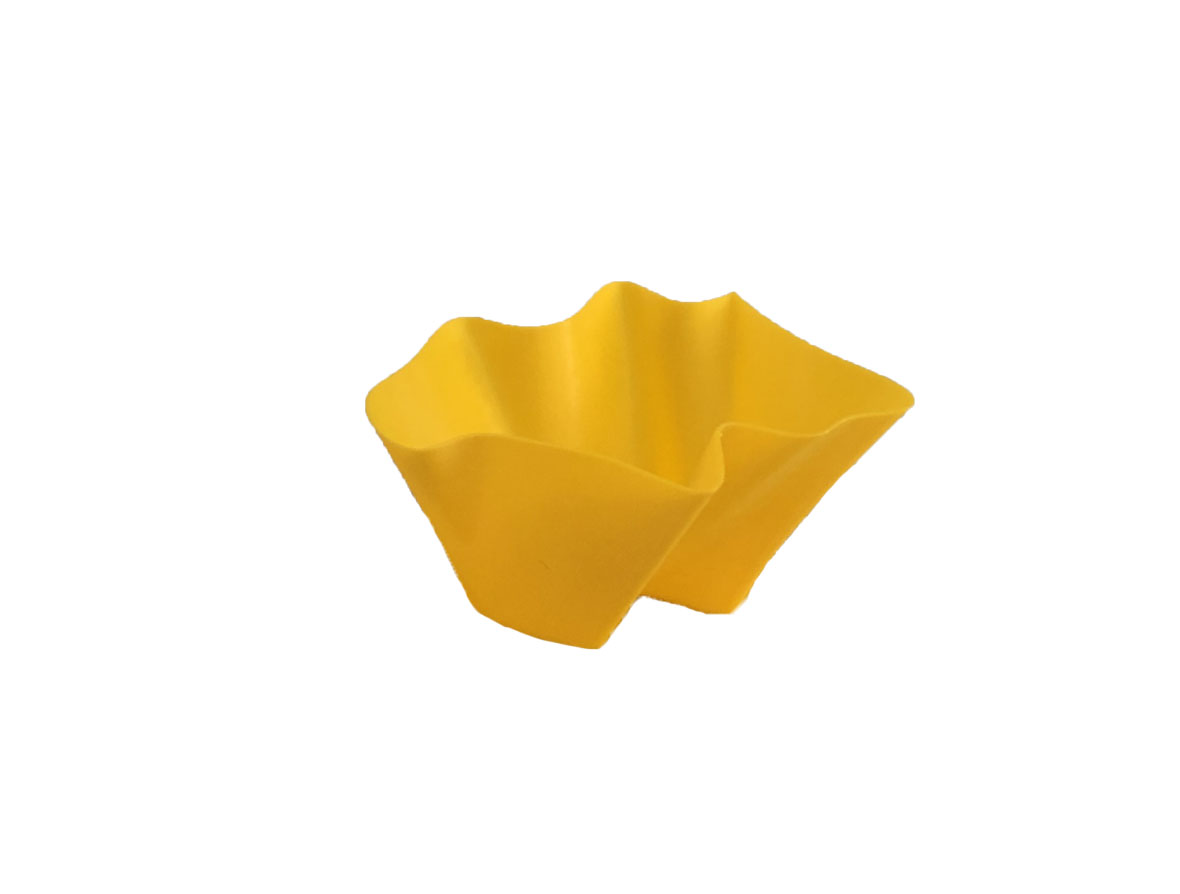
This was supposed to be the luna Moth drawing that I had turned into a print, obviously it was a complete failure. I think it has to do with the dainty line work. I am disappointed it did not work out very well because I was excited for turning one of my pieces into a model.

However, because it failed so early on I was able to complete another print in the class time. It came out alright, not as well as I had expected given there are some unintentional gaps where plastic should be. But for my first print that I really made through tinkercad I am pleased with the result.
Summary of Group Tinkercad Project
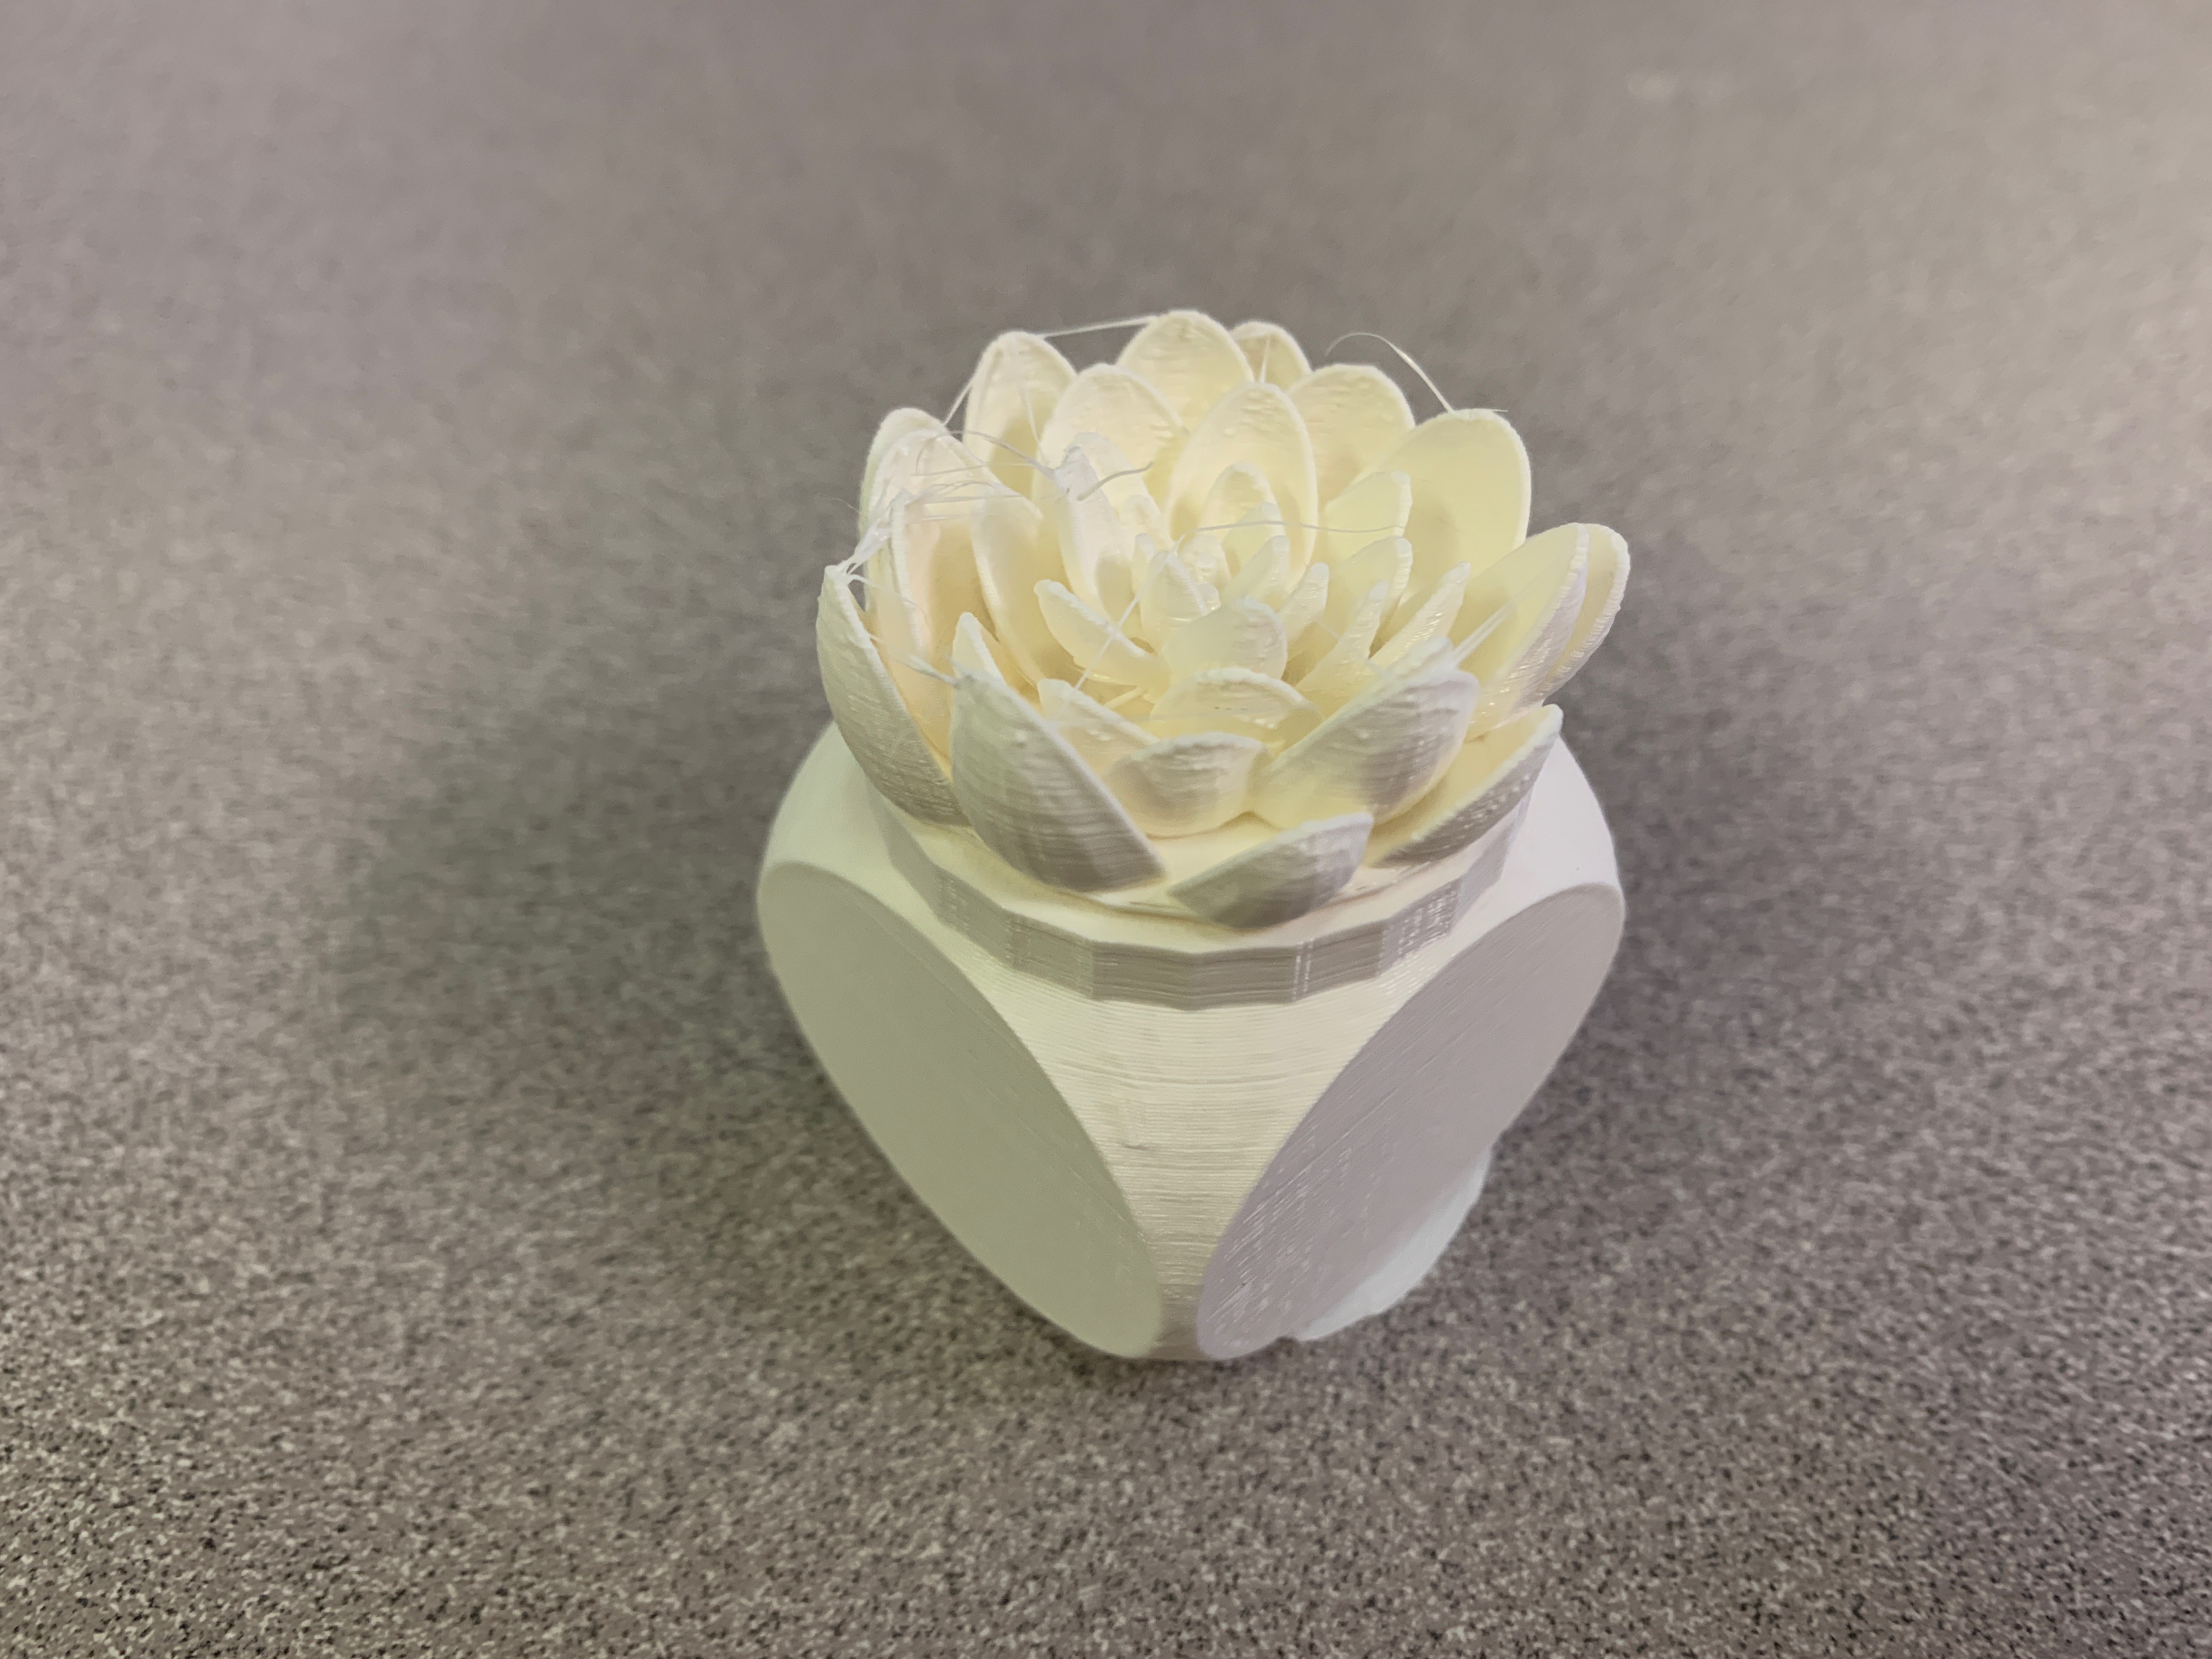
Succulent Pot with Brittany Seto
https://geekhaus.com/isci104_spring2019/2019/01/15/potted-succulent/
https://www.thingiverse.com/thing:3378133
This project was definitely a learning experience for both of us. Creating the succulent on tinkercad took a lot of experimentation and trial and error. I ended up recreating the tinkercad model a number of times in order to get it to actually look the way we wanted and test out which shapes were the closest to the natural form of a plant. In the end, I am very pleased with how the final product came out. It looks almost exactly how we wanted aside from the spiderweb- like string that was hanging off on some parts of it. After the first 3 attempts to print the succulent alone failed, I was relieved that our alterations in the design allowed us to actually print it the way we hoped it would.
20 Forms in Fusion 360


I had a lot of trouble with fusion 360, in the model mode especially I was so frustrated with it. However, once I switched over to the sketch mode I finally started to get the hang of it. Once I had a better understanding I made most of my objects by creating a shape and then right clicking to “edit form” where I found I had more control to alter the shapes exactly how I wanted to. I experimented with bridging, creasing, and pretty much every tool available in the modify section, which took a while before I actually got it to work. I now feel pretty comfortable with using and creating much more customized shapes than in tinkercad.
Fusion 360 Print
The print came out just fine the only issue I had was trying to print the original form I wanted to which looked like a mug. For some reason after creating two bodies in the sculpt mode, I was unable to combine the two bodies once back in model mode. I tried trouble shooting for hours, even recreated the entire form in a different file and still was unable to figure it out.
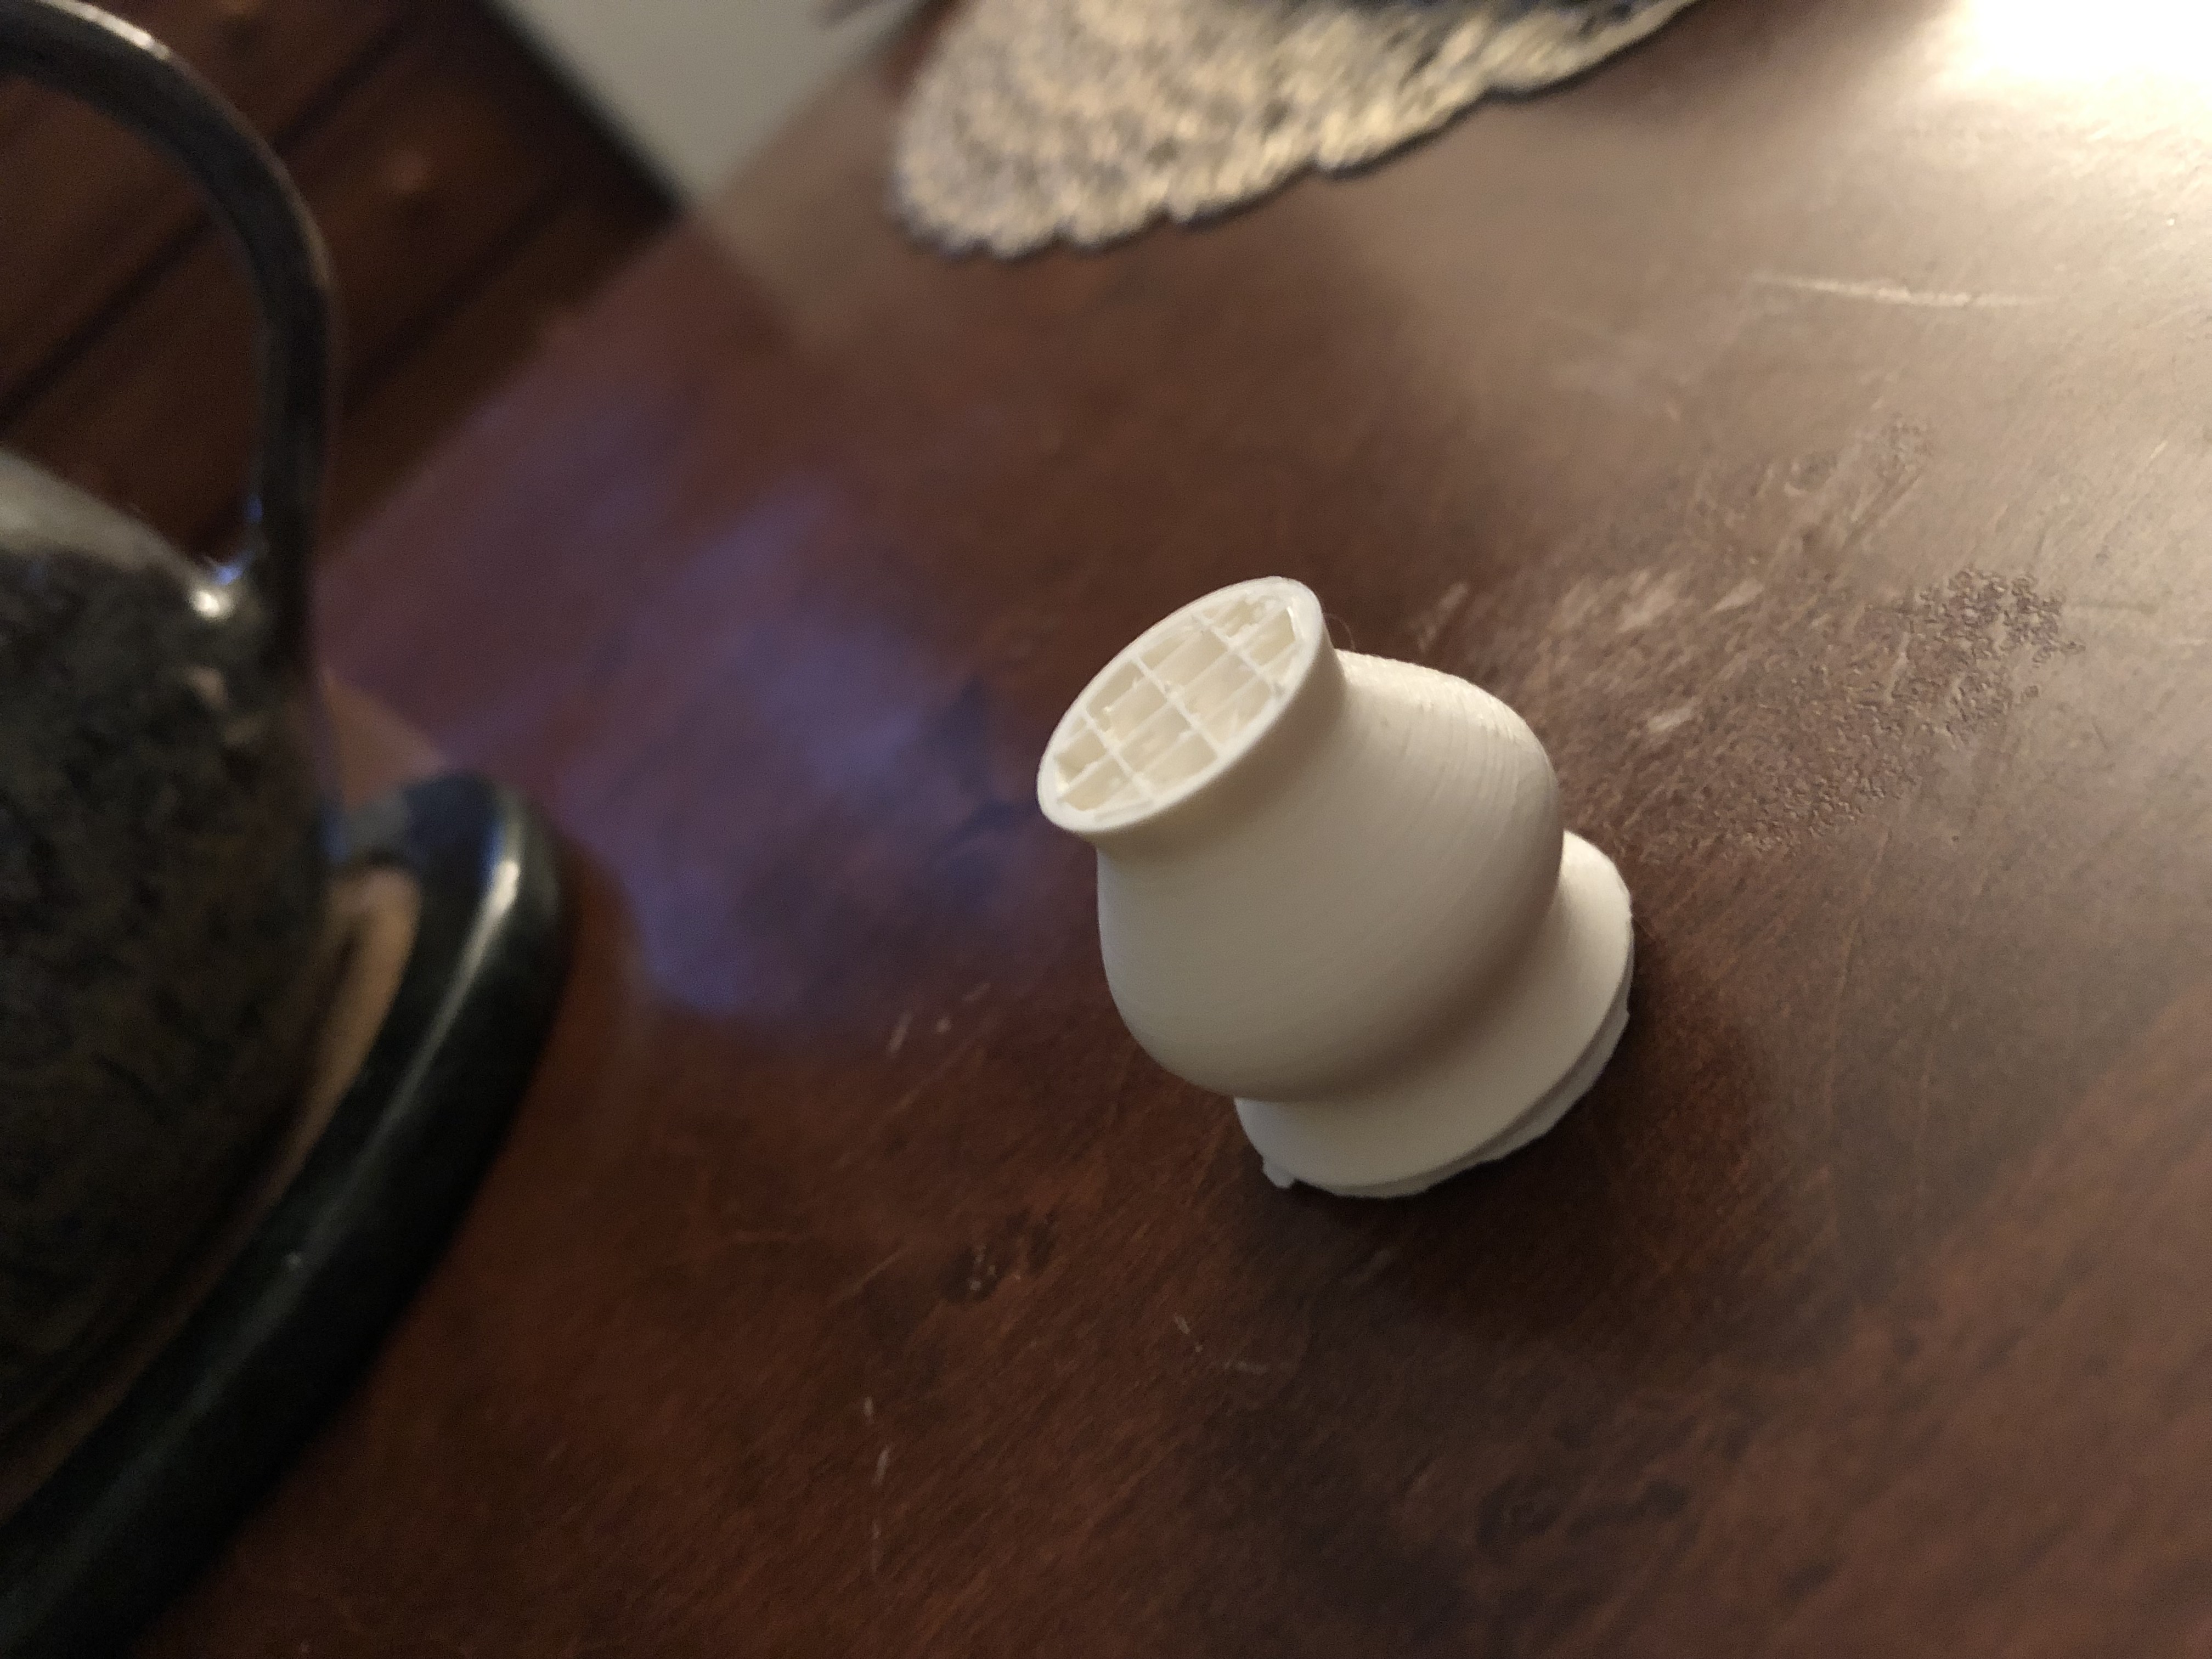
Fusion 360 Vase Design
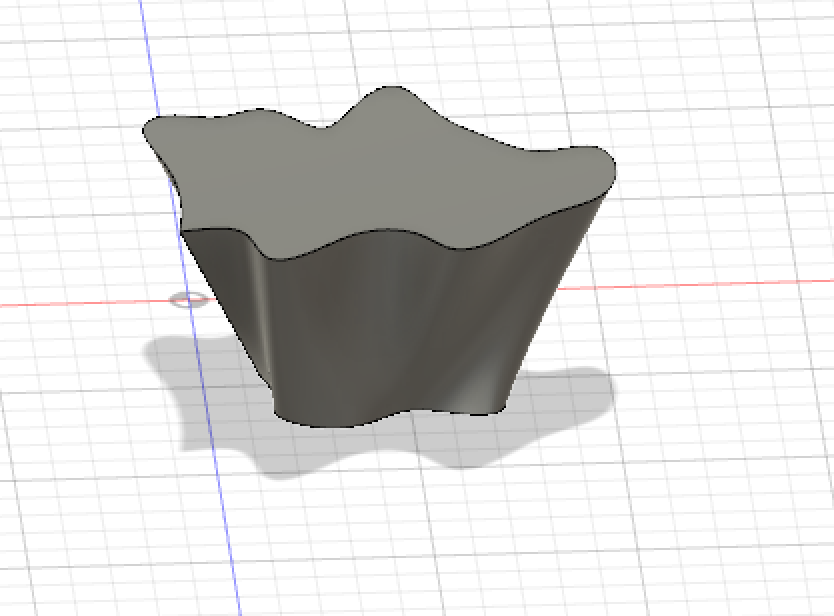
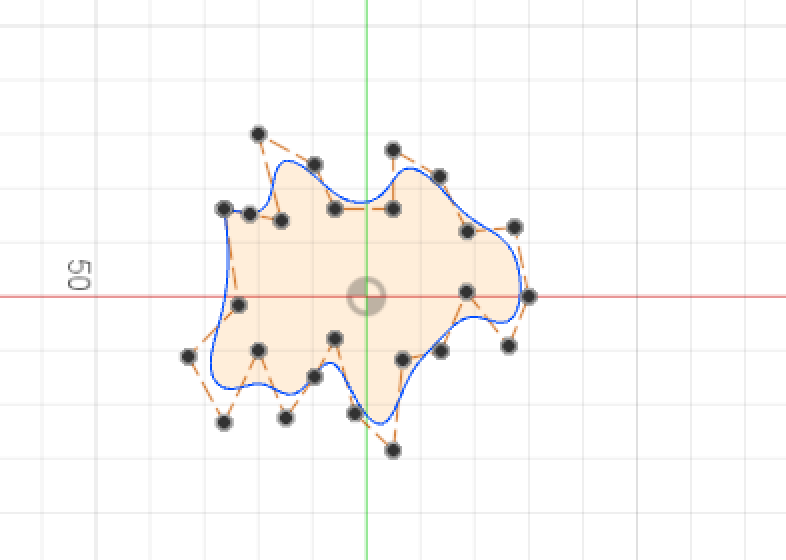

After experimenting with fusion 360 for the last print, I really enjoyed creating forms in the sculpt mode. So initially I tried to create the vase in the sculpt mode where I had more control over the design. However, in the sculpt mode I don’t need to use the loft feature in order to make the shape I wanted. So I then created another form in the model mode using the control spline tool to create both the first and second shapes which I then lofted. I had not taken a screenshot of the second shape I drew on the offset plan and I was unable to find it again in the history so unfortunately I do not have an image of both drawings before I lofted them.
Fusion 360 Vase Prints

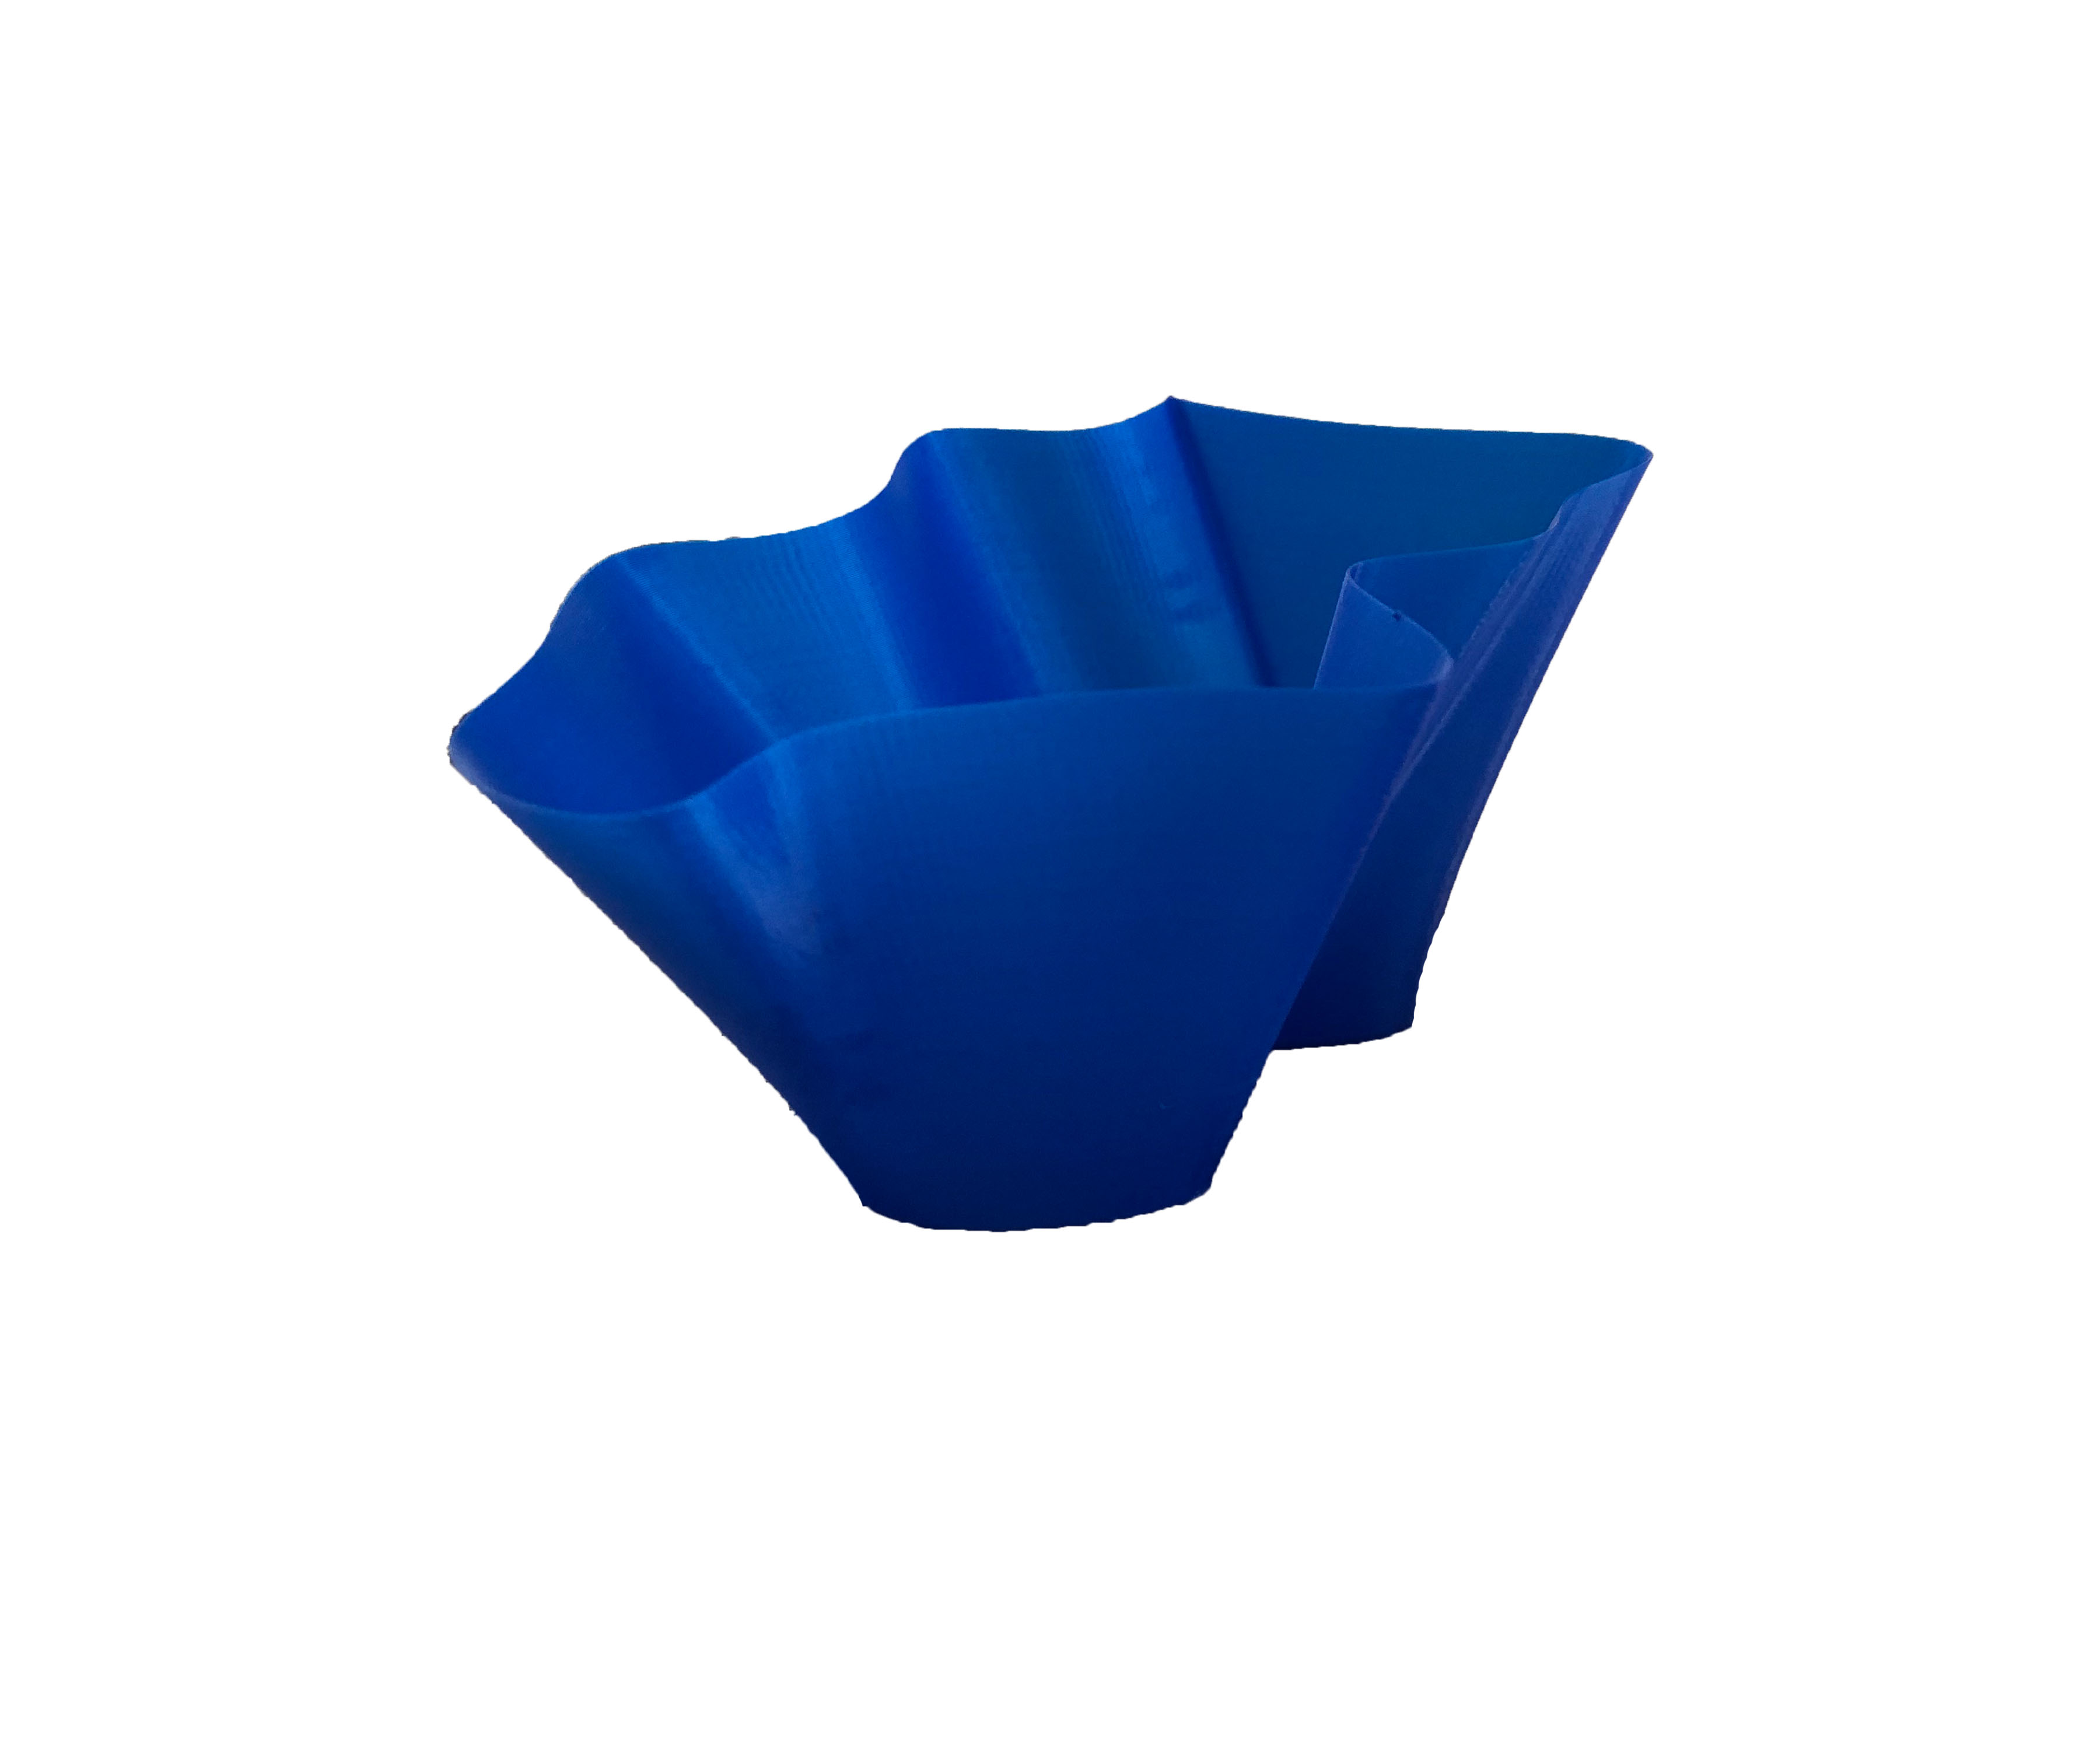
I think the prints came out very well. In the images it is hard to tell which was the demo vase and which was the finished print, but the blue is the large print and the yellow is the demo vase. I don’t think there were really any failures at all, both prints came out identical aside from the size difference and they came out exactly as I designed them to. I thought it was very interesting to see how think the print actually came out to be and how smooth the final print was compared to all the other prints.
https://www.thingiverse.com/thing:3407039
20 Forms in OpenSCAD


I had a lot of difficulty navigating this program. It is absolutely my least favorite out of all the programs we have tried. So I did a lot of research, finding standard codes that I could reform and alter. The majority of these forms derived from a variety of different codes I had found through my research, all of which I altered changing the numbers, scale, orientation etc. I also experimented with adding, subtracting and moving around different shapes to gain a better understanding of how to navigate and create within OpenSCAD. Unfortunately I found that this program was especially glitchy and would constantly have to close the models without saving them because they end up disappearing and I cannot get them back, I think I continuously hit a shortcut key that must cause this. Since I had a hard time trying to save my models, I took screenshots of the models with the codes I used so that I can recreate them and print them in class.
OpenSCAD Print
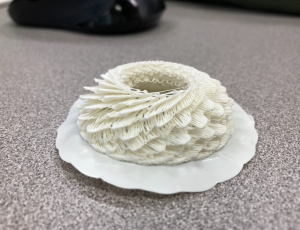
Unfortunately this print was a failure. The first time I attempted to print it, the melted plastic wouldn’t stick to the platform so I had to start it over, so I decided to see what would happen if I spiraled it when I printed it and as you can see that did not work out very well.
Summary of Group OpenSCAD Project
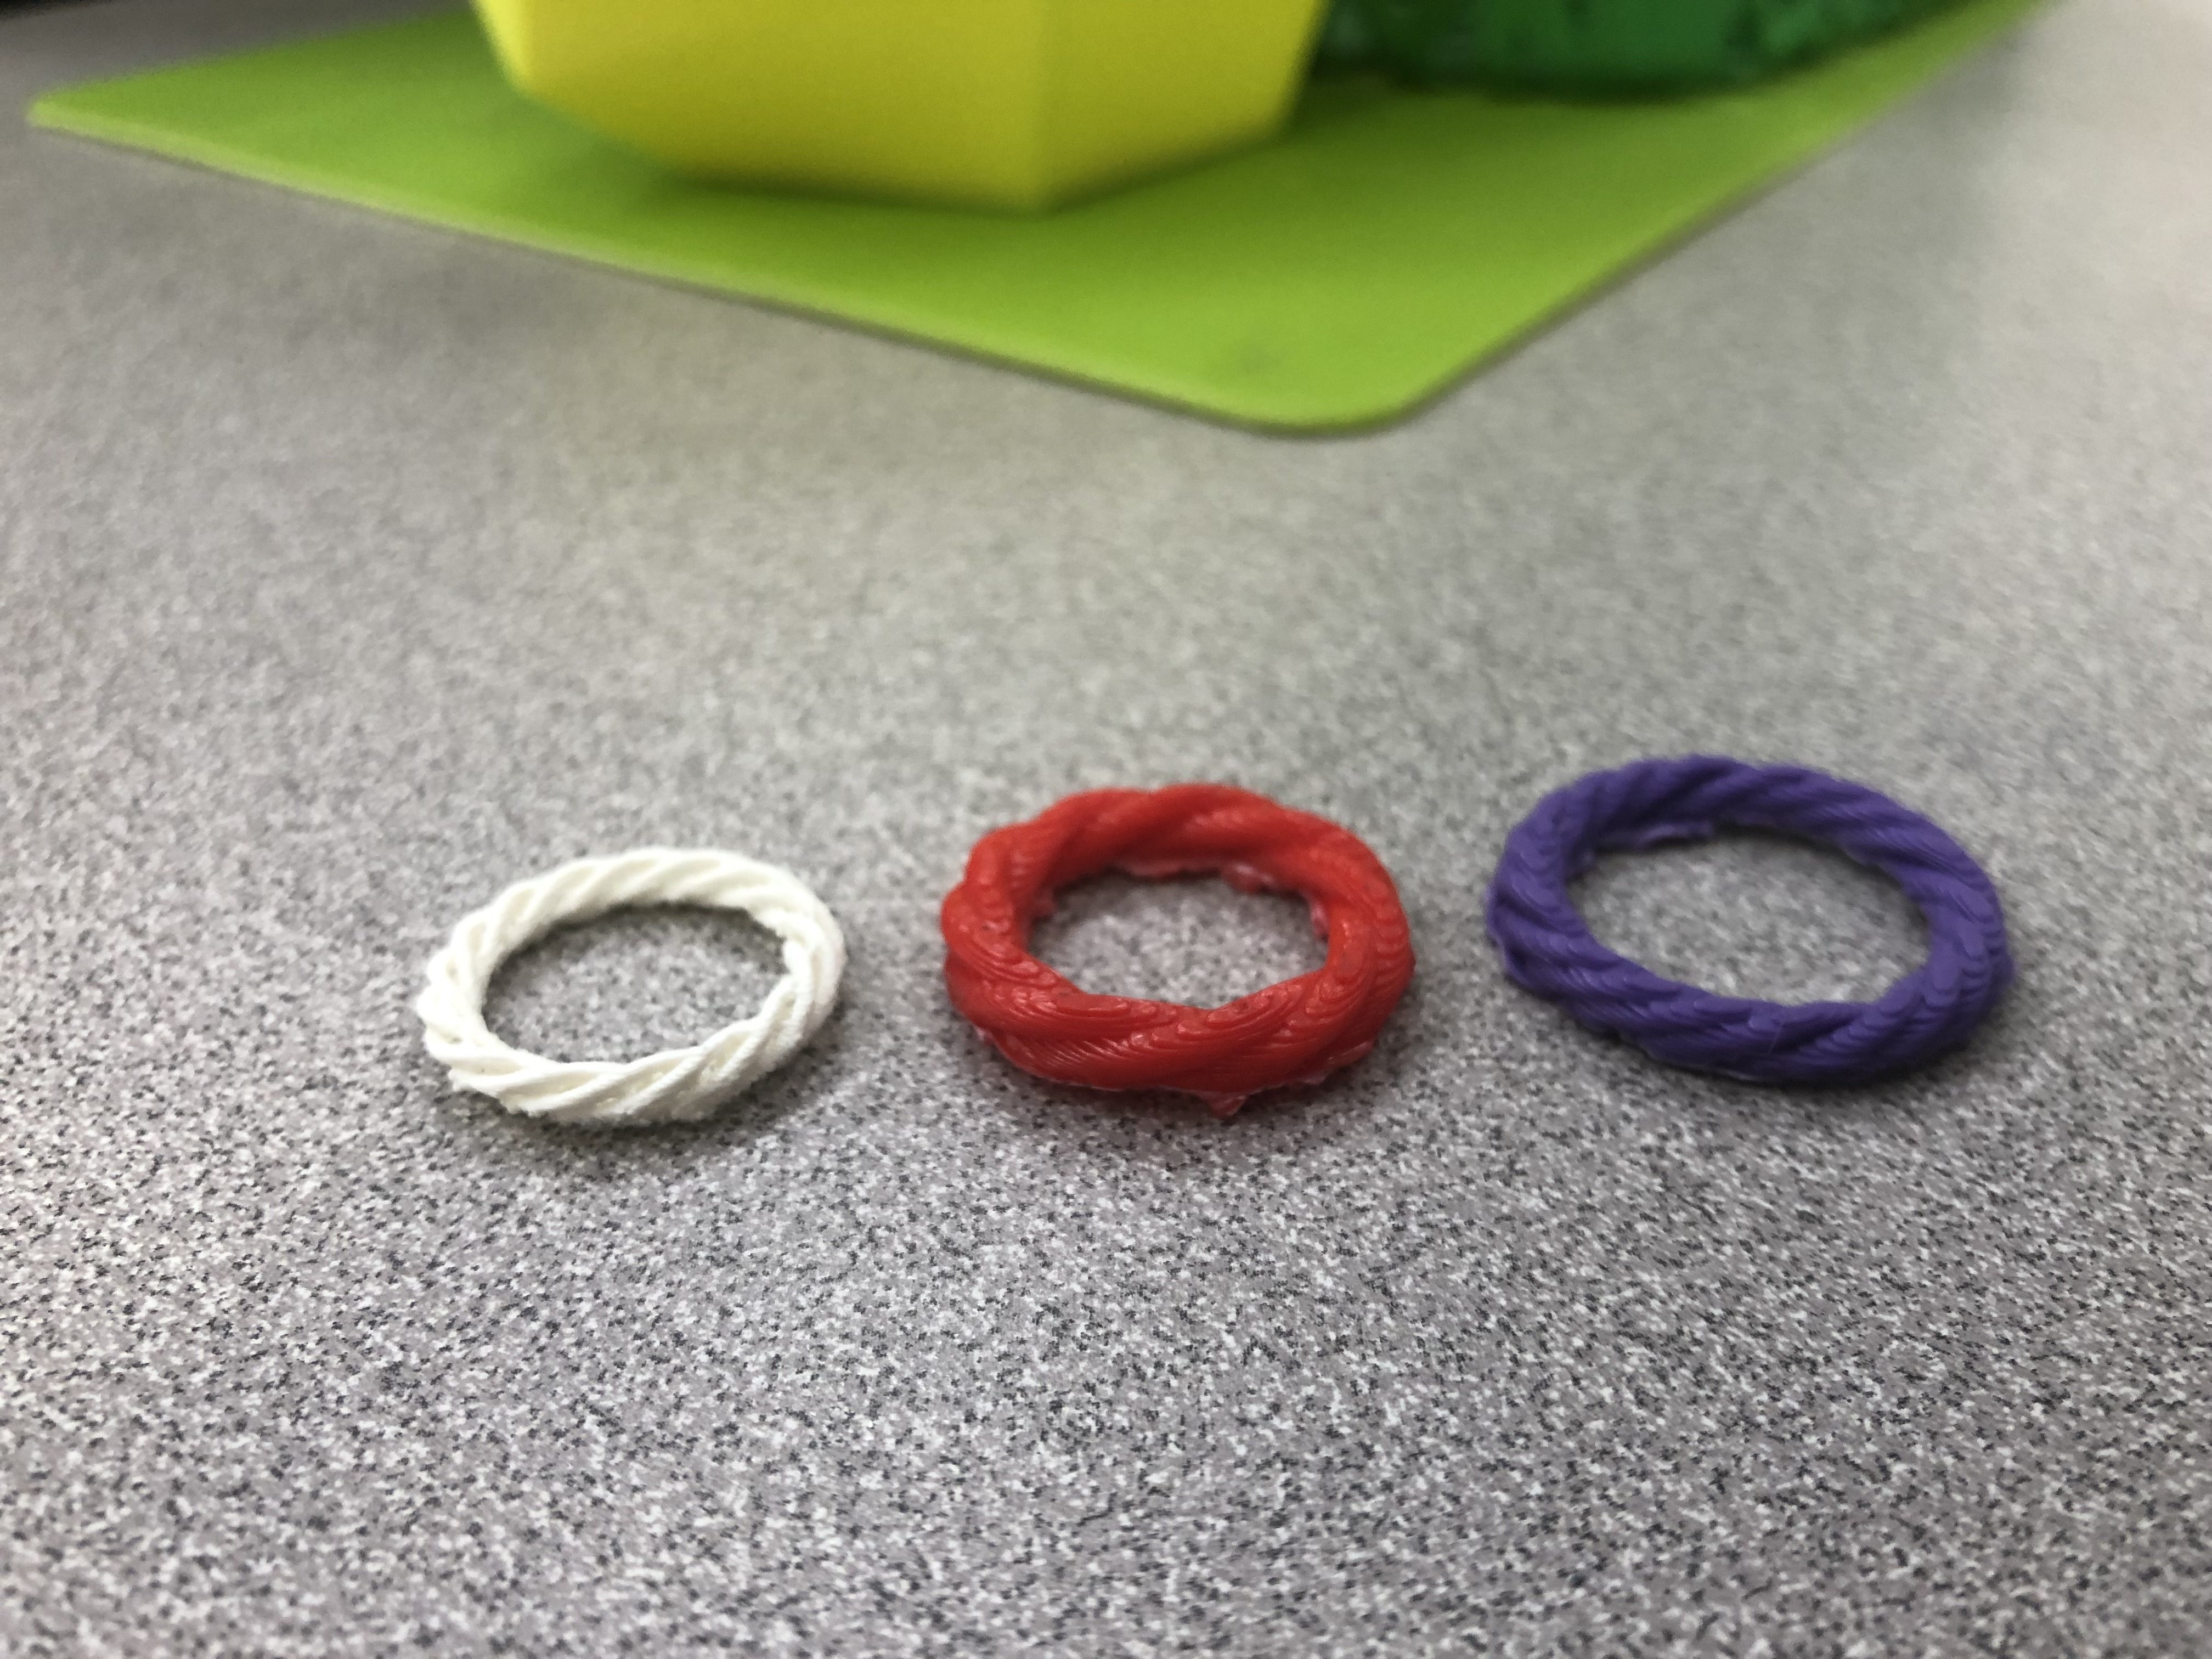
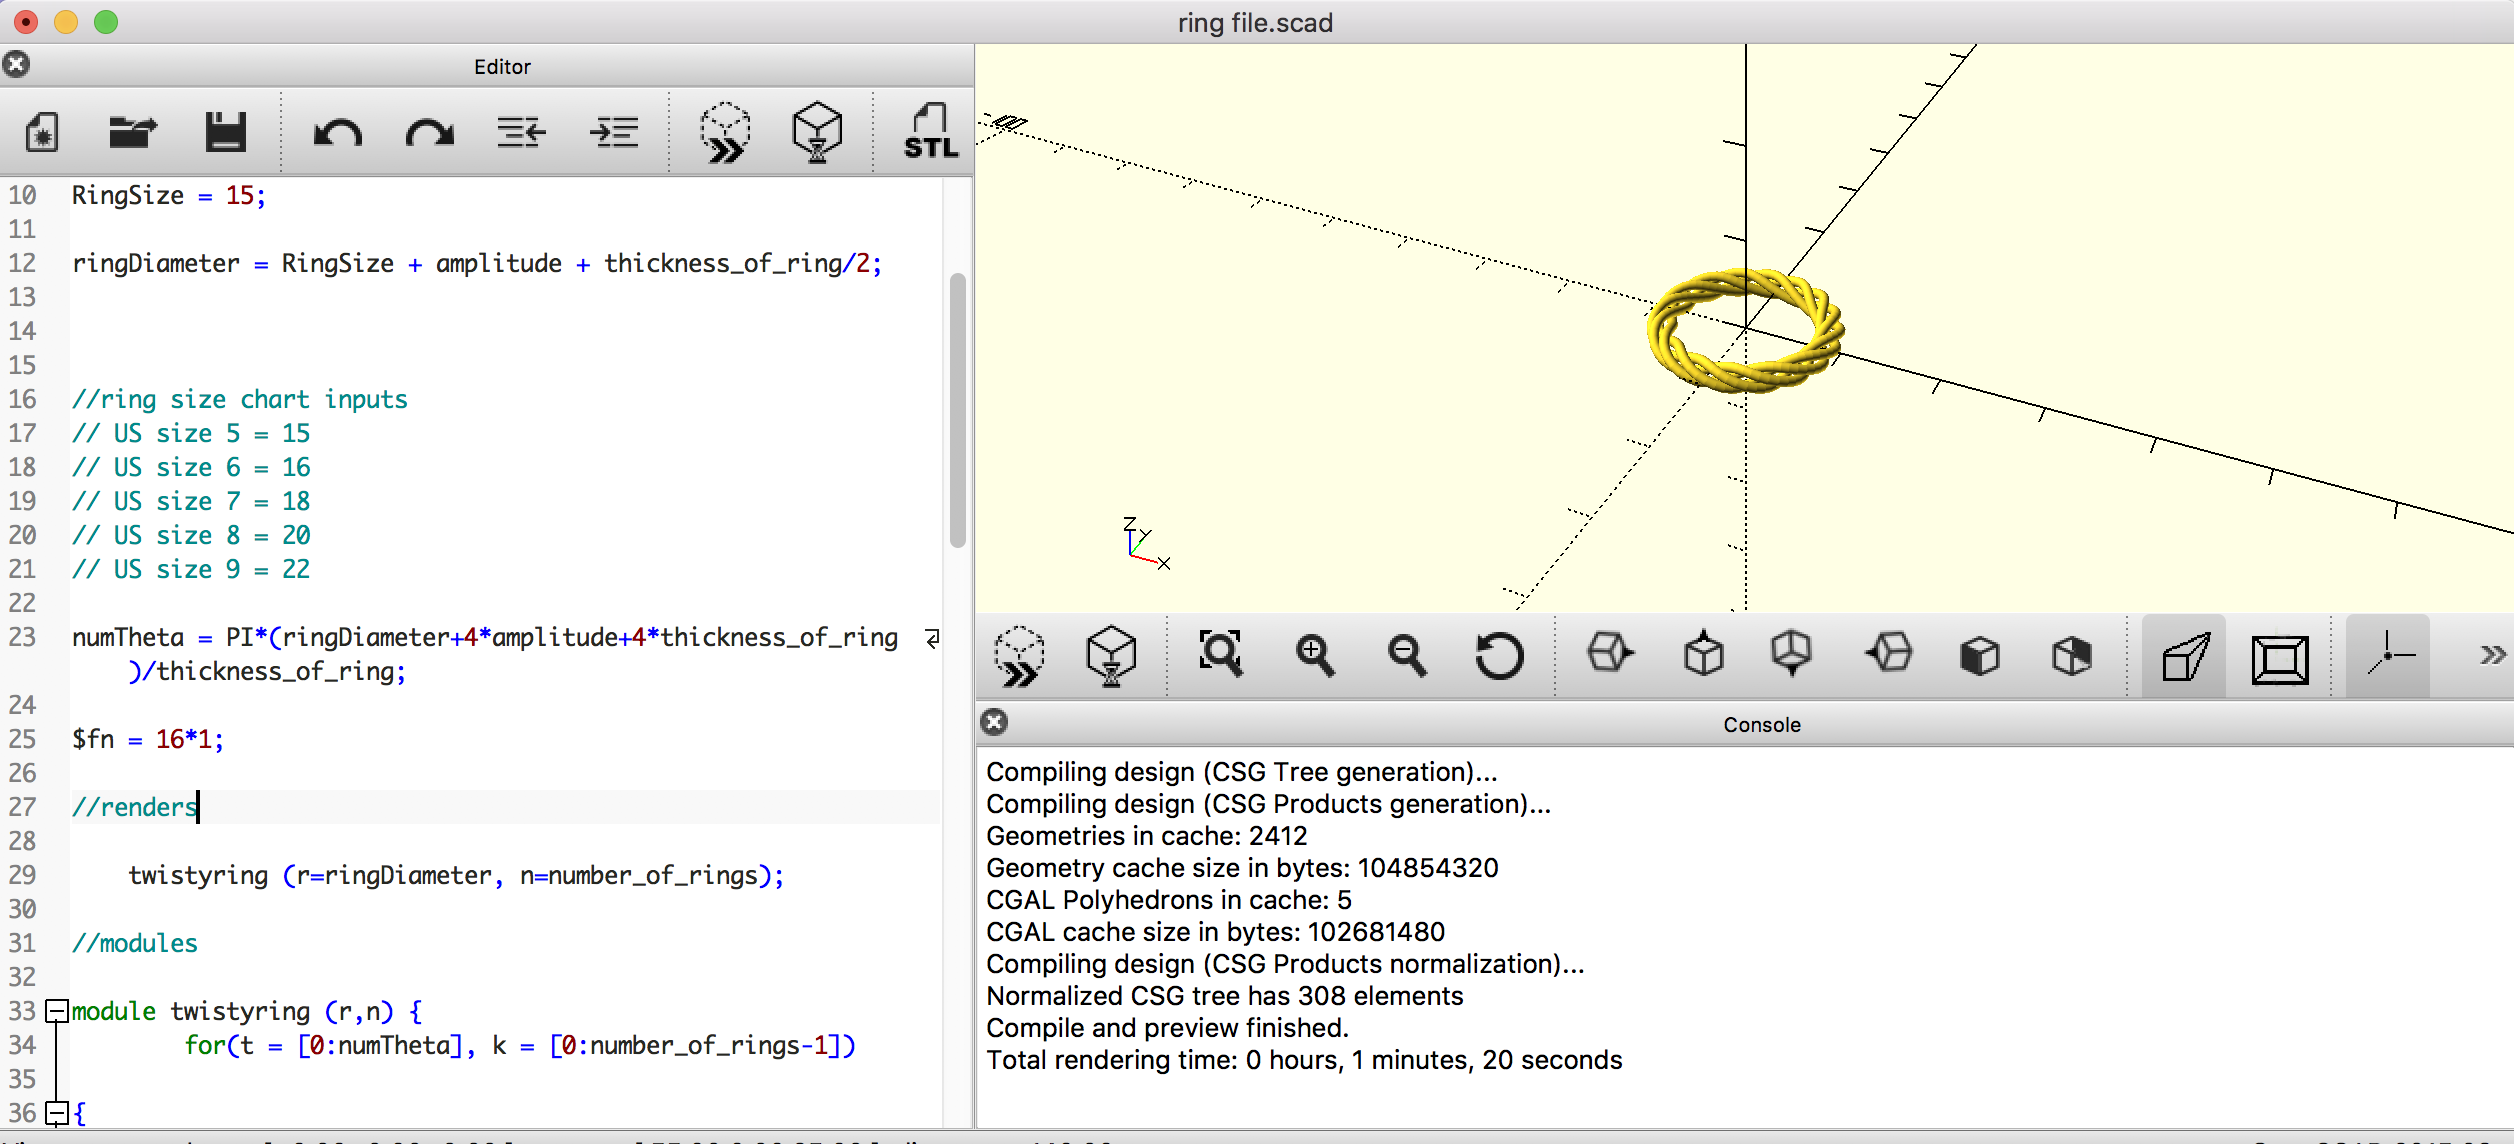
“Customizable Ring”
Partner: Brittany Seto
This project consisted of generating a code in openSCAD to create a customizable ring in both the size of the ring and numbers of coils to create a unique look. At first we were both completely lost during this project. We had a very difficult time trying to understand the coding process and how to navigate through the program. Once we were able to find a code online, we were able to play around with the numbers to discover what the different codes meant and how they affected the model. Overall, we finally got the hang of it and were able to have an understanding of how to customize the ring in addition to developing the skills to customize the design itself and then use the customizer in Thingiverse for other users.
https://www.thingiverse.com/thing:3443707
https://geekhaus.com/isci104_spring2019/2019/02/12/customizable-ring/
Reflections and Future Projects
I have been very satisfied with the my development throughout this course. Each time we learned a new software I was completely lost and would spend hours trying to figure out how to do a simple adjustment. But each time, eventually I hit a point where it just clicked and I understood how to maneuver in each program. As an artist, who is used to working with their hands, it was very difficult at first for me to wrap my mind around creating a 3 dimensional form on the computer. However, this course allowed me to change my perspective and be able to imagine and 3-dimensional form on the computer which I am typically used to using for 2-D work.
The one thing that I was most excited about in the beginning of the semester was being able to apply the knowledge and skills I have learned from this course in my own art work, and I am pleased to say I have been able to do so. I am relieved to know that I now understand the basics of 3-d printing and CAD programs which is something I would have had to figure out on my own in order to pursue a career in the jewelry industry. I will definitely be using 3-d printing as a way to create prototypes and molds for jewelry casting and am so excited to be able to have this skill under my belt that I will be able to use in my career. Even if I do not have access to a 3-d printing, I will be able to use all the different programs we have learned to use almost as a sketchbook for creating designs for 3-d projects that is so much easier to be able to visualize the final product as opposed to trying to draw it out.